Hi all. How was your Thanksgiving weekend? The weather was beautiful in CT. While it was just the four of us we went all out on the food. Mr. SB ended up roasting the turkey in our rotisserie oven. It was delicious. I think I also perfected my home made stuffing. The girls and Mr. SB commented on the crisp aspect. While I love Thanksgiving dinner, there is often a lack of diversity in texture so a bit of crunch is unexpected and welcome. I feel the same way about fresh cranberry sauce.
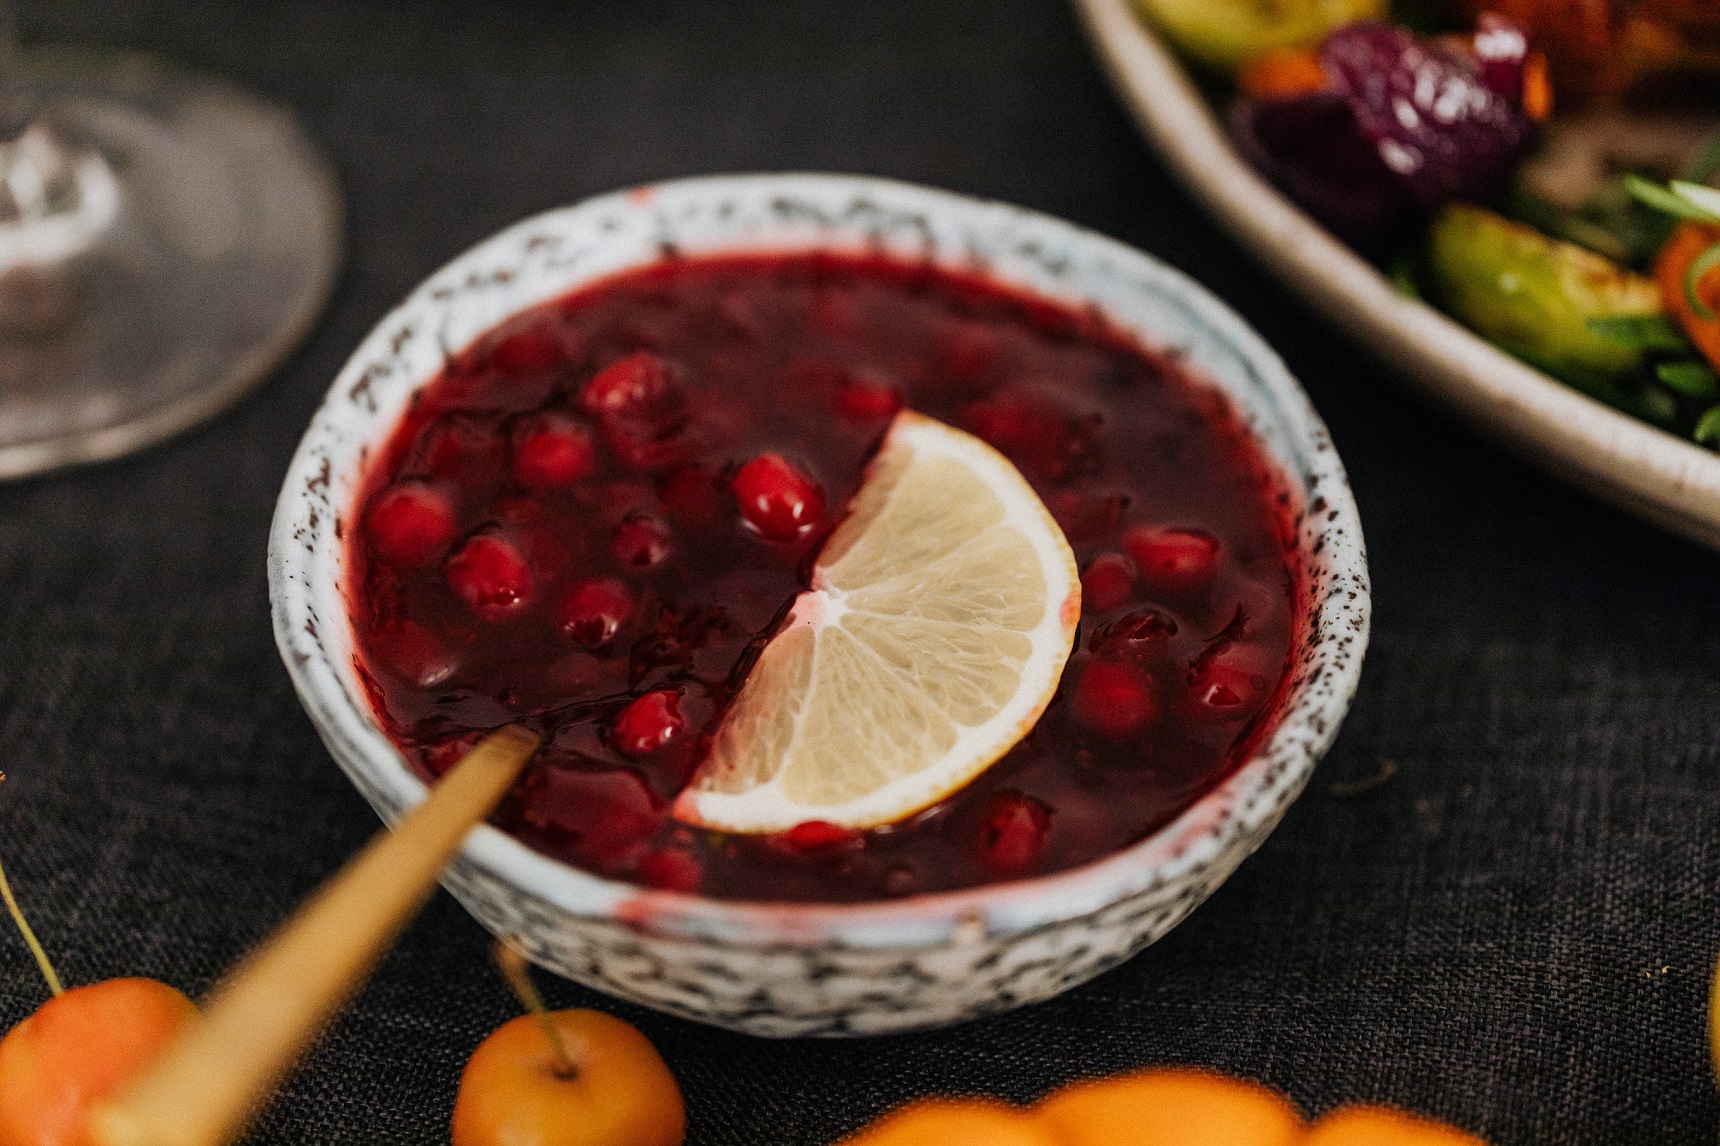
Homemade cranberry sauce balances the meal
With so many rich sauces and flavors, the acidity in the cranberries really balances the rest of the meal. Fresh holiday cranberry sauce is also perfect for Christmas. The deep red of the cranberries complements any festive meal.
Are cranberries good for you?
I adore cranberries so I was thrilled to learn that they are full of antioxidants. In fact, they are one of the top ten antioxidant foods! Interesting fact too – cranberries have been harvested in North America for over 500 years.
Good for you and delicious? All the more reason to make fresh homemade holiday cranberry sauce. Here is my very quick and delicious recipe.
Fresh Homemade Holiday Cranberry Sauce
Homemade cranberry sauce is so easy to make that you will never even think of buying a can of cranberry again! Cranberry sauce adds a delicious tartness to any meal and the crimson color is perfect for holiday entertaining. Orange juice adds some zest and depth of flavor.
112 ozFresh cranberriesRinsed. Remove any damaged berries.
1/2cupsugarI use organic cane sugar
1/2 cuporange juice
1/2cupwater
Instructions
Combine sugar, orange juice and water in a medium saucepan. Bring to boil; add cranberries, return to boil. Reduce heat and boil gently for 10 minutes, stirring every once in awhile. Cool at room temperature. Refrigerate until serving time.
Hi all! I am getting excited to cook and have our Thanksgiving menu all picked out. In the spirit of organization, I even did the shopping on Sunday to avoid the crowds. Normally we head to a relative’s for a lovely and large Thanksgiving. This year they are wisely not holding that gathering due to the pandemic. So Mr. SB and I will be cooking Thanksgiving for just the four of us.
We actually always cook our own Thanksgiving as I had found through the years that I love leftovers. We also host a Friendsgiving with a college friend and her children. I also like to make the family favorites that I grew up with as our family always hosted our aunts, uncles and cousins.
Thanksgiving Memories
I have very fond memories of waking up and my mom and dad would already be hard at work. My dad took care of preparing the turkey. My mom would make all kinds of sides – mashed potatoes (a must in our house and quickly depleted when my three cousins arrived), pureed butternut squash, peas, stuffing, creamed onions and at least two or three pies. I remember loving the apple, cranberry pie she made one year.
Conversation would last well beyond dinner. I used to love hearing my mom and aunts telling stories about my grandparents who had died when I was very young. Some holidays there were heated political conversations but always in good humor and with no lasting ill will (life seemed easier in that way back then!).
This year, while our gathering will be small, it will still be special. I am going to use our china and good silverware and pick up some fresh flowers.
The food will include a mix of old favorites and a few new recipes. I love to try one or two new recipes every holiday to keep it fresh.
The 2020 Thanksgiving Menu
I plan to make the following – and am sharing my recipe for the best stuffing ever (home made and easy as can be…just some chopping).
Turkey smoked on the Big Green Egg (Mr. SB’s specialty:)
The best stuffing with celery and leeks. I adapted this from the NYT Cooking and it is delicious. Feel free to experiment with the herbs you like best too. I may even use a bit of my meat share’s bacon to flavor it this year.
Pumpkin cake in the slow cooker (am trying this one too for the first time). It looks so easy and with just the four of us I think a homey, easy dessert will be welcome.
What dishes will you be making? Any special family traditions?
Oh, and on Friday we go to cut down our Christmas tree and tailgate with friends. Will be sharing what I make for that too! Happy Thanksgiving everyone.
Best Ever Thanksgiving Stuffing (with a crisp outer edge) with Celery and Leeks
Home made stuffing is easy to make and well worth the effort. This version has a crispy outside and a tender, custard-like interior that is full of fresh flavor from the leeks and celery. Get a good loaf of ciabatta or sour dough and hand tear it for the best results.
1large loaf breadpreferably sourdough or ciabatta (about 1¼ pounds)
¼cupolive oil
8tablespoonsunsalted butter
6garlic clovesthinly sliced
2large leekswhite and light green parts, chopped
Salt and freshly ground black pepperto taste
6celery stalkschopped
½cupdry white wineI like Pinot Grigio
2 ½cupschicken broth
3large eggs
½cupfinely chopped parsley
¼cupfinely chopped chives
2tablespoonsshredded sage leaves and thyme leaves
Instructions
Preheat oven to 375 degrees. In a large skillet over medium-high heat, combine olive oil and 4 tablespoons butter. Once the oil and butter has melted, add the garlic and leeks. Season with salt and pepper and cook, stirring occasionally, until leeks are bright green and softened about 8 to 10 minutes.
Then add celery, and season with salt and pepper. Cook, stirring occasionally until bright green and tender, 4 to 6 minutes. Add white wine, and cook until reduced by about three-quarters, 3 to 4 minutes. Remove from heat.
Whisk together broth and eggs in a medium bowl. Place bread in a large bowl big enough for mixing. Add the leek and celery mixture, parsley, chives and marjoram. Stir to coat so that everything is evenly distributed. Pour the egg mixture over everything and toss a few times. Let sit a minute or two and give another toss. Repeat twice until all the liquid has absorbed and evenly distributed to each and every piece of bread.
Transfer mixture to a 2 1/2- to 3-quart baking dish (a 9-by-13 pan also works), making sure not to pack it too tightly. Dot the top with the remaining 4 tablespoons butter, making sure to pay extra attention to the corners, where the stuffing will get the crispiest.
Cover with foil and bake until the stuffing is sizzling at the edges and completely cooked through, 25 to 30 minutes. If it’s not yet time to serve, remove stuffing from oven and set aside.
When ready to serve, remove foil and increase temperature to 425 degrees. Bake stuffing until crispy, crunchy and deliciously golden brown on top, 20 to 25 minutes. Sprinkle some chopped parsley on top if desired.
Hi there. So, yesterday I shared my organization journey. It would not have been complete without the inspiration I received from other bloggers (who continue to inspire me today). How did I find them? One day I think I googled “top organization websites” or something like that and fell into the world of organization blog! These ladies are funny, have great tips and influence my own organization journey. I am happy to share with you the 5 best organization blogs.
A Slob Comes Clean (the best of the top 5 organization blogs if you are starting out)
If you are just starting out, Dana at a Slob Comes Clean is a great place to start. She shares her brutally honest struggle to put some order in her life. She does not sugar coat it either – from the dishes piling up to having to buy garage sale clothes (because the rest of the clothes were dirty), she shares it all along with how she found peace in decluttering.
Easy tips such as just “do the dishes every day” (which I have also found to be true) get even the messiest, cluttered home on a path to order and serenity. She is also very funny and self deprecating which is fun as some of the organizing bloggers might take it all just a bit too seriously. She also a podcast. I enjoy listening while I tackle a decluttering or organizing project (or anytime).
iHeart Organizing
iHeart Organizing created a big Aha moment for me. Jen, the blogger, had such beautiful spaces and was so creative in how she labeled and organized. I love the creative DIY aspect of organizing. It is fun (well if you are me) to play around with fonts, patterns and making your containers and labels special. After decluttering and organizing a space I will treat myself to some beautiful labels and possibly containers (but only if I really need them!). She does not seem to be actively blogging anymore but she still has plenty of ever useful posts that will inspire you.
Andrea Dekker
I found Andrea Dekker’s blog awhile ago likely from one of my internet searches on organization. She is all about leading a simpler life and also has great ideas on living frugally (but fully). I really like her attitude that you don’t need fancy containers or tons of money to lead a simpler, organized and very fulfilling life. In fact she often will share organized spaces that may just reuse some cardboard boxes or tin cans that could be found in anyone’s recycling bin She also has great advice on how to be careful about accumulating stuff to begin with and leading a minimalist, simpler life.
Organizing Junkie
I recently discovered Organizing Junkie. She has tons of content around organizing everything (and I mean everything). I found I had to sift through much of the content but found some great tidbits. I like her idea around pouches and am going to try that out for my office where paper tends to become out of hand. She has been blogging for years so I recommend searching on a specific topic to find exactly where you may be challenged.
Clutterbug
I recently found the Clutterbug blog and love the quiz that helps identify your organizing style. I think I fit more than one profile (definitely a Ladybug but maybe a Cricket too?). It is thought provoking and makes you review what you like/don’t like and where you may have obstacles to overcome.
I hope you enjoyed the top 5 organization blogs and will check them out. Do you have any blogs you go to for organization advice? Check back in frequently as I continue to share resources and my own tips and tricks for a decluttered, more organized, productive and fulfilled you!
If you caught yesterday’s post, you know I took the week off. Did I jet off to Paris, Greece or maybe a resort in Cancun? No, far more exciting I decluttered and organized our home (HA!). Maybe it was not so glamorous, but it sure did feel good! It was an especially great feeling coming back to a decluttered, organized office. I also became very motivated to share my organization journey as it has been a journey!
I have always tried to maximize life and minimize drudgery (my definition of drudgery includes endless, repetitive housework). Learning and implementing organization strategies has improved my life immensely. It can help you too. Are you sick of not being able to find items? Are clothes, papers (fill in the blank) bursting from drawers. Laundry overflowing? Or maybe 5 comes and you have no idea what dinner will be? I have been there and I can help.
I plan to share those same strategies that took me from overwhelmed to a much calmer existence (and a home that the entire family enjoys). So onto the journey…you may recognize yourself somewhere here.
Organization growing up
I never had an issue with organization in school or work. Home, even my childhood home was a different story. My mom good naturedly called me Messy Mimi from time to time.
But at school and work I was the organized one. At my very competitive graduate school I had fellow students who said I was the most organized person there. I also had a professor tell other students they should emulate my organization strategies. No frantic all nighters for me…work was generally always done well in advance.
Truthfully when it comes to my work/school I am organized. Partly because school/work has been such a priority for me. My mind just over compensates for any messiness, clutter or disorganization in my surroundings. That said, it is still easier to be organized in all (or at least most) facets of life.
Young, single and organized
Second, when you are a single person staying organized is just not as hard. If you move frequently as I did back then, you also just can’t hang on to that much stuff (unless you want to pay to move it!).
And I moved frequently as a single woman in my twenties. I lived in Boston, New York City and then off to business school and some time in California. When my husband and I married we lived in Montreal, and then moved back to New York City. What does all that moving do? It makes you constantly sort through your stuff. As we lived in rentals we did not invest too much in home décor either. As a single or newly married woman without kids, I was lulled into thinking that being an organized person with a tidy home was really pretty simple.
Organization post children
Moving into our first home in CT from a small one bedroom in Manhattan changed our lives in more ways than one. All of a sudden we had space! Four bedrooms and two thousand square feet seemed like a mansion.
We also had two babies born two years apart. An entirely new shopping category was added – baby stuff! At the time I was working full time with a 45 minute commute one way, caring for an infant, and as our home was a fixer upper we remodeled it. Oh boy I was busy…at least I thought I was busy.
Then our second daughter came along (I was even busier!). I was full on Mom and enjoying every minute (at least for the most part). I worked part time at this point. So my days off were spent taking the girls to the aquarium, children’s museum, beach and library and doing all of that fun mom stuff I could not do while in the office.
In other words organization was not my priority…and frankly I was and am still OK with that thinking. Although if I had known a few strategies I would have lived a more organized and enjoyable life – but I was not there yet.
And the stuff just accumulated. Babies grow and clothes that fit two weeks ago no longer do. No one ever told me there could be so much stuff with two little kids.
Our girls are also the youngest of 10 other children from our extended families. The hand me downs started – everything from a full play house, at least 50 Barbies (with all of the little shoes and outfits), endless toys to dozens of clothing items. I also worked in children’s publishing so had access to free books! I am a book lover and was so happy to have all of these books for our children. Before you know it, our house that seemed big, was stuffed to the brim.
Selling our first home
At some point, we decided to move into a larger home. We were busting at the seams so the answer was a bigger home right? Now as I look back a larger home to move more stuff is usually not (almost never!) the answer. You have to live with what space you have. In our defense we had hit a remodeling wall. It just was not worth it money-wise to put more money into that house so we called an agent.
I remember the day the real estate agent came, toured our house, and then when he arrived in the basement he said, “now it all makes sense.” Basically we had made the basement a dumping ground. We never had time (nor did we make time) to deal with the excess stuff so we just stuck it in the basement.
To sell the house, we started some serious decluttering, sorting and organizing. After an exhausting few weekends and the realization that we had accumulated so much in a short period of time, I vowed that in my next house, I would not let a year go by without at least cleaning out all closets at least once. At this point I realized that taking care of me versus taking care of a family and a home was something I knew little about. This realization was really step one on the organization journey.
Being a successful professional does not mean organization at home is second nature
Here I was a successful business professional known for being efficient and organized at work, yet at home it was a different story. If you are at this point, do NOT be ashamed. No one really teaches you these skills now. Home economics was either eliminated or barely covers how to run a household. Along with teaching personal finance to women and girls, it is a major reason and passion for starting this blog!
Another notable change has contributed to our difficulties managing our belongings. We entered the decades of stuff somewhere in the eighties and nineties. Cheap exports from abroad and “fast fashion” have made it so easy to buy stuff and more stuff (and then there is an entire industry devoted to organizing it!). We are also marketed to constantly on social media, email, TV …you name it. Americans are drowning in stuff!
Nature versus nurture
It is worth mentioning that I had also mistakenly thought there are “neat” people out there, and that I was simply not one of those people. Sort of like how some people tend to gain weight while others have problems keeping it on – organization was just not in my genes. While it is true that being neat with your stuff may come naturally to some, I would argue (as a convert) that you can absolutely learn the habits and skills to become a neat, organized person.
To start solving a problem you need to realize you have a problem
Our second and current house is larger. It has a finished basement/rec room and a walk up attic which have been blessings and challenges. A blessing as it has been so nice to have some extra room (and ability to hide the mess). A challenge as at some point, you need to face all of that stuff you “stored.”
I remember the day the realization came that our second home, while so much larger and with better storage, this home had also become terribly disorganized.
We are fortunate enough to have someone help clean our home every other week. One day, I saw her go into our rec room with the vacuum and come out almost immediately. The room had so much stuff in it that there was only a tiny area to vacuum and clean. Stuffed animals were everywhere. Toys the girls had grown out of were still there long after. Even my beloved children’s books were so overwhelming that no one really read them. Bells went off. And, that is when I started Project Organization or Project O as I refer to it.
I started reading books, searching on Pinterest for organization ideas and came upon some excellent blogs. After some trial and error, I developed my steps to organize just about anything. I spent all of my weekends one winter tackling the mess and getting to a really great place. And, Project O as I still call it continues.
While I have entered more of a maintenance phase, I also have times where I still occasionally become overwhelmed (including the last 3 months). However, now I have the tools and inspiration to tackle it.
So check back in as my next post will share some great books, blogs and influencers who have helped me come up with my own strategies.
How have you been? I took some time off both from my job and the blog, and unplugged and organized! I decided to organize our home in a week! Yes, an organized home in 7 days. I promise to share how I tackled that challenge. But before I get to that, I am excited to share that I will be posting a series that I am calling Organization 101. I will share my journey and all of the tips, tricks, strategies and resources that have helped me lead a calmer, more productive life and have a home and homelife that the entire family enjoys.
Why it is OK to keep some stuff (at least for now!)
The organization pass system and how it will help you minimize
Daily routines that help you maintain an organized home
Trigger points to watch out for that will sabotage your organization progress
How to make money selling your stuff (and where to sell it)
How our consumable “Stuff” culture has made it so hard to get and stay organized
And probably more! My goal is to share all of the tips, tricks and how to’s that I have learned through the years to make YOUR home and life as organized as you want it to be.
So stay tuned folks. And, before I begin, you may just want to check out The Home Edit on Netflix to get excited about having an organized home.
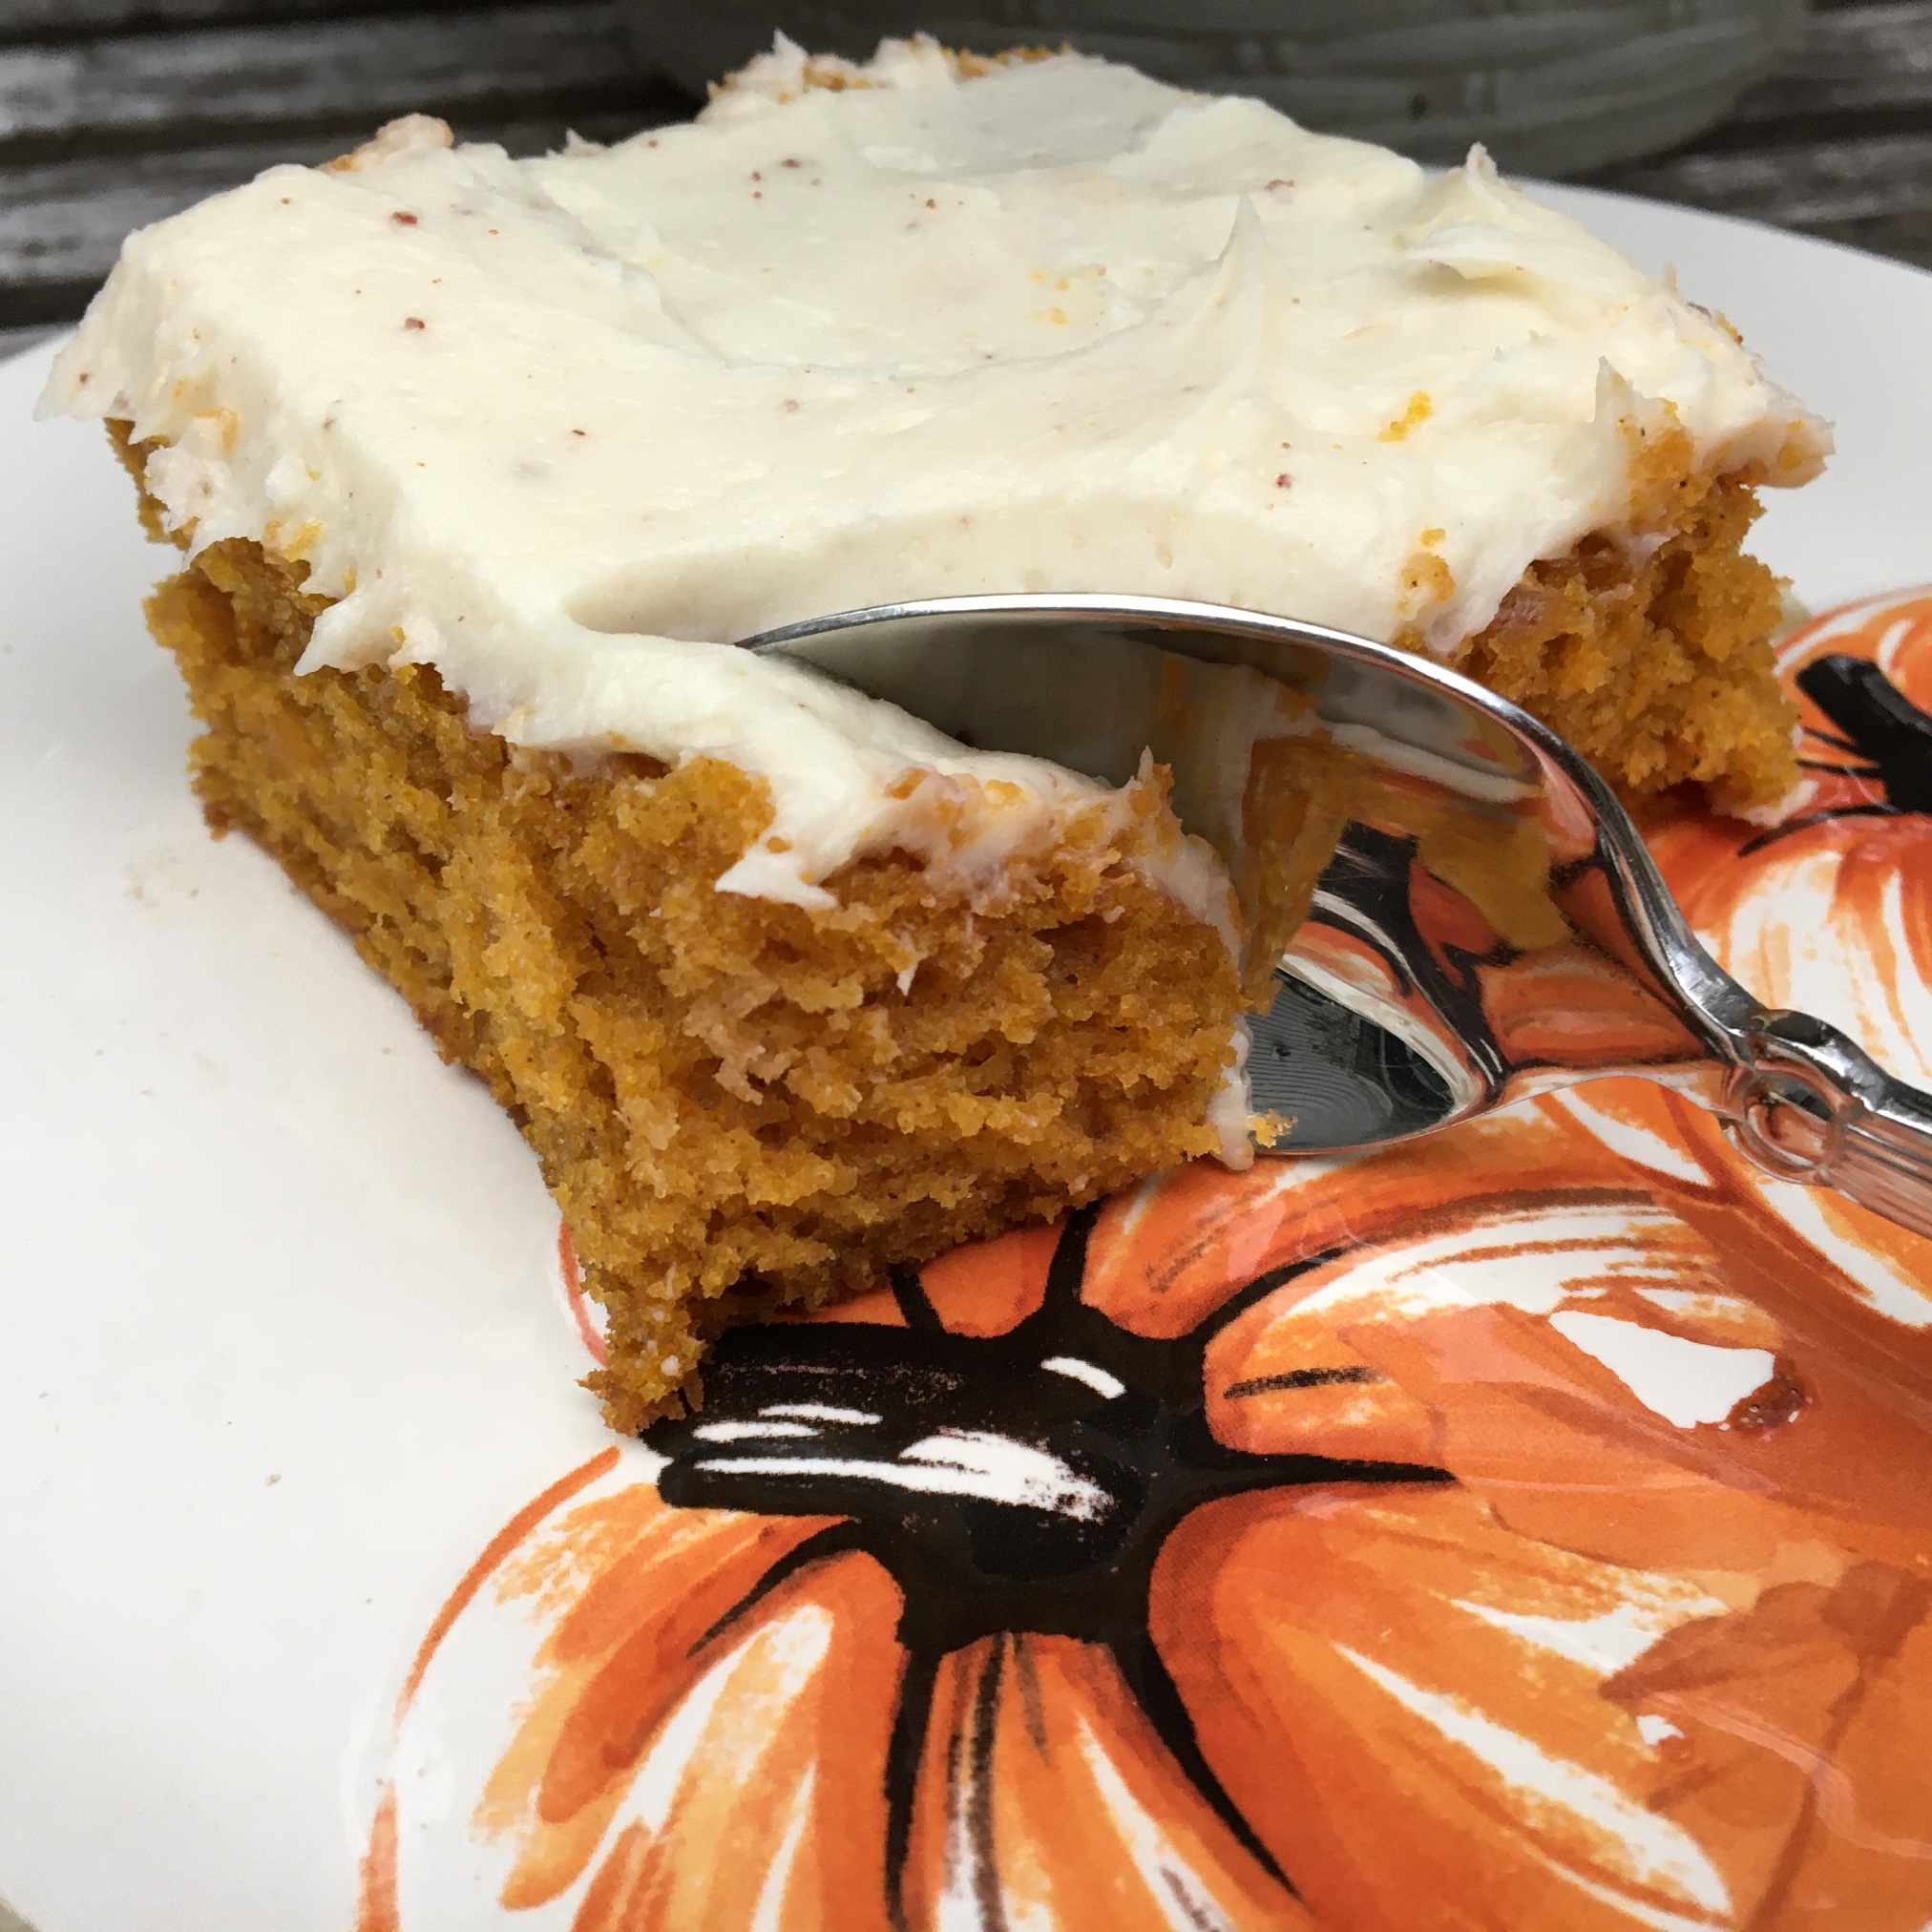
Hi friends. I hope your week is going well. I have been cooking and baking and can’t wait to share some recipes with you. Today, I will be sharing one bowl pumpkin bars with cream cheese frosting. I really do not like pumpkin pie but I love pumpkin desserts such as pumpkin crisp and pumpkin bars. These bars have a brown butter cream cheese frosting which is simply divine and very easy to make.
Pumpkin is good for you!
Pumpkin is very nutritious with tons of beta carotene which helps your body convert vitamin A and help your vision and brain function. Pumpkins were discovered 7,500 years ago in Central and South America. Today of course we use pumpkin for pies, desserts, soups and more.
Pumpkins were discovered 7,500 years ago in South and Central America
A note about brown butter
Browning the butter adds a complexity to the flavors of this frosting and is very simple to do. Melt the butter in a small saucepan. I recommend using a light colored bottom so you can monitor the browning. You do not want it to burn (and that is easy to do). You will need to watch the butter carefully and stir occasionally. I like to leave the brown bits as it adds flecks to the frosting (and tastes delicious). You could strain it if you do not like that effect.
What do you need to make one bowl pumpkin bars with cream cheese frosting?
Spices. I use a pumpkin spice blend by McCormick. You can find this or other brands easily at the supermarket
My girls loved the pumpkin bars and have even been eating them for breakfast for a change and a treat. I am also planning on bringing them to a friends’ fall fest party.
One Bowl Pumpkin Bars with Brown Butter Cream Cheese Frosting
Simply delicious, one bowl pumpkin bars with brown butter cream cheese frosting are delectable! Tender pumpkin bars full of pumpkin spice flavor topped with a generous amount of browned butter cream cheese frosting. Perfect for dessert, a treat or even breakfast.
1teaspoonor so of pumpkin pie spice to dust on top
Instructions
Instructions
Preheat oven to 350F. Spray a jelly roll pan or cookie sheet with high edges with nonstick cooking spray and line with parchment paper. Set aside.
In a large bowl, whisk together flour, sugar, brown sugar, pumpkin pie spice, salt, baking soda, and baking powder.
Stir in eggs, vegetable oil, and pumpkin puree until combined.
Pour batter into prepared pan. Smooth out batter so it is even in pan.
Bake for 25 to 30 minutes or until an inserted toothpick comes out clean. Cool completely on a wire rack before frosting.
Frost with brown butter cream cheese frosting.
Refrigerate unless serving immediately.
Brown Butter Cream Cheese Frosting
Heat butter in a small saucepan with a light bottom over low heat until completely melted. Continue heating, stirring occasionally, until light golden brown in color. Remove from heat and let cool.
Combine cooled brown butter and cream cheese in a medium bowl. Beat on medium speed until light and fluffy.
Transforming a cardboard-like frozen pizza into a delicious meal is entirely doable, super easy and economical. In fact, you can easily make your frozen pizza taste like takeout with a few simple steps.
We have all been there…dinner needs to be on the table and we have nothing prepared…
It is also one of those recipes for what I call “on your last nerve” meal ideas. “On your last nerve” recipes do not really qualify as “recipes” but may just save your “last nerve” mid week (or anytime). When I meal plan on Saturdays and Wednesdays (usually) I always factor in a few items that can be stored in the freezer and easily made for mid week. I find these options are particularly handy after a long work day or driving around to extra curriculars.
What is a On Your Last Nerve Recipe?
Sometimes these are items I cook myself and have frozen for a quick reheat in the microwave or instant pot. Occasionally they are freezer favorites from Trader Joes or Costco, and often they may have a base of store prepared food with a few items to doctor it up for something way better than what could be served directly from the freezer. I always keep a few items in my freezer such as Costco’s frozen cheese pizza (4 for $9 in my area) and recommend that you do too.
How to Make a Frozen Pizza Taste Like Something You Want to Eat?
Normally I am not a fan of frozen pizza. The cheese never freezes well (as is usually the case with dairy items), and the crust is like cardboard. Additionally, in my book, there is never enough cheese or any of the toppings that make pizza so delicious. So here are my go-to tips:
Shop your fridge and pantry: Either fresh or leftover vegetables make excellent toppings. Leftover cooked mushrooms, peppers, onions and eggplant are delicious as a topping. In the summer I always have a basil plant too that I will top the pizza with fresh shards of that summery goodness.
Keep ingredients on hand. I also always have onions and garlic. A quick sauté with some Italian seasoning or oregano can really up the flavor. Canned, sliced olives are delicious too. Costco Pesto, and pretty much any brand of pasta sauce are good bases. And, I always have flatbread (Aldi and Trader Joes have good options) as well as the Costco cheese pizza with a breadcrumb crust. Spices are key too. Nothing fancy – just some dried oregano and basil and maybe a bit of garlic salt if you like.
Cheese! If you buy a frozen pizza the cheese is awful. Cardboard shreds. I usually don’t bother to scrape it off but always add either fresh mozzarella or if I don’t have that at least some of the sliced variety.
Freezer toppings. Sliced, uncured pepperoni and salami are always in the freezer. I take them out a few minutes beforehand (or take a few slices and defrost in the microwave). Other toppings might include frozen pre-cooked rotisserie chicken or if we are doing a Meatless Monday we leave out the meat.
Finish with a yummy glaze. Balsamic glaze adds just the right touch of tartness to the melted cheese. I have also known to drizzle a little truffle (fancy!) oil or garlic infused oil too. This pizza is so economical no matter how you finish it that I say go ahead…be fancy!
A Few Last Recommendations to Make Frozen Pizza Taste Like Takeout
We all have those nights when we are on our last nerve. For those moments, I always keep frozen pizza and some add ons to make frozen pizza taste like takeout. Make a quick salad of pre-washed lettuce and some favorite veggies and you are done…very little clean up too!
The weather was gorgeous this past weekend, and we did a second round of apple picking at our favorite orchard which made the most delicious apple crisp (recipe below!).
Friday I realized that I had dozens of eggs in the fridge (don’t ask) and decided to make a quiche. Then I realized I did not have prepared crust so did a quick recipe search and found this simple recipe for pie crust. Could not have been easier, was delicious and I used real ingredients like organic flour and butter so am guessing was much healthier too and without the preservatives in refrigerator crust! French guy was impressed although we both agree we need to find a low-cost source of gruyere cheese which is one reason why quiche in France is so delcious (I used sharp cheddar as that is what I had on hand).
We also had our last day at the shore which was bittersweet. Even during the pandemic, it was so great to escape to sail, kayak and hit the beach and socialize safely outside. It has been a silver lining to discover the beatuiful, CT shore and go back to my roots of sailing (and now teaching the girls to sail).
While hiking will be great during the fall, I told Mr. SB that we need a winter escape (am asking for cross country skis for Christmas). Downhill skiing may be challenging as the pandemic continues.
Sunday afternoon I tackled cleaning the basement. I actually organized the spot two years ago, and while it looked terrible in recent days, it only took me about an hour to remove unwanted items and put others away in the labeled spaces I had created years ago. I used my 5 step organization method for a particularly messy part. So nice to go in and not have stuff everywhere! I also realized that end of season or any major event should be an alert. That is the time to empty beach bags, wash towels etc. (anyone ever clean out a kid’s backpack and find 3 month old hummus?…surely not me:).
Now what about that apple crisp?
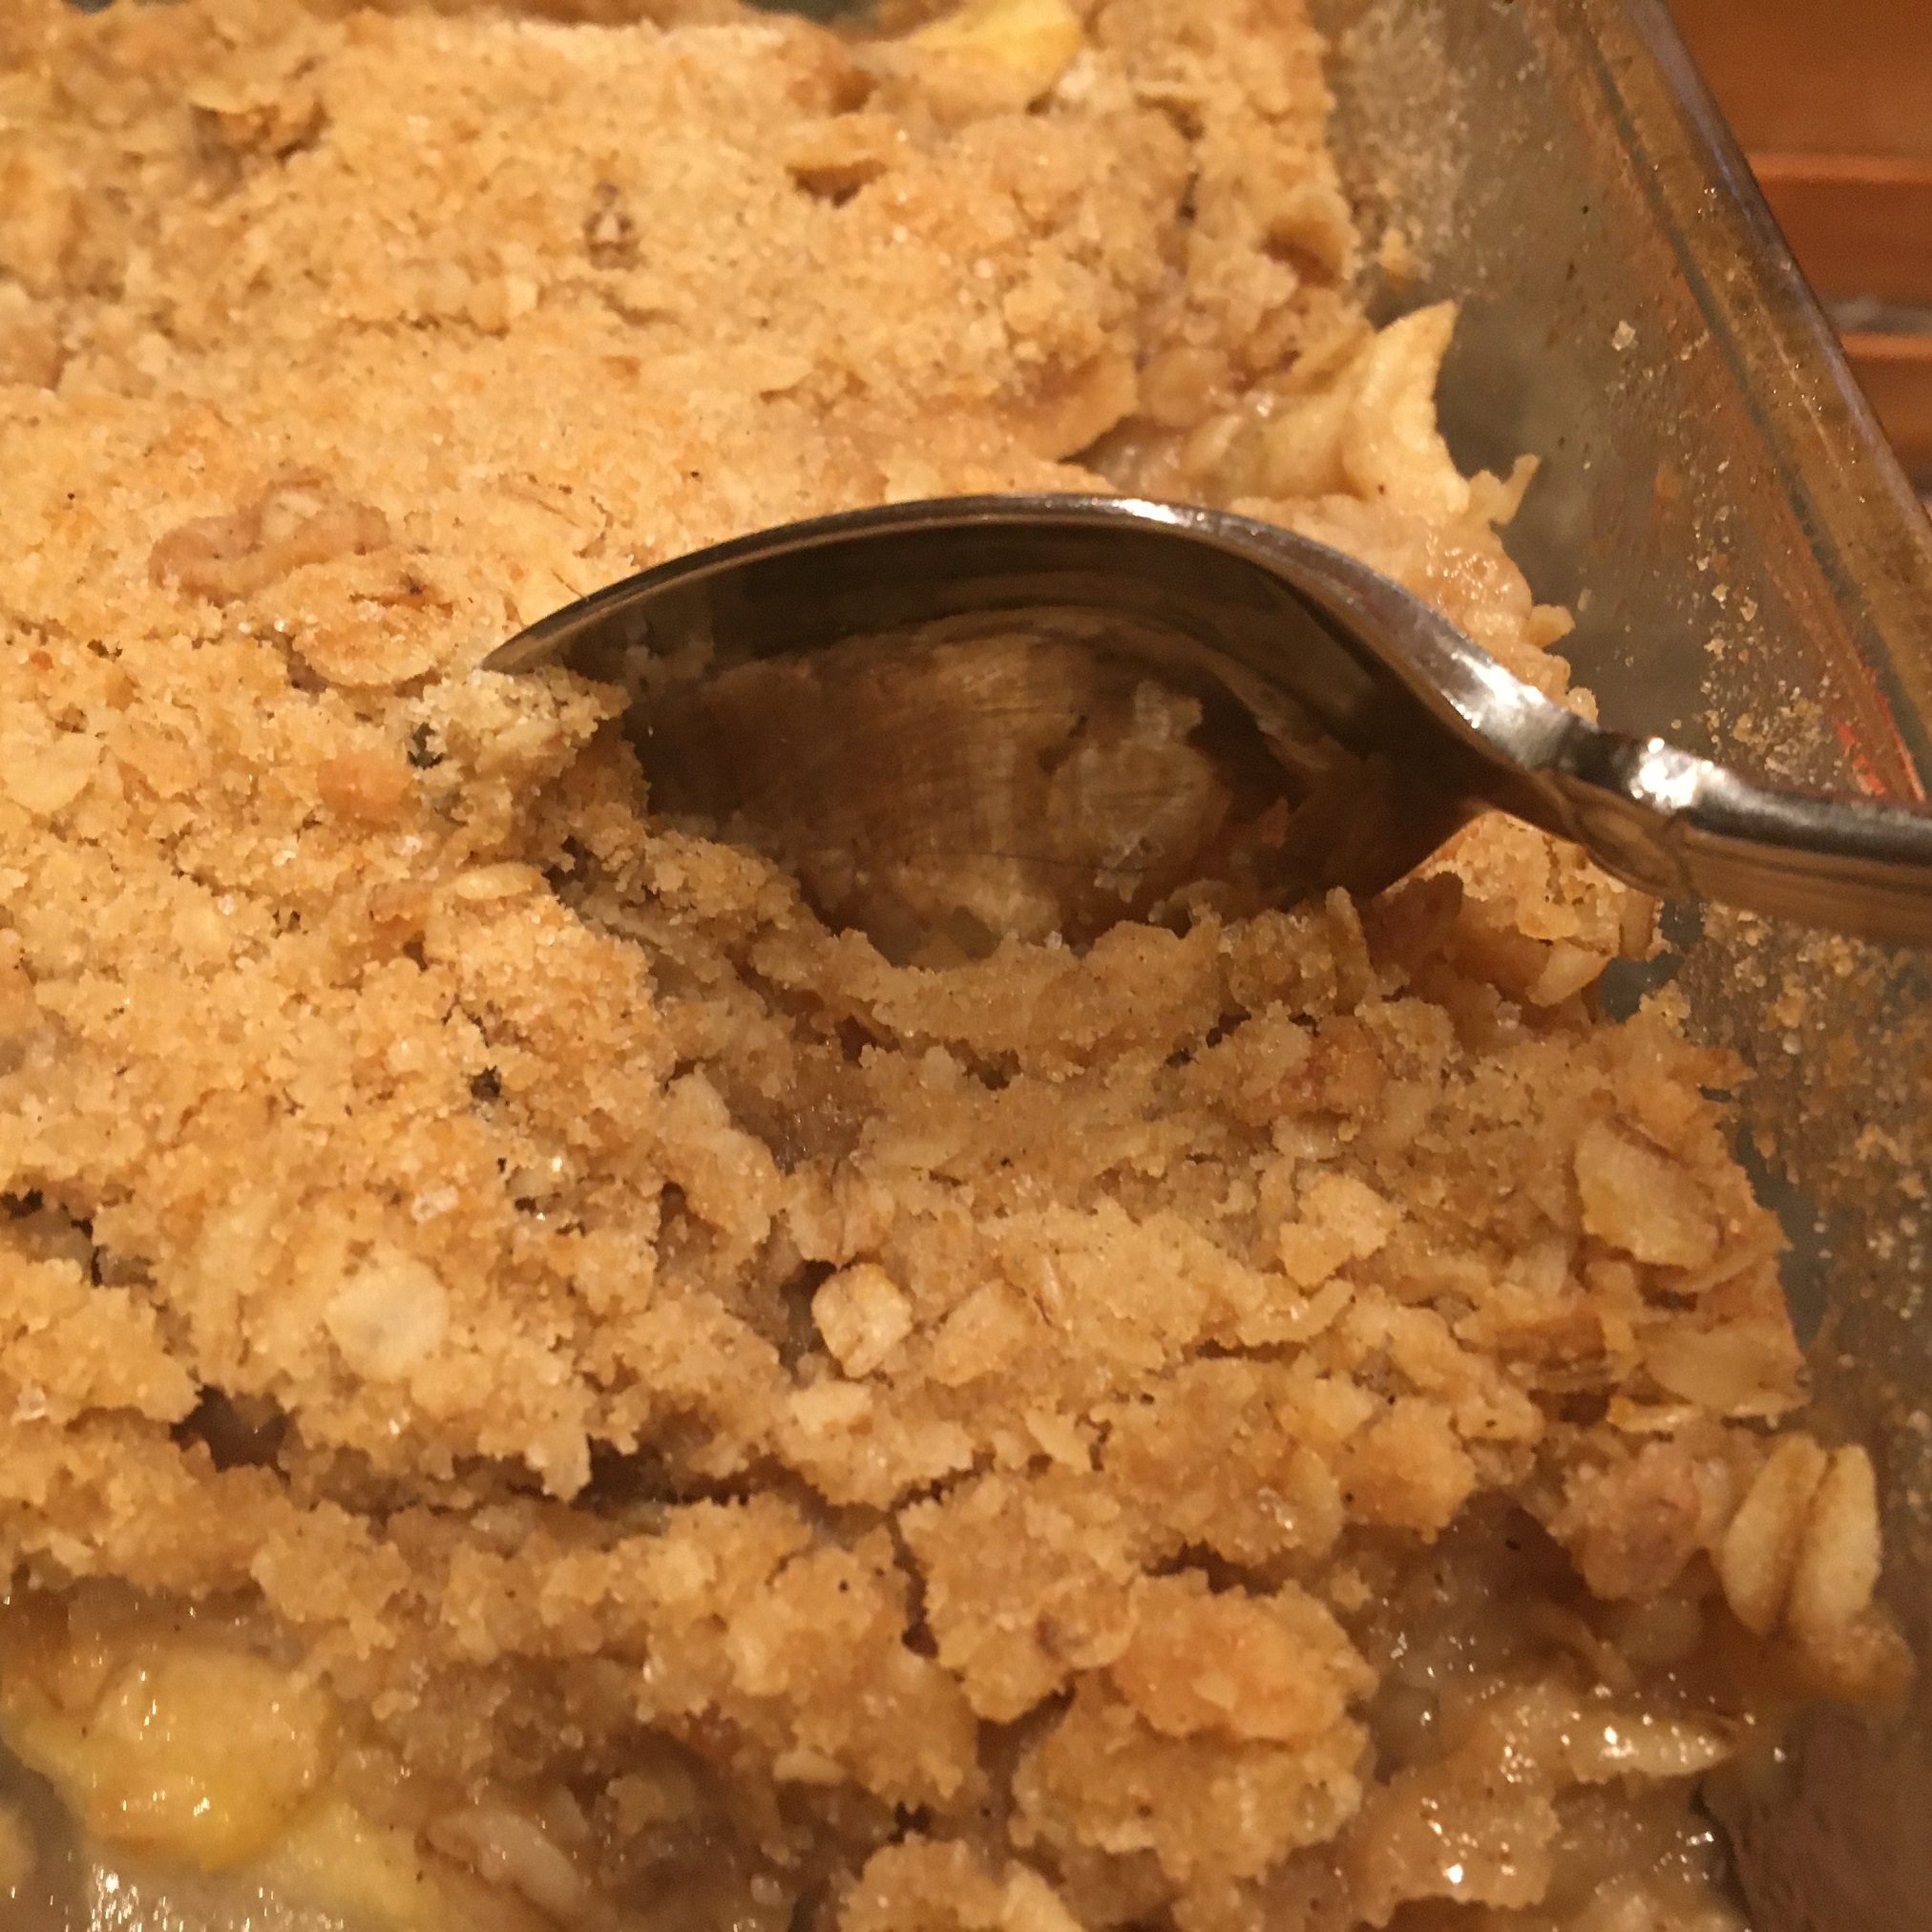
So all in all a good weekend. The apple crisp was a perfect way to end Sunday dinner. I used a mix of Jonah Gold, Granny Smith, Cortland and Mutsu apples. Typical recipes use far more sugar – while this recipe is plenty sweet I like to taste the apples. The top is a delicious mix of oats, brown sugar, cinnamon and butter. If you love crisps as much as I do, be sure to check out last week’s pumpkin crisp recipe which is also easy, perfect for fall and delicious. Super easy…enjoy!
Best Homemade Apple Crisp
Sunday’s bread recipe for warm, homemade apple crisp. Nothing says home like apple crisp. Top with some vanilla ice cream or whipped cream for the perfect, sweet comfort food.
4cupsapplessliced thinly. I leave a little skin on for texture.
1tablespoonflour
1/2cupsugarI use Costco organic
3/4cupbrown sugar
1/3cupbuttercold and cut into smaller tablespoon sized slices
3/4cupflour
1/2cupoats
1/4tspbaking soda
1/2teaspoonsalt
1teaspoonof cinnamon
Instructions
Preheat oven to 350 degrees
Combine the first three ingredients and place in a greased 8×8 baking dish.
Combine the remaining ingredients. I use kitchen gloves to work the butter into the dry ingredients. Mixture should look crumbly. Spread over the top of the apple mixture.
Bake for 30 minutes. Apples should be juicy and bubbling but hold their shape. Test with a fork or knife to determine that the apples are tender. Bake for another 5 to 10 minutes if necessary.
We had beautiful, crisp weather in the New York area this weekend. The weekend was full of cooking autumn dinners and dessert (pumpkin crisp recipe to follow!). I also tackled organizing the bathroom top to bottom so will be sharing that as well. Of course I used my foolproof steps to do so. But let’s talk food.
What did I cook this weekend?
Fridays as always are evenings where my Mr. SB comes in late. Last week was a stressful one (hence my lack of blog posts) so cooking something yummy on Friday was a great stress reliever. I admit – I love pumpkin both in savory and sweet dishes (with the exception of pumpkin pie…not sure why I do not like pumpkin pie!). So I went in search of a savory, pumpkin-based sauce and found a great recipe from Rachel Rae. Rachel is famous for her 30-minute meals and this recipe for pasta with pumpkin sage sauce and sweet Italian sausage was delicious. It also refrigerated well so we had leftovers last night:)
Saturday morning meant looking in the fridge/freezer at leftovers and figuring out what kind of home made soup to make. It turns out the easiest pot roast recipe in the world also makes a fantastic Beef and Barley soup. I promise recipes to come. In the meantime a quick photo.
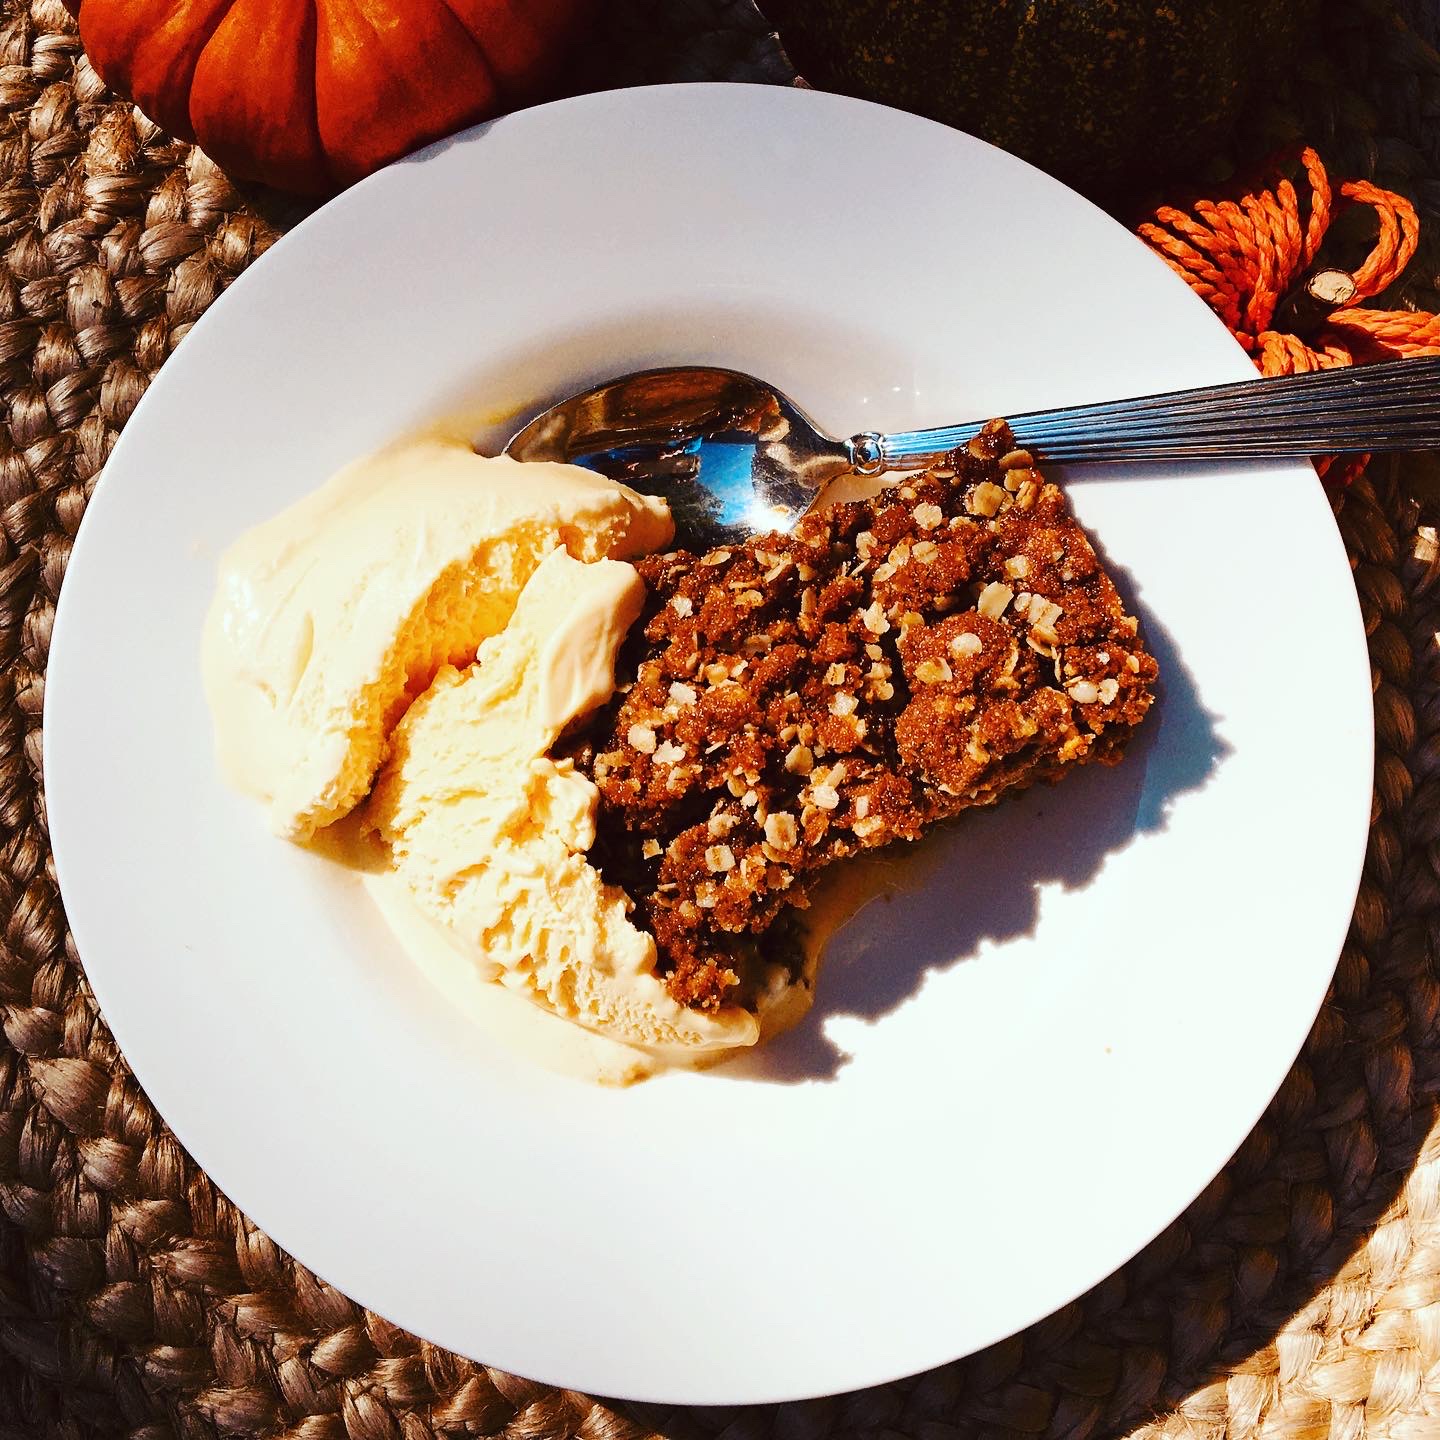
Pumpkin Crisp – the perfect fall dessert
So here’s the deal – I love pumpkin bread, pumpkin spice and most pumpkin desserts (except pumpkin pie). A few years back I had pumpkin bars which had this delicious, gingerbread crust and tender filling. It made me think about why not having a pumpkin crisp with those same flavors. Combine all that gingery goodness into a crumbly mixture and layer it on top of the yummy part of pumpkin. It came out delicious. So here is the recipe…enjoy!
Pumpkin Crisp
Creamy custard, pumpkin spice goodness topped with a gingerbread crisp. Nothing better on a fall day and a great addition to Thanksgiving too!
2tsppumpkin pie spiceor more if you love pumpkin spice!
1/4tspsalt
1cGingersnap cookie flour made by putting Gingersnap cookies in the food processor
1cquick oats
1/3cbrown sugar
1/4tspbaking soda
1/4tspbaking powder
1/2cbutter softened
½tspof pumpkin pie spice
Instructions
Preheat oven to 350°F.
Grease a deep square or rectangular pan or a 2-3 qt casserole dish.
In a large bowl, whisk together the first ingredients through salt, and then pour into the prepared dish.
In a medium bowl, combine the ground up gingersnap cookies, oats, brown sugar, pumpkin pie spice, baking soda and powder. Then, use a fork to incorporate the butter into the dry mixture.
Bake the custard for 20 minutes. Once you see it start to harden at the edges and set, you can add the crumble topping. If you add the crumble mixture right away it may sink!
Bake for another 20 to 25 minutes, or until the center of the pumpkin pie filling reaches 175°F. The center will still have a little wiggle, but it won’t be super runny.
Serve with ice cream and a drizzle of caramel sauce if you so desire.
Notes
Pumpkin crisp is best served warm with some ice cream or whipped cream on the side.
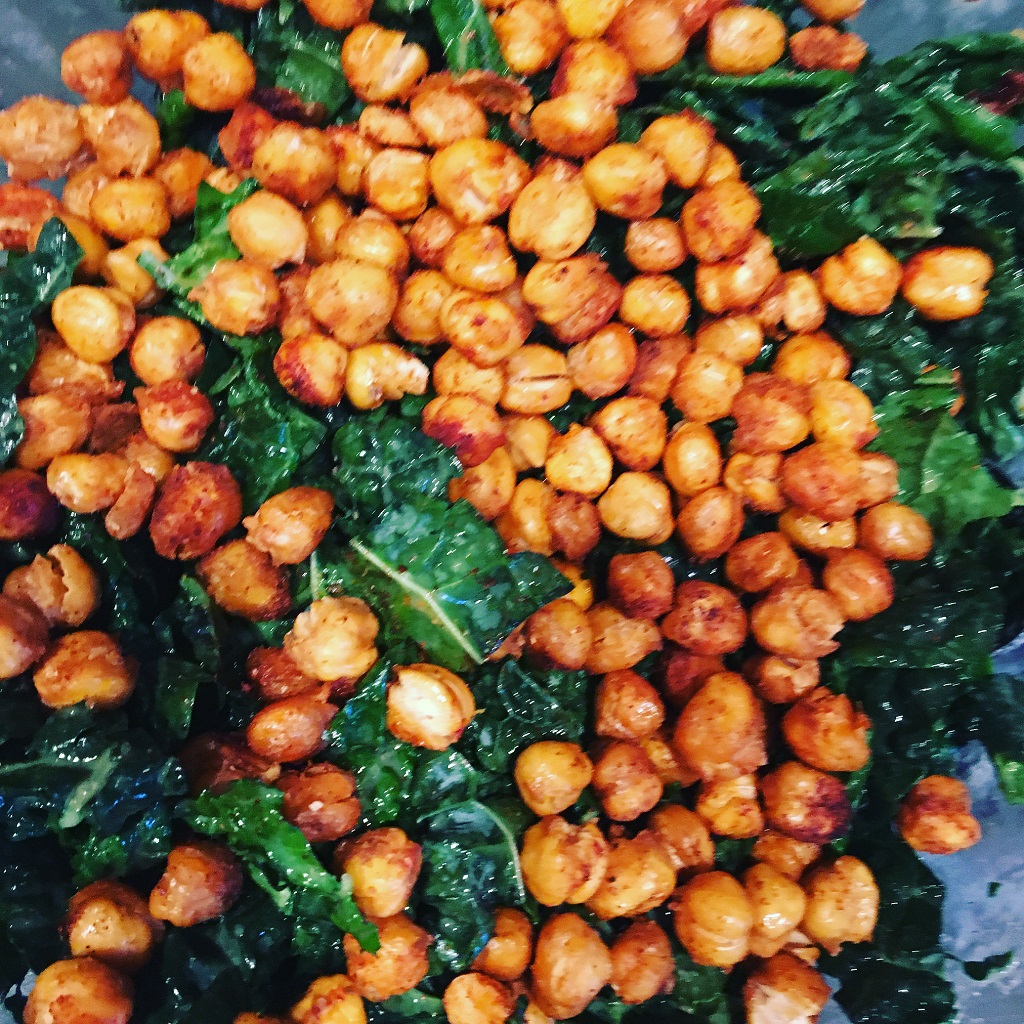
Hi there! We are enjoying fall around here and have been doing plenty of seasonal cooking. Kale is a hearty fall green that goes so well with many of the stews, soups and other fare you find this time of year. I love kales salad with crispy chickpeas and tahini dressing. Both kale and chickpeas are super healthy too. Kale is full of anti-oxidants.
Fall weekend cooking and eating
Fridays tend to be a late night for my husband so I usually cook in the Instant pot or slow cooker. The girls and I tend to eat earlier, and then when he comes in the meal is still warm. The sauces in these types of recipes make his serving as fresh as if he ate with us.
Kale salad goes well with my regular, Friday night rotations such as slow cooker pot roast, chicken marsala, meatballs or even Indian style chicken curry. This week it was foolproof pot roast (recipe coming soon).
Fall weekend look back
The weekend was full of activity. We had warm temperatures here so were thrilled to enjoy the shore, and even went clamming/oystering (with a license of course!). I finally set up my fall table took out the autumn, pumpkin dishes. I figure if we are still spending so much time at home we may as well make it pretty.
Fall pumpkin centerpiece
How do you make Kale Salad with Crispy Chickpeas and Tahini Dressing?
So moving on to my fall salad recipe – first step is to wash the kale and strip out the tough center fibers. Kale is very different than lettuce. It is heartier. As such, you will need to cut it into smaller pieces and ideally let it sit in the dressing for at least twenty minutes to marinate. I use a kitchen shears to cut the kale into smaller ribbons. Then I make the dressing:
1/2 cup of mild olive oil (or I like avocado oil)
Juice from one lemon (or 2 to 3 tablespoons or more if you like it very lemony)
2 tablespoons of tahini
1 teaspoon of sugar (mellows out the lemon)
Salt to taste
Shake in a container to mix, and then pour on your cut up kale leaves. Set aside while you make the crispy chickpeas. Enjoy!
Roasted Crispy Chickpeas
Crispy, spiced chickpeas are healthy and a delicious snack or topping for salad or anytime you want some crunch and texture.
1tablespoonof avocado or another oil that can cook at high temperature
1teaspoonof cumin
Salt and pepper to taste
Instructions
Preheat oven to 400 degrees
Drain chickpeas
Pat with paper towels and let dry. It is important that the chickpeas dry before cooking or else you will steam them when you go to roast them.
Toss chickpeas with the oil and cumin powder.
Lay evenly on a baking sheet. I like to line my baking sheet with foil to avoid mess.
Put pan in middle of preheated oven and cook for thirty to forty minutes. Shake to turn halfway through cooking.
Let cool and chickpeas will continue to crisp.
Notes
Serve over salad or as a snack. Chick peas are best eaten day of preparation. If refrigerated they may soften. You can also vary the spices. Curry powder or smoked paprika are also delicious spices to try.