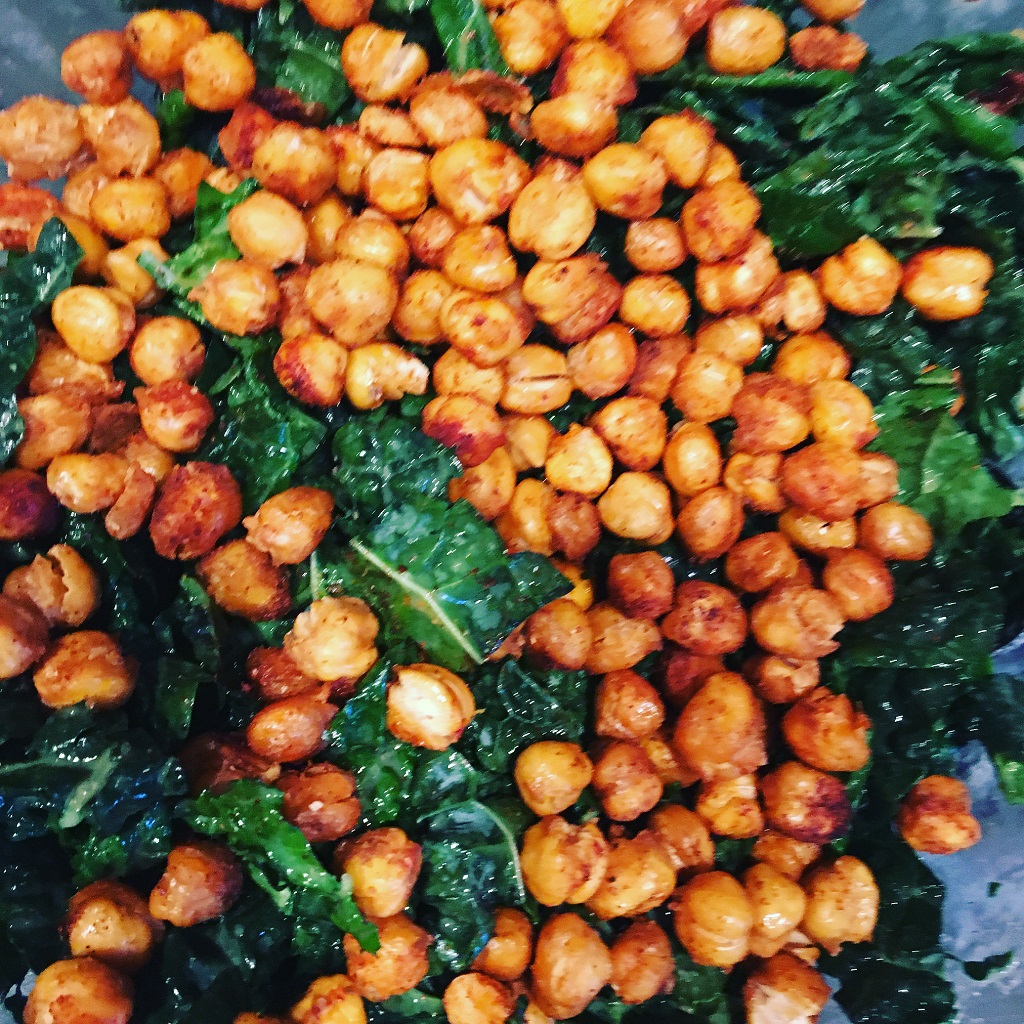
Hi there! We are enjoying fall around here and have been doing plenty of seasonal cooking. Kale is a hearty fall green that goes so well with many of the stews, soups and other fare you find this time of year. I love kales salad with crispy chickpeas and tahini dressing. Both kale and chickpeas are super healthy too. Kale is full of anti-oxidants.
Fall weekend cooking and eating
Fridays tend to be a late night for my husband so I usually cook in the Instant pot or slow cooker. The girls and I tend to eat earlier, and then when he comes in the meal is still warm. The sauces in these types of recipes make his serving as fresh as if he ate with us.
Kale salad goes well with my regular, Friday night rotations such as slow cooker pot roast, chicken marsala, meatballs or even Indian style chicken curry. This week it was foolproof pot roast (recipe coming soon).
Fall weekend look back
The weekend was full of activity. We had warm temperatures here so were thrilled to enjoy the shore, and even went clamming/oystering (with a license of course!). I finally set up my fall table took out the autumn, pumpkin dishes. I figure if we are still spending so much time at home we may as well make it pretty.
Fall pumpkin centerpiece
How do you make Kale Salad with Crispy Chickpeas and Tahini Dressing?
So moving on to my fall salad recipe – first step is to wash the kale and strip out the tough center fibers. Kale is very different than lettuce. It is heartier. As such, you will need to cut it into smaller pieces and ideally let it sit in the dressing for at least twenty minutes to marinate. I use a kitchen shears to cut the kale into smaller ribbons. Then I make the dressing:
1/2 cup of mild olive oil (or I like avocado oil)
Juice from one lemon (or 2 to 3 tablespoons or more if you like it very lemony)
2 tablespoons of tahini
1 teaspoon of sugar (mellows out the lemon)
Salt to taste
Shake in a container to mix, and then pour on your cut up kale leaves. Set aside while you make the crispy chickpeas. Enjoy!
Roasted Crispy Chickpeas
Crispy, spiced chickpeas are healthy and a delicious snack or topping for salad or anytime you want some crunch and texture.
1tablespoonof avocado or another oil that can cook at high temperature
1teaspoonof cumin
Salt and pepper to taste
Instructions
Preheat oven to 400 degrees
Drain chickpeas
Pat with paper towels and let dry. It is important that the chickpeas dry before cooking or else you will steam them when you go to roast them.
Toss chickpeas with the oil and cumin powder.
Lay evenly on a baking sheet. I like to line my baking sheet with foil to avoid mess.
Put pan in middle of preheated oven and cook for thirty to forty minutes. Shake to turn halfway through cooking.
Let cool and chickpeas will continue to crisp.
Notes
Serve over salad or as a snack. Chick peas are best eaten day of preparation. If refrigerated they may soften. You can also vary the spices. Curry powder or smoked paprika are also delicious spices to try.
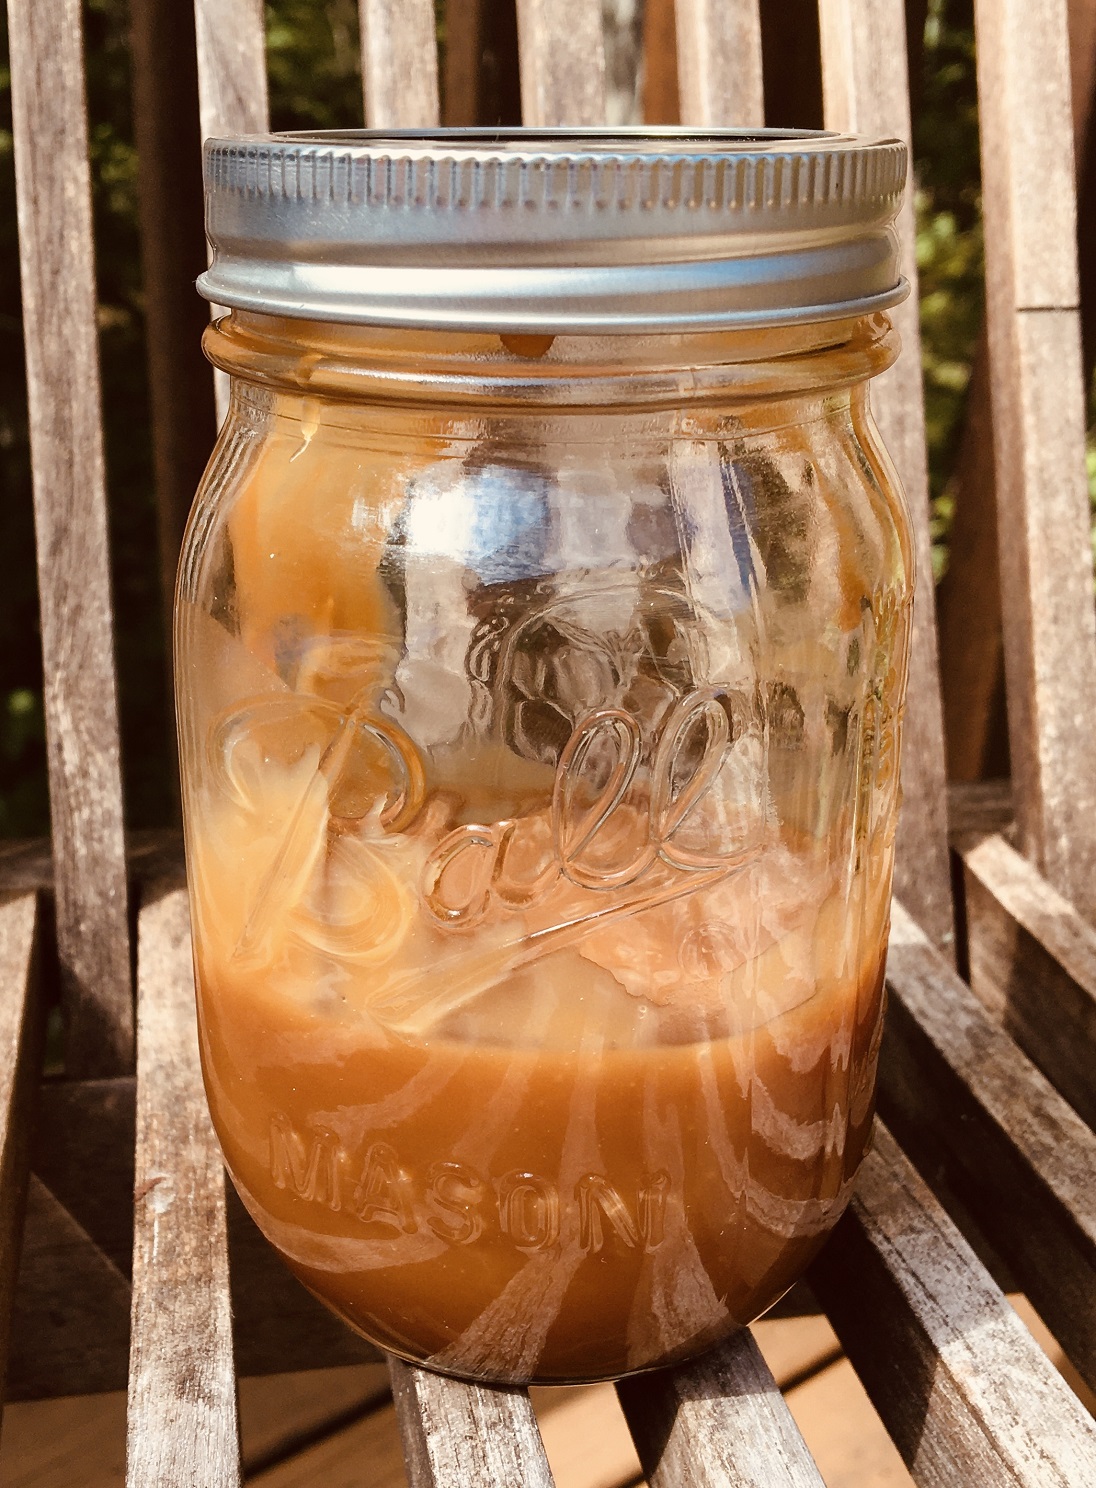
So I have been baking since I was ten years old. I sort of enter a transcendental state when mixing up butter, sugar, flour and creating something delicious and decadent to eat. I love to bake cakes, cookies, bars, muffins…you name it. But candy (which may not really be considered baking?) has always been off the list. It seems intimidating and too complicated with the requisite thermometers and equipment. Then I figured out how to make homemade Salted Caramel sauce (Without a Candy Thermometer). As they say, necessity breeds invention so let’s take a moment to visit Brittany, France a beautiful seaside region known for its sel (salt!).
Salted Caramel Paradise in Brittany
We visited Brittany in France last summer. I promise to share our fantastic trip at some point. We stayed in a seaside village called Concarneau. In addition to eating plenty of fresh seafood and shellfish we discovered French salted caramel (By the way, Brittany or Bretagne is known as a shellfish capital with the most incredible oysters!).
The American craze for salted caramel sauce is apparently pre-dated by several centuries in France. Salted caramel can be found in many Breton shops and is absolutely delicious thanks to something called Guérande sea salt which is an essential ingredient along with the famous Breton beurre (butter!) which is another main ingredient to caramel.
Of course the Sunday’s Bread family brought home a case of the Breton salted caramel drug…oops I meant sauce but sadly it was all gone far too soon. My thoughts turned to how can I make this delectable treat? ? And, what about my aversion to candy thermometers? Is it even possible
Yes it is. This recipe for salted caramel sauce is so delicious, and it does NOT need a thermometer. I adapted the recipe for caramels from the Fannie Farmer cookbook (which my mom gave me when I was about 18).
Not saying I will not try candy recipes requiring a thermometer at some point but as a first step, this is perfect – and it comes out so delicious every time. Oh, and it takes about 15 minutes to make – and you may just want a spoon handy! And if there is any left over, homemade salted caramel sauce is a lovely gift!
6Tablespoonssalted butter cut into six tablespoon pieces Room temperature
1/2cupheavy creamYou could use light cream (but not milk)
1teaspoonof sea salt or to taste
Instructions
Melt the sugar in a heavy bottomed saucepan stirring constantly and watching carefully to make sure it does not burn. Sugar will turn into an amber colored substance at this point.
Once sugar is completely melted, immediately add the butter. Be careful in this step because the caramel will bubble rapidly when the butter is added.
Stir the butter into the caramel until it is completely melted, about 2 minutes. If you notice the butter separating or if the sugar clumped up, remove from heat and stir quickly to combine it again. I wear gloves and use a splatter screen at this step. Keep whisking until it comes back together, even if it takes 3-4 minutes. It will eventually– just keep whisking. Return to heat when it’s combined again.)
Very slowly drizzle in 1/2 cup of heavy cream while stirring. Since the heavy cream is colder than the caramel, the mixture will rapidly bubble when added. Allow the mixture to boil for 1 minute. It will rise in the pan as it boils. Watch that it does not boil over.
Remove from heat and stir in 1 teaspoon of salt. Allow to slightly cool down before using. Caramel thickens as it cools.
Cover tightly and store for up to 1 month in the refrigerator. Caramel will thicken in the refrigerator. You can reheat in the microwave or on the stove to desired consistency.
Notes
This recipe can be made ahead and stored in the refrigerator for a few days. You can also freeze it for 3 months in an airtight container. I love storing my caramel in a Mason Jar (see photo). As it makes a lovely gift, I have been known to make my own labels too.
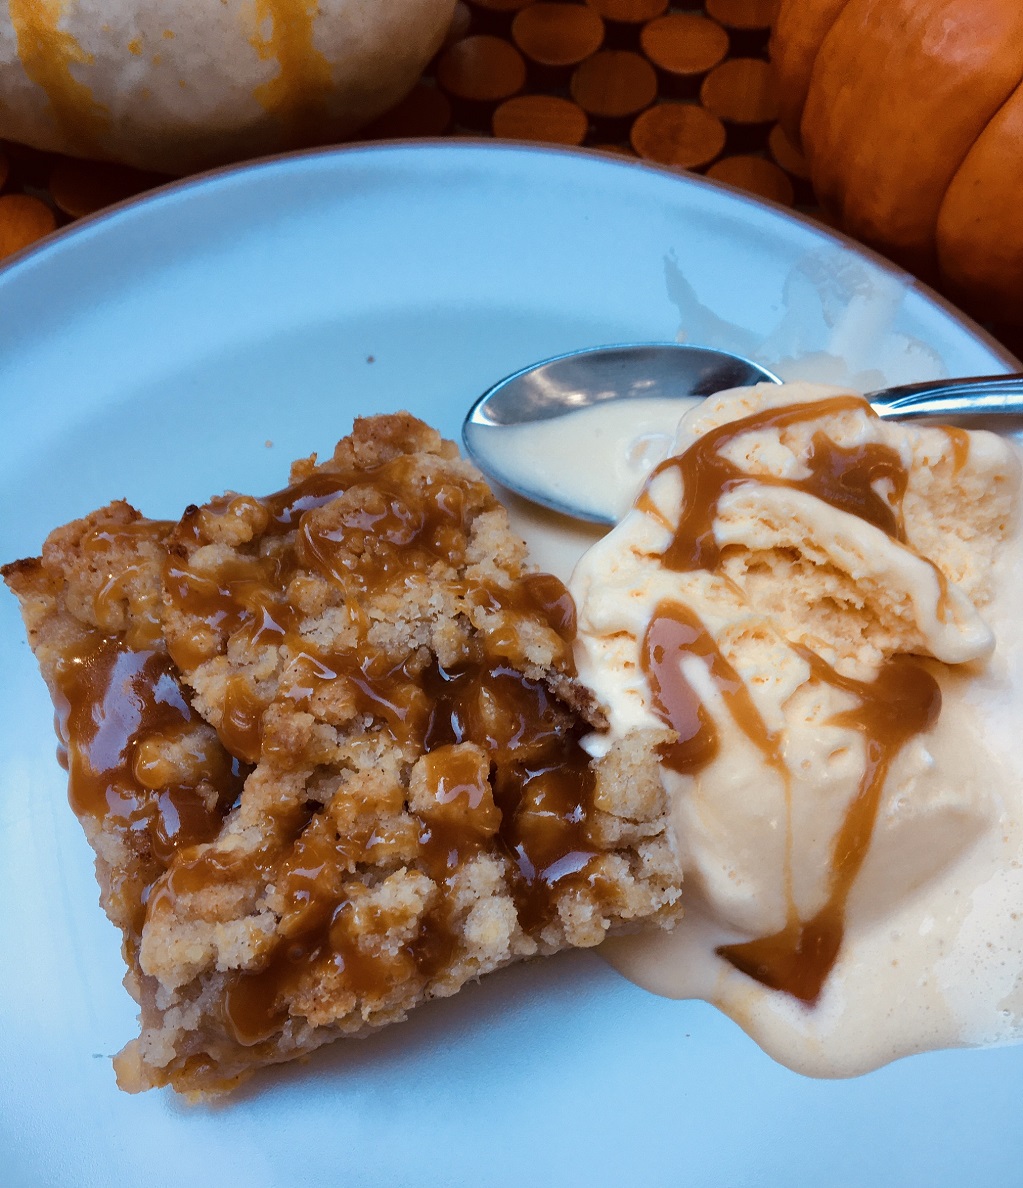
This weekend I made Apple Crisp Bars with Salted Caramel Drizzle after a fun morning picking apples (Cortland, Jonah Gold were in the orchard). I used the basic recipe for the topping and crust from my Blueberry Crumble Bars recipe. It worked perfectly with the apple topping. I have recently discovered the ease of making salted caramel (promise it is easy!) so I decided to top the Apple Crisp Bars with some Salted Caramel (recipe coming tomorrow I promise!).
What kinds of apples do you use to make Apple Crisp Bars with Salted Caramel Drizzle?
This time of year Cortland and Jonah Gold are available for picking in Connecticut so I used both of those. I also had a Granny Smith apple from the supermarket which I threw in for some tartness. A mix of apples will give you the most complex flavors.
Were they hard to make?
No! Remember to use cold butter for that extra crumbly texture. I also love a pinch of ground ginger and of course cinnamon. You should also line your pan with foil. That makes it easy to remove the bars and then I use a pizza cutter to cut them into squares.
What to serve with the bars?
In our house we love ice cream so we had French vanilla ice cream as a side. Whipped cream would have also been delicious and if you love chocolate I don’t see any reason why you could not serve chocolate ice cream or even drizzle a little chocolate sauce on top.
Apple Crisp Bars with Salted Caramel Drizzle
Addictive salted caramel drizzled apple crisp bars have a tender apple-pie like filling on a buttery shortbread crust and crumbly topping. The best apple crisp but in bar form!
4cups500 g apples peeled, cored and thinly sliced (about 4-5 medium apples2)
2Tablespoonsall-purpose flour
½teaspoonof cinnamon
1/4cup50 g granulated sugar
For the Bottom Layer & Top
1and 1/4 cup all-purpose flour spooned & leveled
1/2cupgranulated sugar
1/2teaspoonbaking powder
10tablespoonsunsalted butter cold1/2 cup plus 2 tablespoons. It is very important that the butter is cold as that is what helps keep the topping crumbly.
1large egg
1tablespoonpacked brown sugar
1tablespoongranulated sugar
1teaspoonof cinnamon
⅛teaspoonof nutmeg
¼teaspoonof dried gingeroptional
Instructions
Preheat the oven to 375F degrees. Line an 8×8 inch square baking pan with aluminium foil and grease with butter or shortening.
In a separate large bowl whisk together the flour, 1/2 cup granulated sugar and the baking powder.
Cut in the butter & egg yolk using a fork until the mixture is crumbly.
Press about two thirds to three quarters of the mixture into the bottom of the prepared pan. Pour the apple mixture over top.
To the rest of the flour mixture, stir in the brown sugar and remaining 1 tablespoon of granulated sugar.
Crumble the remaining dough over the apple mixture using your hands to distribute on the top.
Bake in the oven for about 45 minutes, until you see the juices from the apples and the crumble layer starting to turn golden.
Allow to cool fully to room temperature and ideally put in the refrigerator to chill . Then lift the bars out of the pan using the aluminium foil overhang and cut into squares. I used a pizza cutter which worked well. I also let the bars warm to room temperature which really brings out the flavors.
Make the salted caramel and while warm drizzle on top!
Notes
Using a mix of apples will give you the most complex apple flavor. I love pairing tart Granny Smith with a milder Jonah Gold or Cortland.
Hi there from me and G, my darling dog and best work-at-home buddy! The temperatures dropped in the New York area, and it is feeling like autumn! I love fall but have to say, I do not want summer to go especially with the pandemic likely forcing us all inside. On the bright side, I absolutely love this time year for decorating, cooking and entertaining. So today I am starting a series of posts on Best Fall 2020 Cooking, Recipes and Decorating.
Apple Crisp Bars with Salted Caramel Drizzle
This weekend was perfect for apple picking, and we picked a bunch. I decided to adapt my blueberry crumble bar recipe to make a divine apple crisp bar. I could not stop there though, so I also made some homemade salted caramel to drizzle on top (and of course had to have some French vanilla ice cream on the side). These apple crisp bars are divine – with their sweet, salty, caramely drizzle, soft apple filling and decadent shortbread crust and topping – as you may have guessed, they did not last one day. Recipe to come!
Apple crisp bars with salted caramel drizzle
The easiest Crockpot Butternut Squash Soup
It was not all sweet stuff though. College girl told me that she loves butternut squash (who knew?), and that she wanted butternut squash soup. So I made the easiest butternut squash soup ever in the crockpot. Shh…it also has carrots, onion and other healthy ingredients (she normally hates carrots…picky toddlers can grow up to be picky teens!)
We headed to the shore Sunday and came back on the late side so to have that soup ready was fantastic. I served the soup along with a green salad and Mr. SB’s famous roast chicken. His roast chicken always comes out perfectly. There is something about being French that gives you natural talent for creating a perfect roast chicken…must be genetic! I also served my roast fingerling potatoes coated with Penzey’s Northwood’s spice which is a favorite. Will post these recipes soon (except the roast chicken…he won’t disclose his secrets).
More cooking and recipes!
In the blog world, apparently you need to be thinking ahead so I also cooked a test batch of turkey soup with wild rice – also delicious and super cheap to make if you have leftovers (can easily sub chicken for the turkey). But I will save sharing the recipe until after Thanksgiving when you will be pulling your hair out trying to figure out what to do with all that leftover turkey!
About a year ago, I started this blog and guess what? My first post was the best-ever pumpkin bread! Life got in the way (#2020) so I had to put my blog dreams on hold until recently, but am happy to share that recipe. It is delicious and healthier than the usual you find out on Pinterest.
Fall online shopping
Lastly, I had to do some fall shopping online (well maybe not “had to”). As the budget minded girl I am I headed to Target.com and found this awesome long sweater. It is so cozy. I decided to buy it in another color too. I love the yellow, teal and aqua and will pair that one with black and grey. At 5 foot 4, I am an extra small. It does run long but I love the fit (see above pic).
Fall decorating
I finally cleared the deck of dead plants (keeping it real here!) and bought some mums for that space and the front step. I also dug out my fall wreath. I found this one that would work well on Amazon but I am re-using one from a season past. More to come on the decorations. I just ordered these darling pumpkins from Target. At $5 each they are a steal, and I love the neutral colors and texture which will work well with my other fall entertaining. Well I promise recipes will be up soon! Check back for more best fall 2020 cooking, recipes and decorating.
How are you preparing for fall 2020? Any good recipes or tips to share?
Hello! Welcome to Money Mondays, a series of posts dedicated to women and personal finance. Today, we focus on your financial future (promise…it will be illuminating!). So, let’s start with a surprising thought. What if I told you that by curbing your latte and salon nails habit you could have $34,000 in ten years? And $100,000 in twenty years? Or $208,000 in 30 years!!!!
But I love my latte…. and salon nails are my “me” time!
Before digging in, I would like to say that personal finance is, well, personal. What you choose to spend your money on is up to YOU. The point of this post is to present an example of how one hypothetical woman’s choice can lead to an extra $34K to $200K in her bank account! This savings effort amounts to thousands of dollars that she can use to spend, continue to save or give away.
I am using the nails/coffee example as those are two luxury services that many women I know (including me) spend money on. This is not a judgment but rather an easy example to point out how YOU have choices on how to spend your money. And, those choices have a real impact on your wallet and your life.
If you spend and save intentionally, then you are making good choices with your money and can maximize what you do with that money whether it be to save for a house or a car or that vacation you have been dreaming about…again, every woman is different, and I am not here to judge! Only you can decide what you want your financial future to look like!
Lattes and nails a fun math example!
Math fun? It sure is fun when we are talking about growing your bank account. Spoiler alert: you will have access to a financial calculator that does the heavy lifting for you.
Let’s take a look at how much that designer coffee and professional manicure costs in my corner of Connecticut.
What you spend:
Regular (not spa) manicure $10 plus $2 tip
Fancy coffee at Starbucks $6
Assuming a 30-day month:
Having your nails done once a week is $48 a month and $576 spent in a year.
Daily coffee at Starbucks is $180 a month or $2,160 in a year.
If you add them both up, daily coffee plus weekly manicures cost $2,736 in a year.
So, then do you take $2,736 and just multiply by 10 to get what you would have in ten years? Not quite. (Unless you stuck that money in your mattress and it earned nothing). In that case, you are not taking into account the interest earned and compounded or something finance geeks like me call The Time Value of Money.
Let’s geek out and see how savings over time impacts YOUR financial future.
On day 1 of every finance class (trust me on this topic – I have taken many finance classes in college and grad school) the professor starts out with a concept called the Time Value of Money. Fortunately, you can skip the pain of sitting through a finance class as I am going to explain the idea right here.
The Time Value of Money means that $1 today is worth more than a $1 tomorrow. Why? Because today you can take that dollar and invest it and earn interest on it, thus tomorrow that dollar will be worth more!
Now that Finance 101 is done, let’s move on for the fun part.
How much could you save with DIY nails and coffee?
While on a daily or weekly basis nails and designer coffee do not seem like much of an expense, let’s think about if we changed these two habits over the span of 10, 20 or 30 years (or in other words your financial future!).
First, we need to calculate the true cost of doing it yourself (DIY). You will need to buy yourself some nail supplies and coffee plus creamer/milk/sweetener if you like. Let’s deduct those costs from the savings we calculated above for DIY nails and coffee.
Is your latte killing your financial future?
Coffee: Cost of brewing at home versus Starbucks
Now, according to the Specialty Coffee Association of America, one pound of coffee is enough to make 48 6-ounce cups of coffee. I just bought a pound of coffee at Trader Joe’s for $4.99 on Friday. So at that price ($4.99 divided by 48), the cost per drink is $.10 cents a cup. Because I like milk and sweetener I am adding another 9 cents to my totalling .19 cents per cup. (As a side note, I always heat or froth my milk – and put it in a pretty mug so it is exactly as I like it, and as if I am at Starbucks).
Fancy coffee at Starbucks $6 a day, minus .19 cents so your savings from not going to Starbucks on a daily basis and making your own coffee at home equals approximately $5.81 per day.
DIY nails
Nails: Paint your own or professional manicure
Salon manicures in my area cost $12. If you deduct the cost of buying nail polish and a few supplies which I estimate to be $8 a month (possibly less depending on what you buy) then the cost is roughly $10 a week if you had nails done every week.
With 52 weeks in a year:
Coffee ($5.81 a day $174 a month, and then multiplied by 12 months) = $2,091
Nails = ($10 a week, $40 a month and then multiplied by 12) = $480
So, the savings is $2,091 plus $480 = $2,571 for a year of savings for being an DIY er and not going to a professional barista or manicurist.
Use a financial calculator to see where you end up in 10, 20 or 30 years
Ladies, I hate math. Yes, I majored in finance but the dirty little secret is that you do not have to know much math in business or even finance unless you are trading options. The rest of business math is pretty straightforward, and I had mastered it in middle school (you heard it here…my job to break is it down for you)! Fortunately, there are handy dandy calculators to help you figure all of this out. Here is one I like.
How much money do I have in 10, 20, 30 years?
Plug in $1 to start into “Starting principle” (just fancy for how much money do you have now)
Then plug in your interest rate. Let’s use 6% which is a conservative rate for a long-term investment (more on investing at a later date).
10 is your “n” (or number of years)
$2,571 is your payment (Remember the savings calculated above. This is the amount you would have from DIY coffee and nails)
Voila! The magic number is – $34K (and if you make your payment at the start of the year you have another $2K for $36K)
And in 20 or 30 years? Compound Interest is more fun than you think!
How did that happen? Well, your money earned money through the interest. The larger sum then continued to earn money. You kept putting in more money from doing your nails, brewing your own coffee. Like a snowball that is rolling down the hill, the money gets bigger and bigger and bigger.
Let it snow…
Let it snow!
In fact, if you did this for twenty years, you would have approximately $100K. How about 30 years? You would have $200K! All for brewing a cup of Joe at home and doing your own nails, and putting the savings into an account that earns 6%!!!
Ugh…I don’t want to think about my financial future! Why are you picking on my two favorite things to do for myself?
Ladies, I started out by saying that personal finance is personal. I use these examples as illustration only! In my case I really like my double, skinny latte with a dash of mint. I also really like the way the nail salon does my nails! But when I run these numbers I realize that for me, an occasional visit to the nail salon or visit to Starbucks to meet a friend more than satisfies my need. The rest of the time I make it myself or do my own nails. You may be different.
Your Starbucks may be the place you get work done and compared to renting office space, it is downright cheap!
Or the weekly nail salon trip is your time alone and a mental health saver. Certainly much cheaper than therapy.
I am totally fine with that! My non-negotiables are getting my house professionally cleaned every other week. I am sure I could save money doing it myself but honestly those five hours are gold to me…so again, it is not my place to tell you how to spend your money. I would like you to think about how you spend affects your financial future.
My hope is that you will start to think about choices. Maybe you clean your house but heading to the nail salon is your must have. Or maybe like me you like to travel so doing some stuff yourself is a small price to pay for seeing the world.
Plug in your own examples. Maybe you could cut $25 off your grocery bill? Or do you really need to dry clean? What if you bought clothes that were easy to maintain? Take your savings and plug them into the financial calculator. Play around with the interest rate, years you can save and see how you feel. When you see your the “facts” or what you could have making a certain decision it all becomes very interesting.
What do you spend money on? And where do you save? Do you put that savings into an account that earns interest? Please leave a comment below and join me on social media to chat about it too!
DISCLOSURE: Sunday’s Bread and any content in it exists to thought provoke and learn from the community. Your financial decisions are yours alone, and we are in no way responsible for your actions.
Instant pot chicken curry has quickly become a family favorite around here. It is creamy, simple, flavorful and can be made in 30 minutes flat. This recipe is also gluten, dairy free and low-carb so it checks a lot of boxes. I use a mild curry powder (which you can add heat to if you prefer your curry spicier).
What is curry?
Curry means sauce with spice. It also refers to any variety of dishes in a number of countries that uses a combination of spices. The word “curry” was created by the British in the 19th century when India was still a British colony. Curry is actually anglicized for kari, a word that means sauce.
Curries can be found in India, Southeast Asia and the Caribbean. Indian style curry powder dates to the 18th century when it is thought that Indian merchants prepared spice blends for the British Colonial government and army who would return to Britain. The primary spices found in Indian style curry powder are coriander, cumin and turmeric (which gives the blend the signature yellow color). By the way, traditional Indian chefs and cooks do not use curry powder. This recipe is admittedly an Americanized Indian curry (but I am OK with that as it is delicious).
Is curry healthy?
This dish has numerous healthy ingredients. Indian style curry powder typically has turmeric in it. Turmeric has been shown to reduce inflammation. There are over 12,000 peer reviewed studies that show the benefits of turmeric!
Other healthful ingredients include onions which are high in antioxidants. Chicken provides vitamins, minerals and protein. This dish is also versatile so you could add in some peas or other vegetables. Carrots, celery and peppers would all make nice additions.
What do you need to make this Instant Pot Chicken Curry?
Spices are at the heart of any curry, and this Instant Pot Chicken Curry is no different. Toasting the spices in coconut oil extracts the spices’ flavors (please do not skip that step!).
This dish calls for a few spices that you should be able to find at any major grocery store chain. If you can not, I highly recommend Penzey’s spices which are always fresh and delicious.
Here are the spices you will need:
Indian Curry Powder: Make sure you check the spice level. Typically you can find hot or sweet curry powder (or if it is not marked, it is likely on the milder side). The last time I made Indian Chicken Curry I used McCormick’s brand which was not too hot and should be widely available.
Garam Masala: Garam Masala is a warming spice blend which can vary dramatically depending on the location in India. You should add the Garam Masala at the end of a dish.
Ground Cumin: Cumin is from a plant found from India to the Middle East and has a nutty, distinctive taste (it is also often used in Mexican cuisine). I used my local supermarket’s brand which worked well.
A note on other ingredients:
I used Costco’s Kirkland organic chicken tenderloins which cook quickly and are easy to chop and are well priced.
I also use full fat coconut milk (canned). Fresh lime and chopped cilantro add some freshness, and cut the richness of the curry.
How do you make Instant Pot Chicken Curry
I started off by saying how easy this recipe is – and it is! The full recipe is below but here are a few notes.
First you toast the spices (all except Garam Masala) in coconut oil for a couple of minutes which really adds a great flavor dimension. As it is made in the Instant Pot you can simply do this with the saute function (love my Instant Pot…one pan to clean!). Another important step is to deglaze the pan of the brown bits. This is a classic step in many dishes and once again with an Instant Pot it is super easy.
Instant Pot Chicken Curry
Instant pot chicken curry is easy, full of flavor and a recipe the entire family will love. Creamy curry sauce with tender chunks of chicken and vegetables make a go-to weeknight dinner as you can have it on the table in 30 minutes flat.
2lbboneless skinless chicken breast or tenderloinsI like Kirkland, organic chicken tenderloins
1tspsalt
1Tbspcornstarch
1can coconut milkfull fat
Cilantro and/or parsley chopped to taste
Fresh lime juiceto taste
Instructions
Instructions
Press the “Saute” function on your Instant Pot. Add coconut oil and heat for a minute or two. Add in the curry powder, cumin and turmeric. Stir continuously to toast the spices, 1-2 minutes.
Add the onion, garlic, and ginger. Stir to coat in the spices and saute for 2 minutes. Watch carefully to ensure the mixture does not scald (add a spoonful of water if it seems to be over cooking).
Add the tomato paste and stir with the onions. Cook 1-2 minutes.
Add ½ cup chicken broth to the pot. Stir and scrape up any browned bits.
Add the diced chicken and salt and stir all ingredients.
Press the “Cancel” button to turn off the “Saute” setting. Secure the lid, ensure the pressure valve is set to “Sealing” then program to High Pressure for 5 minutes. It will take 8-10 minutes for the pot to come to pressure. Perform a quick release once the timer goes off.
Mix the cornstarch with one tablespoon of water in a small bowl. Whisk briskly until smooth. Pour the cornstarch mixture and coconut milk into the pot, then stir; simmer 2-3 minutes or until the sauce has thickened. Add the Garam Masala with one minute left.
Add the fresh lime juice and cilantro. Taste for seasoning and add salt if needed. Serve immediately over steamed rice or serve with Naan or pita bread.
We have visited over 10 national parks with our girls. Each one has been unique, breathtaking and full of ways to be active in the great outdoors. Today’s post is the first in a series about visiting the National Parks with kids – specifically what our expectations were for our trips, versus reality.
Expectation: Breathtaking scenery
Yes, we decided to travel across the country on several occasions for the pure beauty of the parks. This expectation was met and then some! What we did not expect was the sheer diversity. From the grandeur of the Grand Canyon, the majesty of the old growth forests in Olympic National Park, to the almost surreal scenery of Bryce Canyon, each park has been so unique and gorgeous. None disappointed in any way.
Expectation: The kids might be bored
Wrong. Our girls loved the parks at every age. We started visiting when our youngest had finished second grade and our oldest, fourth. They were the perfect age to become Junior Rangers. The Junior Ranger program has a self guided scavenger hunt, puzzles, and other activities that lead you to explore the park. At the end the girls would receive a badge. Each park has a unique Junior Ranger program, and they are all very educational with lots of science and often history.
Our girls also loved to hike, watch for wildlife and visit the historic sites. Where else could you pick fresh fruit from an orchard originally planted by pioneers (Capital Reef)? Or see the names of pioneers or Native American Hieroglyphs etched into the cliffs? (also Capital Reef).
Many of the places we stayed did not have Internet access. Guess what? We played board games, drew, listened to music and read. We also brought books on CD or used audible (more recently) to listen to books on long car rides. Many of the parks protect the night sky too so star gazing is amazing. Worried about boredom when visiting the National Parks with kids? No need…plenty of old fashioned fun to be had (and everyone is tired at night after hiking, rafting, touring).
Expectation: There would be numerous places to eat and stay outside the parks
Well, this one really depends on where you are visiting. Coming from the East Coast where you can’t throw a stone without seeing a highway exit with restaurant signs – we had a few surprises. After leaving Grand Canyon to drive to Zion we went hours without seeing a restaurant (and fast food would have been fine!). I highly recommend that when you start your tour, go to a store and stock up on snacks as well as a cooler. Fortunately we had done this so our girls were happily munching on fruit and Chex Mix until we found a place to eat. I also like to pack some breakfast items such as granola or muffins to eat when we stayed where breakfast was not included (time and money saving!).
Expectation: The highlight of the day would be the National Park
Hah. So with school age kids, our expectation was that they would be as enthused as we were to see such amazing sights. For the most part they loved it. However, in our case we often stayed outside the parks in chain hotels such as the Hilton Garden Inn, or Marriot Courtyard. These hotels often had a swimming pool and free breakfast. Let’s just say that usually around 3 p.m. our girls could not wait to hit that swimming pool. Oh, and as I do not buy sugary cereals…the hotel free breakfast was usually a hit too. So while I would not say that swimming pools and Fruit Loops were the highlight…they were a close second after the sights in the park.
Expectation: The parks are not really untouched and can be crowded
Ok, so in some of the parks there were crowds. Yellowstone had tour busses filled with tourists from abroad. Yet, 99% of those tourists would descend to see Old Faithful and get back on the bus. One ranger told us that fewer than 2% of visitors ever go beyond a mile or so from the main attractions. This fact presents a great opportunity if you do want to go off the beaten path.
In our case we ventured beyond the main attractions, and then you are really removed from the crowds. We stayed on the hiking trails, had a map, plenty of water and snacks and were able to see some amazing sights such as geysers and waterfalls with either no people around or one or two. In some parks you have to watch out for bears – they do not like surprises so we would often sing as we hiked to give them fair warning! We did see a bear twice but once from afar (a Grizzly mama and her cubs running across the plains of Yellowstone and a brown bear which the Park Rangers shooed away when he was too close to people). The parks do sell bear spray too if you are worried.
In general the parks are very wild and you need to heed all of the precautions. We always checked into the main park ranger station and reviewed the weather reports, spoke to the park rangers and outlined our day. We also followed directions and did not sit too close to the rim at Grand Canyon or at any of the incredible water falls we have visited. I can’t tell you how many people were not following those precautions. My theory is that people are used to visiting Disney and think they are safe like it is a ride. It is not! Heat can also be an issue in the Southwestern parks so you need to bring plenty of water and not stay out too long.
Final thoughts
In general, our expectations were exceeded at all of the National Parks we have visited with our kids. Visiting the National Parks is budget friendly, educational, fun and a great way to make memories with your family. Check back as I continue this series on the National Parks. My next post for Travel Tuesdays will be our two week tour of the Southwest National Parks including Grand Canyon, Bryce, Zion, The Arches, Mesa Verde and more.
So glad you are here. Money Mondays will be our time to chat about money and women (and how you can avoid being one of the statistics!). Sound boring? Scary?
Join me weekly, and I promise to break it down into easy-to-digest steps. Grab a cup of coffee while we chat about how to save money, what to do with your savings, how to set short and long-term goals, budget tips and more.
One of the reasons I started this blog is that I am passionate about money and women. Why? Well, in my own circle, some of my girlfriends and family members seem to struggle with money – whether saving enough for a goal or how to invest.
Some of these women have had unfortunate circumstances such as losing a spouse or being on the short end of a divorce. Or maybe they left the workforce to care for family, and now may be facing a spouse’s job loss. Lastly, attitudes do not help. The patriarchal past that states that men are in charge of money still seems to be alive and well in certain families.
Unfortunately society often tells girls they don’t have to learn about money. It is too hard. Or that their fathers and husbands will take care of them. Ladies, a man is not a financial plan. Make sure you understand how to take care of yourself. If you never have to then knowing how (and taking the steps to ensure you will be fine financially) will just be a nice insurance.
Still not sure you believe me? Read on for a few more stats.
Money and women in America
I started researching women and personal finance, and found my own circle was pretty indicative of the rest of the country.
Here are a few stats:
According to the U.S. Census, women are more likely than men to be single parents
Women live longer with an average life expectancy of 81 years compared to 73 for men
50% of marriages end in divorce
Women are more likely to leave the workforce to care for family. On average women are out of the workforce 15% of their eligible working years compared to 1.6% of men. As a result, women have lower social security benefits and sometimes difficulty earning an income when trying to return (Women’s Institute for a Secure Retirement).
Women occupy the majority of the lower paying, service jobs
According to the U.S. Census the average age of widowhood is 55 years old
80 to 90% of women will be solely responsible for their finances at some point in their lives due to divorce and longer life expectancies than men.
How can I help with money and women?
In my corner of the Internet – I am intent on helping other women succeed with money.
Full disclosure, I am not a professional financial advisor. Certified financial advisors can be excellent support and certain cases warrant one. Here I will be sharing what I have learned.
What is my background? One of my college majors was finance. I then went on to work in banking for five years for one of the largest banks in the country. After that I earned my MBA.
I will not be sharing complex stock option trading strategies. This blog will be focused on basic, practical advice around savings and investing – and my own experiences that have enabled me to reach my financial goals.
A bit more background
My father grew up in the depression and let’s just say Bob imparted a strong understanding of savings, investing and money for his daughters. I realize how lucky I am and how other women were not part of that conversation growing up. He was also very frank about getting a job that would support me financially after college. No basket weaving allowed!
Money is not boring
You see, personal finance may be sort of dry but what you can do with your money is not boring. We women often focus on being caregivers which is a wonderful and admirable trait. However, ladies, taking care of your money can mean taking care of your family, your life – and freedom from worry so you can spend your time doing what means most to you.
How great is it to be able to provide the kind of education for your children that you envision? Or a secure retirement for yourself so you won’t be a burden? Or maybe your dream house or vacation to make those family memories?
Join me for Money Mondays!
So let’s change that…come join me Mondays as we discover the world of personal finance to help you achieve your goals. We will take a topic every week ranging from savings (how to save, budget, where to put your savings) to investing (how you can build a bright future with investments).
How does your circle of female friends fare in the personal finance department? I welcome your comments.
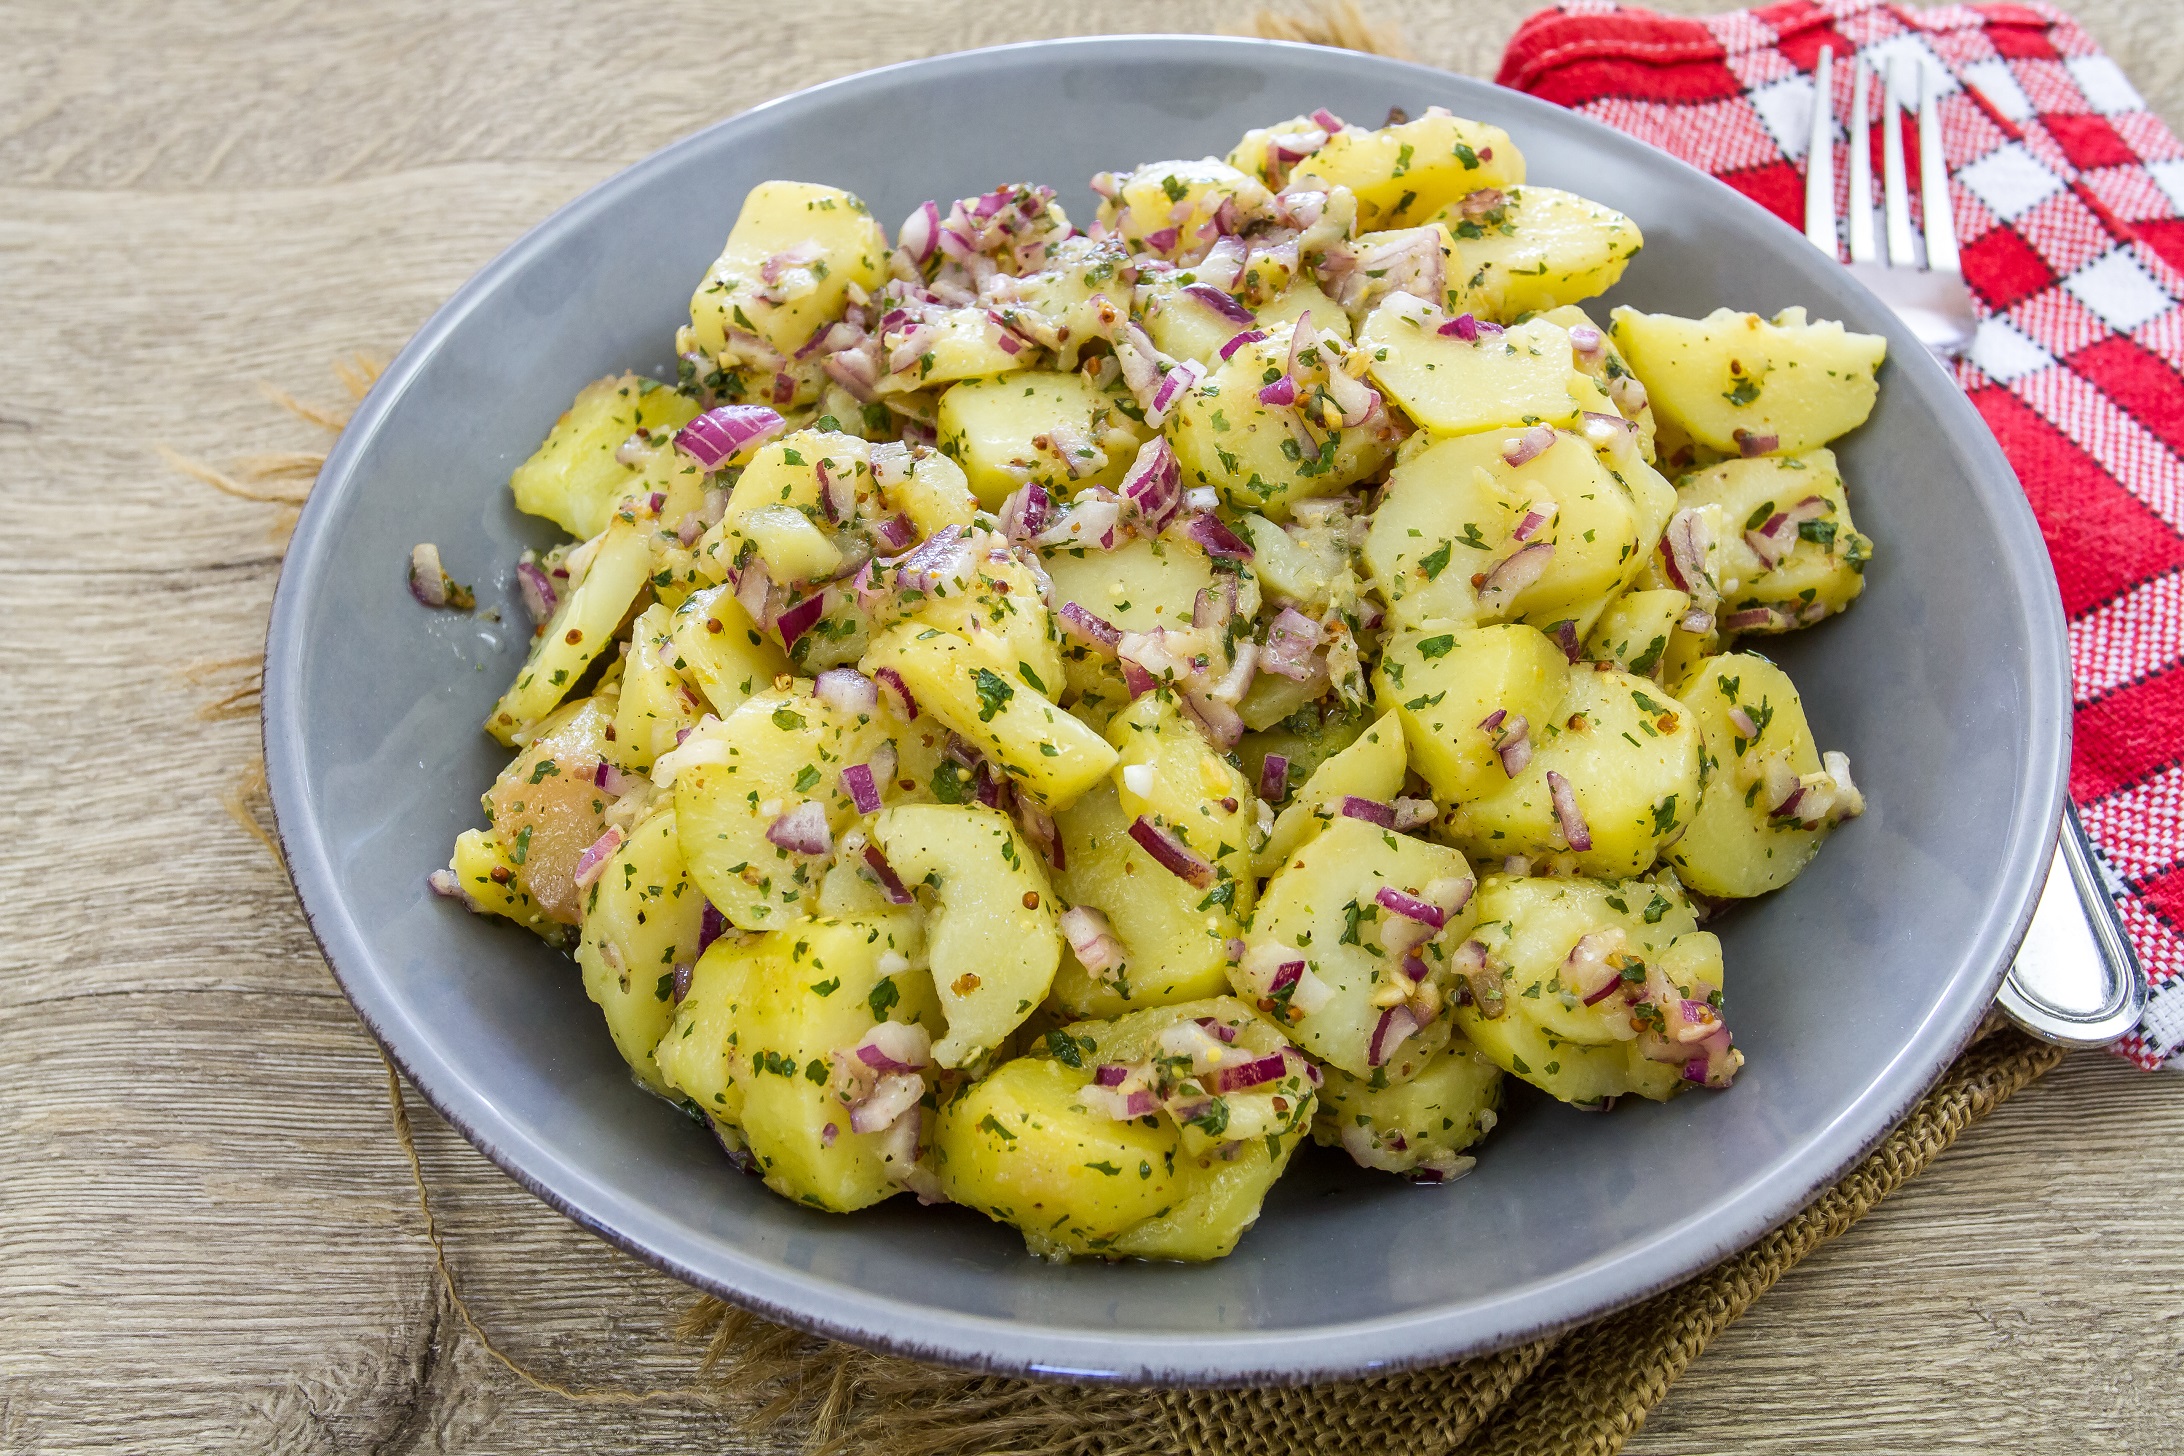
I prepared this super flavorful, easy potato salad recipe (No Mayo) this morning. It is delicious, full of flavor, and I promise it comes out perfect every time! No mushy, watery potatoes here. The tangy vinaigrette is French inspired with a hint of Dijon mustard and plenty of herbs. This is the sort of potato salad I grew to adore on my many trips to France. I also like mayo sometimes but not on my potato salad.
I serve this potato salad warm, at room temperature or chilled. Furthermore, it will last in the fridge for up to five days (if you do not eat it all at once…it is that good!). And, it is vegan, vegetarian and gluten free so it will please many eaters.
Creamy new (or thin skinned) potatoes are paired with an herby vinaigrette dressing which combines virgin olive oil, wine vinegar and Dijon mustard. Add a crunch of red onion, a bit of chives and a generous dose of herbs and you have a perfect potato salad recipe. And bonus – if you can find a mix of potatoes as I did, the purple variety is particularly healthy!
Where does potato salad originate?
Potato salad is German but varieties also come from France. Americans have embraced potato salad, and there are many varieties both with mayo and no mayo. Historians believe that potatoes originated in South America. Peru is well known for having many varieties of potatoes – up to 400!
Are potatoes healthy for me?
Potatoes have a bad rap as adding to weight gain and being full of carbs. However, the way you prepare them makes a huge difference. Deep fried potatoes for chips and fries are high in carbs, fats and calories, and the deep-frying removes much of the nutrition. Simply boiled or baked potatoes are full of fiber and contain plenty of vitamin C. I used a mix of heirloom fingerling potatoes today, and was happy to find out on Dr. Axe that they are very high in vitamins and antioxidants.
Can I substitute some of these ingredients?
Yes. This potato salad recipe is very versatile. You can add in chopped celery, hard cooked eggs, other fresh herbs such as basil and cilantro. Experiment with what you like best!
Potato Salad Recipe (No Mayo)
Tender, creamy new potatoes are combined with a tangy, French inspired dressing. Finely chopped red onions add crunch and fresh and dried herbs add bold bursts of flavor.
2poundsheirloom potatoes or thin skinned red potatoes
2TBSgranulated sugar plus a ½ teaspoon for vinaigrette
4TBSwhite wine or red wine vinegar – divided in half
Kosher salt
Freshly ground pepper
Garlic salt to taste
1TBSof Herbes de Provence
½cupextra virgin olive oilI like Kirkland
3-4clovesgarlic – minced
2tspDijon mustardGrey Poupon works well
¼ – ½tspcrushed red pepper flakes
½cupfresh parsley – gently packed & chopped
¼cupfresh dill – gently packed & chopped
2TBSof fresh chiveschopped
1small red onion – finely dicedabout ¾ cup
Instructions
Instructions
Wash and quarter potatoes: It is important that you half or quarter the potatoes (depending on their size) so that all of the pieces are close to the same size. If the sizes vary, then some of the potatoes will become over cooked (this is where mushy potatoes happen!). You will also want to wash and chop your herbs, onion, garlic at this point too so that making the dressing moves quickly.
Cook the potatoes: Cover potatoes with cold water in a large sauce pan. Add potatoes and bring the water to a gentle boil over high heat. Once boiling add in 2 tablespoons of salt, 2 tablespoons of the sugar and 2 tablespoons of vinegar. Reduce heat to maintain a simmer and cook, stirring occasionally, until the potatoes are fork tender, about 9-11 minutes. Drain the potatoes in a colander and transfer to a large mixing bowl.
While the potatoes are cooking, make the dressing: In a small bowl, whisk together oil, garlic, remaining 2 tablespoons of vinegar, Dijon, crushed red pepper flakes, Herbes de Provence and a ½ teaspoon of sugar. Season with 3/4 teaspoon of kosher salt and ¼ teaspoon ground black pepper. Whisk until fully combined. Add in the parsley, chives and dill. Stir until combined. Set aside.
Finish the potato salad: Drizzle half of the dressing over the warm potatoes and gently toss to combine. Add in the red onion. Combine gently again. Drizzle in the remaining dressing to taste. Gently combine until everything is coated. Taste and adjust for seasoning with salt and pepper.
Serve the salad: Serve warm, at room temperature or chilled. If serving warm and right away, let it sit out on the counter for at least 10 minutes for the flavors to come together.
Notes
Do NOT continuously boil the potatoes at a high heat or you run the risk of the potatoes falling apart, and becoming mushy/watery.As soon as you drain the potatoes toss in the dressing. Warm potatoes soak up the dressing. Cold potatoes will not (and the dressing could become congealed when it hits the cold potatoes).
TGIF. It was a short, jam packed week around here. While Monday was so nice to have as a holiday, I found I paid for all it week at work cramming five days of work into four! I had intentions to blog more…but am catching up Friday afternoon with my first style post. For this first post I thought I would share my fashion philosophy and give you three quick ways to save money online shopping.
Some background about me + fashion
I have always loved clothes, fashion and shopping. Growing up my friends and I followed fashion religiously. My mom and sisters loved to shop and we were always on the hunt for a great bargain.
If you have read anything about me, you know that I have spent a great deal of time in Paris, France. I lived there as an exchange student, college student, and I married a Parisian. I soaked in that French woman style, and it never left me. Visiting the capital of fashion gave me a great appreciation for high quality clothing and accessories. I can’t wait to share more about French style in coming posts!
In my twenties I also worked for a New York City based bank in the retail and fashion sector. So many of my clients were name brand fashion companies. I worked in the fashion district right on Broadway (Broadway is more than a theater district btw!). I was spoiled with designer sample sales.
Pandemic online shopping
So all of this has made me a fashion junky and quite a bargain hunter! Fast forward to now. I love online shopping and especially during the pandemic. I was already an avid fan but not having to go out has made life easier and safer. I am so thankful for our UPS and postal workers! So let’s get to the good stuff – there are some easy ways to save money online shopping.
How to save money online shopping
Ok, there are a number of apps, sites and even blogs dedicated to saving money online shopping. Some of these are just too time consuming. One that is not is Rakuten (which was formerly Ebates).
For Rakuten, you simply go to the Rakuten site before you start shopping. Today they are even offering $10 back when you sign up. Plug the retailer into their search bar to see if there is a percentage of your shopping trip back. In my case, I use their browser add-on so Rakuten will pop up and tell me if there is cash back.
Or let’s say I head over to Ann Taylor a pop up appears and I simply click the button. Rakuten will give me 2% back today on my shopping trip.
So 2% may not seem like much, but it adds up for a family shopping! My teen girls also love fashion so they use it too. My last check was $60…I don’t know about you, but an extra $60 for spending 2 seconds hitting a button for my shopping trips is well worth it!
Rakuten also covers more than just fashion – travel, beauty products, electronics and even some business services. Most major retailers participate (e.g., Kohls, Amazon, Macys, Ann Taylor, Loft, J Crew etc.)
Rakuten sends out a check every quarter. My checks have ranged from $9 to $100.
Save money online shopping with Honey automatic promo codes
So teen daughter told me about Honey. Honey is another browser extension that is super easy. Let’s say you are shopping at Macy’s and you know you saw some promotion codes somewhere. Honey automatically reviews your purchase and applies the coupons for you. I also installed the browser extension.
Per the Honey website, the average yearly savings for a member is $126 – again not bad for something that takes very little time and actually saves you time and effort.
Save money online by checking blogs
There are numerous blogs out there dedicated 100% to saving money! A few you may be interested in:
There are many more and I promise to share. Oh, and I am starting a series on Mondays called (you guessed it) Money Mondays. Tune in this coming Monday for the launch post. As I mentioned above, I started my career in finance and can’t wait to share money saving tips as well as resources to help you invest and reach your goals.