Visiting the National Parks with Kids: Expectations Versus Reality

We have visited over 10 national parks with our girls. Each one has been unique, breathtaking and full of ways to be active in the great outdoors. Today’s post is the first in a series about visiting the National Parks with kids – specifically what our expectations were for our trips, versus reality.

Expectation: Breathtaking scenery

Yes, we decided to travel across the country on several occasions for the pure beauty of the parks. This expectation was met and then some! What we did not expect was the sheer diversity. From the grandeur of the Grand Canyon, the majesty of the old growth forests in Olympic National Park, to the almost surreal scenery of Bryce Canyon, each park has been so unique and gorgeous. None disappointed in any way.

Expectation: The kids might be bored

Wrong. Our girls loved the parks at every age. We started visiting when our youngest had finished second grade and our oldest, fourth. They were the perfect age to become Junior Rangers. The Junior Ranger program has a self guided scavenger hunt, puzzles, and other activities that lead you to explore the park. At the end the girls would receive a badge. Each park has a unique Junior Ranger program, and they are all very educational with lots of science and often history.

Our girls also loved to hike, watch for wildlife and visit the historic sites. Where else could you pick fresh fruit from an orchard originally planted by pioneers (Capital Reef)? Or see the names of pioneers or Native American Hieroglyphs etched into the cliffs? (also Capital Reef).

Many of the places we stayed did not have Internet access. Guess what? We played board games, drew, listened to music and read. We also brought books on CD or used audible (more recently) to listen to books on long car rides. Many of the parks protect the night sky too so star gazing is amazing. Worried about boredom when visiting the National Parks with kids? No need…plenty of old fashioned fun to be had (and everyone is tired at night after hiking, rafting, touring).

Expectation: There would be numerous places to eat and stay outside the parks

Well, this one really depends on where you are visiting. Coming from the East Coast where you can’t throw a stone without seeing a highway exit with restaurant signs – we had a few surprises. After leaving Grand Canyon to drive to Zion we went hours without seeing a restaurant (and fast food would have been fine!). I highly recommend that when you start your tour, go to a store and stock up on snacks as well as a cooler. Fortunately we had done this so our girls were happily munching on fruit and Chex Mix until we found a place to eat. I also like to pack some breakfast items such as granola or muffins to eat when we stayed where breakfast was not included (time and money saving!).

Expectation: The highlight of the day would be the National Park

Hah. So with school age kids, our expectation was that they would be as enthused as we were to see such amazing sights. For the most part they loved it. However, in our case we often stayed outside the parks in chain hotels such as the Hilton Garden Inn, or Marriot Courtyard. These hotels often had a swimming pool and free breakfast. Let’s just say that usually around 3 p.m. our girls could not wait to hit that swimming pool. Oh, and as I do not buy sugary cereals…the hotel free breakfast was usually a hit too. So while I would not say that swimming pools and Fruit Loops were the highlight…they were a close second after the sights in the park.

Expectation: The parks are not really untouched and can be crowded

Ok, so in some of the parks there were crowds. Yellowstone had tour busses filled with tourists from abroad. Yet, 99% of those tourists would descend to see Old Faithful and get back on the bus. One ranger told us that fewer than 2% of visitors ever go beyond a mile or so from the main attractions. This fact presents a great opportunity if you do want to go off the beaten path.

In our case we ventured beyond the main attractions, and then you are really removed from the crowds. We stayed on the hiking trails, had a map, plenty of water and snacks and were able to see some amazing sights such as geysers and waterfalls with either no people around or one or two. In some parks you have to watch out for bears – they do not like surprises so we would often sing as we hiked to give them fair warning! We did see a bear twice but once from afar (a Grizzly mama and her cubs running across the plains of Yellowstone and a brown bear which the Park Rangers shooed away when he was too close to people). The parks do sell bear spray too if you are worried.

In general the parks are very wild and you need to heed all of the precautions. We always checked into the main park ranger station and reviewed the weather reports, spoke to the park rangers and outlined our day. We also followed directions and did not sit too close to the rim at Grand Canyon or at any of the incredible water falls we have visited. I can’t tell you how many people were not following those precautions. My theory is that people are used to visiting Disney and think they are safe like it is a ride. It is not! Heat can also be an issue in the Southwestern parks so you need to bring plenty of water and not stay out too long.

Final thoughts

In general, our expectations were exceeded at all of the National Parks we have visited with our kids. Visiting the National Parks is budget friendly, educational, fun and a great way to make memories with your family. Check back as I continue this series on the National Parks. My next post for Travel Tuesdays will be our two week tour of the Southwest National Parks including Grand Canyon, Bryce, Zion, The Arches, Mesa Verde and more.

Welcome to Money Mondays!

So glad you are here.  Money Mondays will be our time to chat about money and women (and how you can avoid being one of the statistics!).  Sound boring?  Scary? 

Join me weekly, and I promise to break it down into easy-to-digest steps.   Grab a cup of coffee while we chat about how to save money, what to do with your savings, how to set short and long-term goals, budget tips and more.

One of the reasons I started this blog is that I am passionate about money and women.  Why?  Well, in my own circle, some of my girlfriends and family members seem to struggle with money – whether saving enough for a goal or how to invest.  

Some of these women have had unfortunate circumstances such as losing a spouse or being on the short end of a divorce.  Or maybe they left the workforce to care for family, and now may be facing a spouse’s job loss.  Lastly, attitudes do not help.  The patriarchal past that states that men are in charge of money still seems to be alive and well in certain families.  

Unfortunately society often tells girls they don’t have to learn about money.  It is too hard.  Or that their fathers and husbands will take care of them.  Ladies, a man is not a financial plan.  Make sure you understand how to take care of yourself.  If you never have to then knowing how (and taking the steps to ensure you will be fine financially) will just be a nice insurance.  

Still not sure you believe me?  Read on for a few more stats.

Money and women in America

I started researching women and personal finance, and found my own circle was pretty indicative of the rest of the country.   

Here are a few stats:

  • According to the U.S. Census, women are more likely than men to be single parents
  • Women live longer with an average life expectancy of 81 years compared to 73 for men
  • 50% of marriages end in divorce
  • Women are more likely to leave the workforce to care for family.  On average women are out of the workforce 15% of their eligible working years compared to 1.6% of men.   As a result, women have lower social security benefits and sometimes difficulty earning an income when trying to return (Women’s Institute for a Secure Retirement).
  • Women occupy the majority of the lower paying, service jobs 
  • According to the U.S. Census the average age of widowhood is 55 years old
  • 80 to 90% of women will be solely responsible for their finances at some point in their lives due to divorce and longer life expectancies than men.

How can I help with money and women?

In my corner of the Internet – I am intent on helping other women succeed with money.  

Full disclosure, I am not a professional financial advisor.  Certified financial advisors can be excellent support and certain cases warrant one.  Here I will be sharing what I have learned.  

What is my background?  One of my college majors was finance. I then went on to work in banking for five years for one of the largest banks in the country.  After that I earned my MBA.  

I will not be sharing complex stock option trading strategies.  This blog will be focused on basic, practical advice around savings and investing – and my own experiences that have enabled me to reach my financial goals.

A bit more background

My father grew up in the depression and let’s just say Bob imparted a strong understanding of savings, investing and money for his daughters.  I realize how lucky I am and how other women were not part of that conversation growing up.  He was also very frank about getting a job that would support me financially after college.  No basket weaving allowed!

Money is not boring

You see, personal finance may be sort of dry but what you can do with your money is not boring.  We women often focus on being caregivers which is a wonderful and admirable trait.  However, ladies, taking care of your money can mean taking care of your family, your life – and freedom from worry so you can spend your time doing what means most to you.  

How great is it to be able to provide the kind of education for your children that you envision?  Or a secure retirement for yourself so you won’t be a burden?  Or maybe your dream house or vacation to make those family memories?

Join me for Money Mondays!

So let’s change that…come join me Mondays as we discover the world of personal finance to help you achieve your goals.  We will take a topic every week ranging from savings (how to save, budget, where to put your savings) to investing (how you can build a bright future with investments).

How does your circle of female friends fare in the personal finance department?  I welcome your comments.

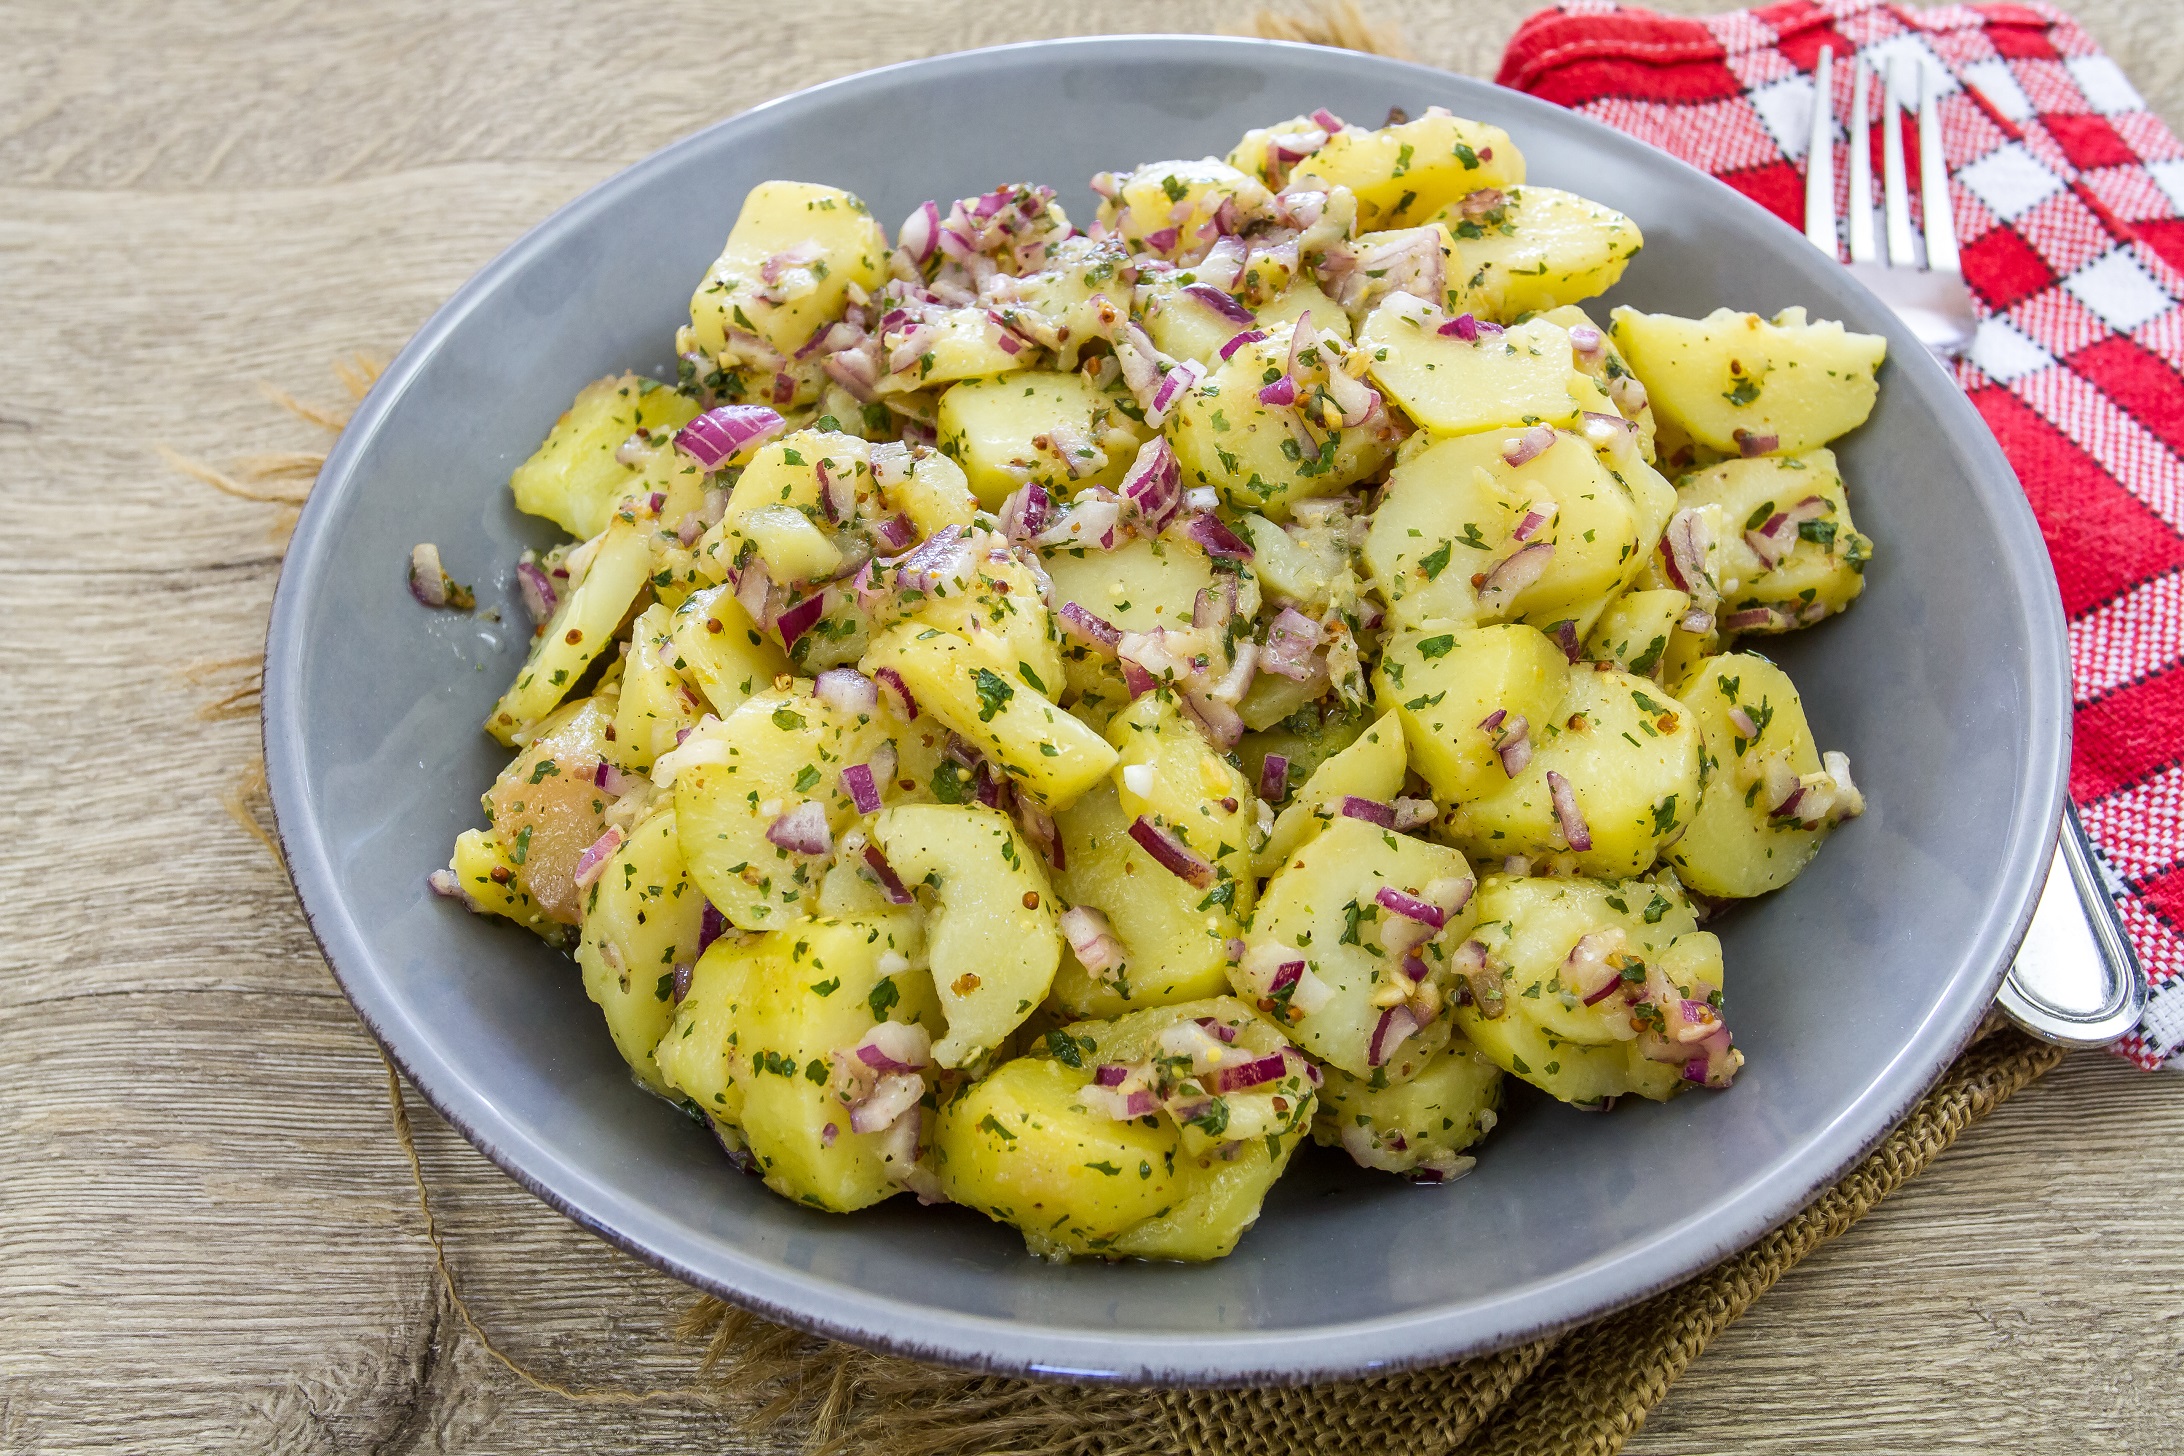
Potato Salad Recipe (No Mayo)

I prepared this super flavorful, easy potato salad recipe (No Mayo) this morning.  It is delicious, full of flavor, and I promise it comes out perfect every time!  No mushy, watery potatoes here.  The tangy vinaigrette is French inspired with a hint of Dijon mustard and plenty of herbs.  This is the sort of potato salad I grew to adore on my many trips to France.  I also like mayo sometimes but not on my potato salad.

I serve this potato salad warm, at room temperature or chilled.  Furthermore, it will last in the fridge for up to five days (if you do not eat it all at once…it is that good!).  And, it is vegan, vegetarian and gluten free so it will please many eaters.

Creamy new (or thin skinned) potatoes are paired with an herby vinaigrette dressing which combines virgin olive oil, wine vinegar and Dijon mustard.  Add a crunch of red onion, a bit of chives and a generous dose of herbs and you have a perfect potato salad recipe.  And bonus – if you can find a mix of potatoes as I did, the purple variety is particularly healthy!

Where does potato salad originate?

Potato salad is German but varieties also come from France.  Americans have embraced potato salad, and there are many varieties both with mayo and no mayo.  Historians believe that potatoes originated in South America.  Peru is well known for having many varieties of potatoes – up to 400!

Are potatoes healthy for me?

Potatoes have a bad rap as adding to weight gain and being full of carbs.   However, the way you prepare them makes a huge difference.  Deep fried potatoes for chips and fries are high in carbs, fats and calories, and the deep-frying removes much of the nutrition.  Simply boiled or baked potatoes are full of fiber and contain plenty of vitamin C.  I used a mix of heirloom fingerling potatoes today, and was happy to find out on Dr. Axe that they are very high in vitamins and antioxidants.

Can I substitute some of these ingredients?

Yes.  This potato salad recipe is very versatile.  You can add in chopped celery, hard cooked eggs, other fresh herbs such as basil and cilantro.  Experiment with what you like best!

Potato Salad Recipe (No Mayo)

Potato Salad Recipe (No Mayo)

Tender, creamy new potatoes are combined with a tangy, French inspired dressing. Finely chopped red onions add crunch and fresh and dried herbs add bold bursts of flavor.
Print Pin
Course: Salad, Side Dish
Cuisine: American, French, German
Keyword: Potato, Salad, Sides
Prep Time: 20 minutes
Cook Time: 11 minutes
Servings: 6
Cost: $5

Equipment

  • Equipment
  • Large Saucepan
  • Small mixing bowl
  • Whisk

Ingredients

Ingredients

  • 2 pounds heirloom potatoes or thin skinned red potatoes
  • 2 TBS granulated sugar plus a ½ teaspoon for vinaigrette
  • 4 TBS white wine or red wine vinegar – divided in half
  • Kosher salt
  • Freshly ground pepper
  • Garlic salt to taste
  • 1 TBS of Herbes de Provence
  • ½ cup extra virgin olive oil I like Kirkland
  • 3-4 cloves garlic – minced
  • 2 tsp Dijon mustard Grey Poupon works well
  • ¼ – ½ tsp crushed red pepper flakes
  • ½ cup fresh parsley – gently packed & chopped
  • ¼ cup fresh dill – gently packed & chopped
  • 2 TBS of fresh chives chopped
  • 1 small red onion – finely diced about ¾ cup

Instructions

Instructions

  • Wash and quarter potatoes: It is important that you half or quarter the potatoes (depending on their size) so that all of the pieces are close to the same size. If the sizes vary, then some of the potatoes will become over cooked (this is where mushy potatoes happen!). You will also want to wash and chop your herbs, onion, garlic at this point too so that making the dressing moves quickly.
  • Cook the potatoes: Cover potatoes with cold water in a large sauce pan. Add potatoes and bring the water to a gentle boil over high heat. Once boiling add in 2 tablespoons of salt, 2 tablespoons of the sugar and 2 tablespoons of vinegar. Reduce heat to maintain a simmer and cook, stirring occasionally, until the potatoes are fork tender, about 9-11 minutes. Drain the potatoes in a colander and transfer to a large mixing bowl.
  • While the potatoes are cooking, make the dressing: In a small bowl, whisk together oil, garlic, remaining 2 tablespoons of vinegar, Dijon, crushed red pepper flakes, Herbes de Provence and a ½ teaspoon of sugar. Season with 3/4 teaspoon of kosher salt and ¼ teaspoon ground black pepper. Whisk until fully combined. Add in the parsley, chives and dill. Stir until combined. Set aside.
  • Finish the potato salad: Drizzle half of the dressing over the warm potatoes and gently toss to combine. Add in the red onion. Combine gently again. Drizzle in the remaining dressing to taste. Gently combine until everything is coated. Taste and adjust for seasoning with salt and pepper.
  • Serve the salad: Serve warm, at room temperature or chilled. If serving warm and right away, let it sit out on the counter for at least 10 minutes for the flavors to come together.

Notes

Do NOT continuously boil the potatoes at a high heat or you run the risk of the potatoes falling apart, and becoming mushy/watery.
As soon as you drain the potatoes toss in the dressing. Warm potatoes soak up the dressing. Cold potatoes will not (and the dressing could become congealed when it hits the cold potatoes).

Save Money Online Shopping

TGIF. It was a short, jam packed week around here. While Monday was so nice to have as a holiday, I found I paid for all it week at work cramming five days of work into four! I had intentions to blog more…but am catching up Friday afternoon with my first style post. For this first post I thought I would share my fashion philosophy and give you three quick ways to save money online shopping.

Some background about me + fashion

I have always loved clothes, fashion and shopping. Growing up my friends and I followed fashion religiously. My mom and sisters loved to shop and we were always on the hunt for a great bargain.

If you have read anything about me, you know that I have spent a great deal of time in Paris, France. I lived there as an exchange student, college student, and I married a Parisian. I soaked in that French woman style, and it never left me. Visiting the capital of fashion gave me a great appreciation for high quality clothing and accessories. I can’t wait to share more about French style in coming posts!

In my twenties I also worked for a New York City based bank in the retail and fashion sector. So many of my clients were name brand fashion companies. I worked in the fashion district right on Broadway (Broadway is more than a theater district btw!). I was spoiled with designer sample sales.

Pandemic online shopping

So all of this has made me a fashion junky and quite a bargain hunter! Fast forward to now. I love online shopping and especially during the pandemic. I was already an avid fan but not having to go out has made life easier and safer. I am so thankful for our UPS and postal workers! So let’s get to the good stuff – there are some easy ways to save money online shopping.

How to save money online shopping

Ok, there are a number of apps, sites and even blogs dedicated to saving money online shopping. Some of these are just too time consuming. One that is not is Rakuten (which was formerly Ebates).

For Rakuten, you simply go to the Rakuten site before you start shopping. Today they are even offering $10 back when you sign up. Plug the retailer into their search bar to see if there is a percentage of your shopping trip back. In my case, I use their browser add-on so Rakuten will pop up and tell me if there is cash back.

Or let’s say I head over to Ann Taylor a pop up appears and I simply click the button. Rakuten will give me 2% back today on my shopping trip.

So 2% may not seem like much, but it adds up for a family shopping! My teen girls also love fashion so they use it too. My last check was $60…I don’t know about you, but an extra $60 for spending 2 seconds hitting a button for my shopping trips is well worth it!

Rakuten also covers more than just fashion – travel, beauty products, electronics and even some business services. Most major retailers participate (e.g., Kohls, Amazon, Macys, Ann Taylor, Loft, J Crew etc.)

Rakuten sends out a check every quarter. My checks have ranged from $9 to $100.

Save money online shopping with Honey automatic promo codes

So teen daughter told me about Honey. Honey is another browser extension that is super easy. Let’s say you are shopping at Macy’s and you know you saw some promotion codes somewhere. Honey automatically reviews your purchase and applies the coupons for you. I also installed the browser extension.

Per the Honey website, the average yearly savings for a member is $126 – again not bad for something that takes very little time and actually saves you time and effort.

Save money online by checking blogs

There are numerous blogs out there dedicated 100% to saving money! A few you may be interested in:

For Fashion:

Living in Yellow, A Thoughtful Place and Honey We Are Home all regularly list top sales and exclusive promo codes. I also really like their style so it is fun to follow them.

For general savings with a lot of online deals I like two in particular:

The Krazy Coupon Lady

Making Sense of Cents

There are many more and I promise to share. Oh, and I am starting a series on Mondays called (you guessed it) Money Mondays. Tune in this coming Monday for the launch post. As I mentioned above, I started my career in finance and can’t wait to share money saving tips as well as resources to help you invest and reach your goals.

Have a great weekend!

Mimi

Camping and the Best Mediterranean Pasta Salad

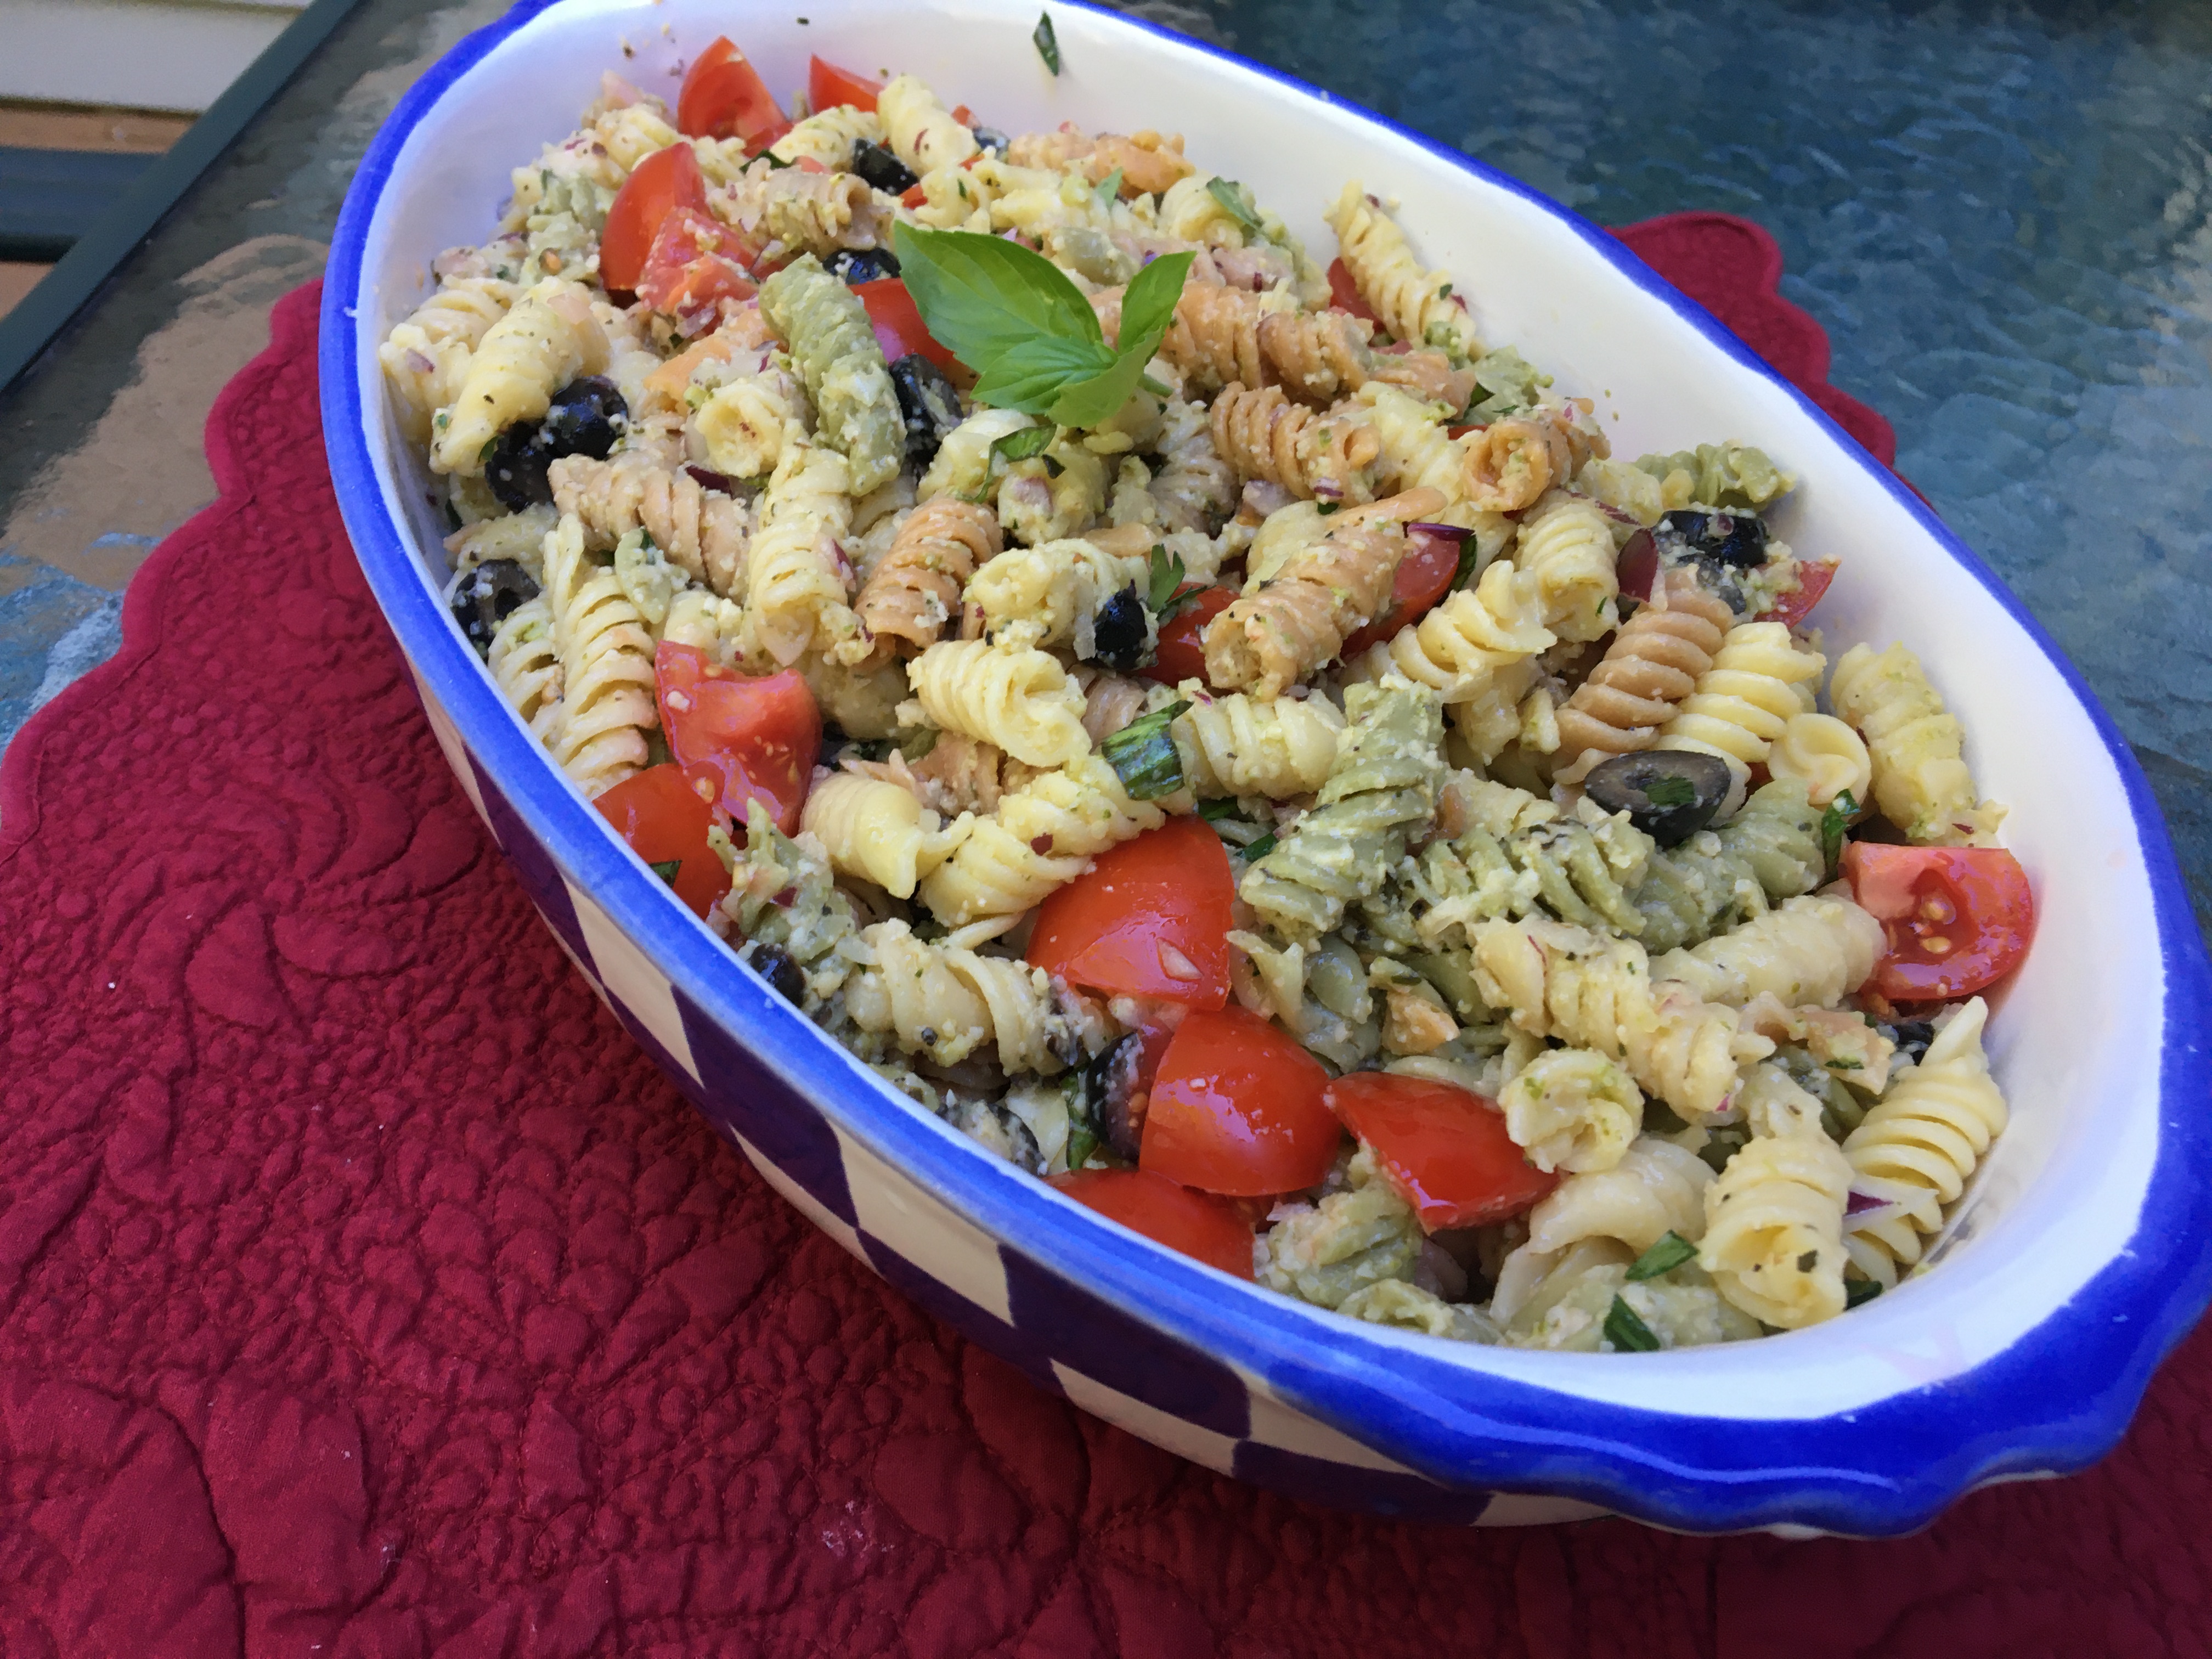
Nothing says summer picnic or cookout like pasta salad, and this Mediterranean pasta salad is my absolute favorite. I made it this weekend for a cookout and camping trip with friends.

Labor Day weekend was absolutely beautiful in CT, and we were blessed to be able to camp by the shore. While I have been a Girl Scout leader for both of my girls and have camped plenty of times at Girl Scout camp sites, I have never slept in a tent. Frankly I was worried…would I be able to sleep?

Would I Like Camping?

Well friends – I realize that I had always had mixed feelings about camping because I hated the cabins. They were often dusty, buggy and usually paired with a less than ideal restroom. While I adored the girls in the troop…they never would go to sleep!

The tent we borrowed from friends was airy, clean, and I could hear the bell on a channel marker out on Long Island sound. I loved it! (Don’t get me wrong a night or two is probably my limit…my bed felt pretty good the day after!).

Also, as you can see from my photos below, the sunrise was spectacular. I woke up when I heard the fishing boats leave at the crack of dawn.

Ribs and Mediterranean Pasta Salad

Of course we ate very well. Mr. SB made his famous ribs (someday I will get the recipe for his top secret basting sauce and share) and I made the Mediterranean Pasta Salad recipe below. It has a Mediterranean influence as it pairs black olives, tomatoes and basil with a creamy pesto, Caesar dressing. This recipe takes all of twenty minutes to make (I prep mix ins while the pasta is cooking). It is a family favorite.

Mediterranean Pasta Salad

Mediterranean Pasta Salad

Tri-color rotini coated in a delicious pesto, creamy Caesar dressing with thinly sliced olives, tomatoes, red onion and basil. A family favorite at family cookouts, camping trips and potlucks.
Print Pin
Course: Side Dish
Cuisine: American
Keyword: easy, Pasta, Side Dish, vegetarian
Prep Time: 20 minutes
Cook Time: 12 minutes
Servings: 6 people
Cost: $5

Equipment

  • colander
  • sauce pan

Ingredients

  • 12 ounce package tri-color rotini pasta cooked and drained
  • 1 cup creamy Caesar dressing I like Kens or Wishbone
  • 1/2 teaspoon coarse kosher salt
  • 1/4 teaspoon black pepper
  • 1 teaspoon garlic powder
  • 1/2 tablespoon of dried basil
  • 3 roma tomatoes diced
  • 1 6-ounce can black olives, drained and sliced (I like the Pearls brand which has a version that comes all sliced)
  • 1/4 cup finely diced red onion
  • ¼ cup of finely chopped red pepper
  • 3/4 cup shredded parmesan cheese
  • 6-10 fresh basil leaves cut into strips or torn into pieces, plus more for garnish, if desired
  • 1/4 cup basil pesto (Costco's Kirkland brand is my preferred)
  • 1/2 to 1 cup toasted pine nuts optional but adds a nice crunch

Instructions

  • Cook the pasta in a large pot of boiling, salted water according to package directions. Drain and coat with the creamy Caesar dressing while still warm.
  • Add the rest of the ingredients, except for the pine nuts if you are using them and extra basil. Toss well to combine. Add additional salt and pepper to taste, if needed.
  • Refrigerate until ready to serve (4-8 hours). If the pasta salad seems dry after refrigerating, add a little more Caesar dressing and stir to combine. Before serving, top with pine nuts and fresh basil, if desired.

5 Steps to Declutter & Organize Any Space

Welcome to 5 steps to declutter & organize any space in your home.

Why organize and declutter any space in your home? For starters, if you are like me you have a certain vision for your home. And, let’s just say this vision is not full of clutter, chaos and spending hours looking for lost items.

So this post is exactly how to approach how to organize & declutter pretty much any space – from a small drawer to an entire garage. But before I get to that I have a confession.  I am not a naturally organized person.  I am a clean person (phew let’s just get that out there). 

If you work with me, you would see I have had a messy office.  As a new mom (and a more seasoned mom) I never could get a handle on toy, clothes, you name it clutter and mess.   My own mother called me Messy Mimi when I was a kid (back then they did not sugarcoat it!). Honestly once I had my own home, I did not know how to declutter or organize in any meaningful and permanent way. I did not understand that similar to an exercise program – organization has to be an ongoing effort.

So I started where you may be at – trying to organize our home where you feel comfortable and relaxed and maybe don’t spend an hour looking for that permission slip/favorite sweater/fill in the blank.  

Sound familiar?  Sound like you could use some help?  Here are my recommended 5 steps to declutter and organize any space.  Trust me.  If a naturally messy person like me can do it.  You can too.

Declutter and Organize

Will share some photos of before and afters…and in-betweens too. To get you started, check out this before of the contents of the utility closet in the laundry room…a mix of vacuums, plastic bags, cleaning supplies, rags…you name it…I followed the steps below (and the after picture is at the end!).

5 Foolproof Steps to Organize Anything
Everything that was in the utility closet. A mess for sure!

Remove everything

  1. Take everything out of the space you are trying to organize (see photo above).  Ugh.  Really?  Yes.  Trust me.  This is a key step.  If you have a large space like a basement you could do this in sections.  The only way to see what you have is to take it all out.  Go ahead.  You can do it.

Sort

  1. Set up three areas and designate them as:  Keep.  Discard.  Give away.  
  2. Sort your stuff into those three categories.  So, I have never sorted items from a disorganized space and not found the following to happen:
    1. You will find things you thought you had lost
    2. It is likely you will find spare change or even dollars (I found $200 my mom had given me!)
    3. You will realize you have stuff that you do not need and will be able to either give it away or sell it.

Evaluate + Organize

  1. Assess the items you wish to keep and then think about how to store them.  A few storage tips:
    • Vertical storage is generally the best use of space.  So think up.  Could you put a multi-tiered shelf in that space?  
    • Break larger storage spaces into smaller.  So if you have a shelf then measure to put smaller storage containers into it.
    • Think about ways to minimize visual clutter. Instead of stacking school and office supplies buy some decorative boxes and then mark what is in each (see blog image for an example of inexpensive boxes from Ikea). Which leads me to….

Labeling

  1. LABEL, LABEL, LABEL  Why am I shouting that?  Because as a naturally messy person labeling keeps me honest.  I also often start out with the best of intentions on how I am going to store an item but then promptly forget a few weeks later.  Labeling also lets others in your home understand where an item goes.  This is even helpful for young kids and toys and any babysitters or others who may not understand your in your head organizing system.
    • I plan on a longer post just on labeling (yes it is that important). In the meantime, think about having some fun with labeling (fun?). Yes fun (maybe not like going to Disney or your favorite wine bar fun but fun in a creative, getting things done kind of way). Avery labels makes some pre-designed labels that you can print yourself or you can even buy pre-printed on Amazon. Avery has a great blog to check out for inspiration. More to come on labeling!

So now for the good part – here is the after of my utility closet after I followed five steps to organize and declutter any space. 

Years later I still have it organized and only need to do a simple refresh every once in awhile to remove cleaning product bottles that are basically finished.

Do you have any tips to share?

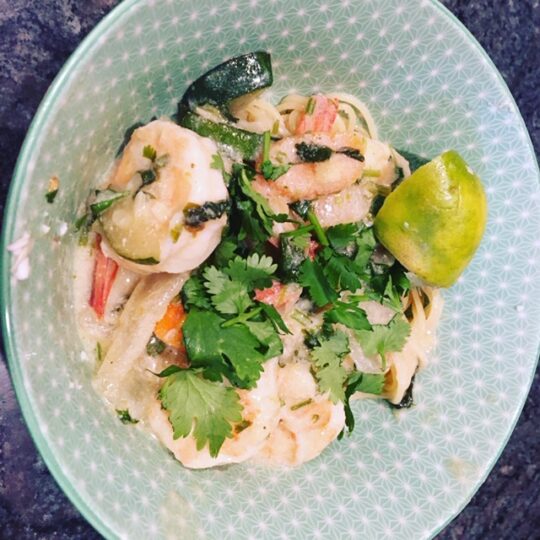
Easy Thai Green Curry with Shrimp and Noodles

Easy Thai Curry with Shrimp and Noodles is such an easy and delicious recipe. It can also be made vegetarian by replacing the shrimp with tofu.

Thai curry is usually one of my favorite take-out foods. The creamy coconut curry sauce paired with shrimp really hits the spot. The coconut milk offers a sweetness that is complemented by the heat of the curry. Vegetables, that are not cooked too much, round out the dish adding some crunch and plenty of vitamins and fiber to make Thai curry healthy too.

When I make Thai Curry with Noodles at home, I like to pile the curry over a mound of Thai rice noodles or regular linguine or maybe rice. Then I add just a squeeze of lime, and some chopped, fresh cilantro. Perfection.

An Easy & Budget-friendly Recipe

It was a great surprise when I realized how easy and versatile Thai curry is to make at home. Making a take-out copy cat at home is especially helpful these days when we are not going out to dinner as frequently (or hardly at all!). Similar to a soup or stew Thai curry with noodles is also a great way to use up vegetables – carrots, celery, onions, and this time of year zucchini!

You can also adjust the heat level (spice wise) to your own tastes. Additionally, I love this recipe because it uses the stems of cilantro. I hate waste! The stems are full of flavor and while they may not work in a salad they are perfect for curry.

By the way green curry refers to the green chilies used in the sauce. While its origins are Thai, apparently it has been adapted by Thai expats to the rest of the world.

As a last note, I really like Maesri curry paste. If you have an Asian grocery story you should be able to find this brand of curry there for a reasonable price. It is also available on Amazon.

Ok, so how do you make easy Thai-curry noodles?

Thai-curry with shrimp and linguine

Easy Thai Curry with Shrimp and Noodles

Easy Thai Curry with Noodles tastes like my favorite Thai restaurant version but at half the price.
Print Pin
Course: Main Course
Cuisine: Asian, Thai
Keyword: curry, dinner, easy, seafood, shrimp, tofu
Prep Time: 20 minutes
Cook Time: 25 minutes
Servings: 4
Cost: 15

Equipment

  • wok or frying pan
  • sauce pan
  • cutting board

Ingredients

Ingredients:

  • 12 oz linguine or asian noodles
  • 1 medium zucchini or as I note you can sub in other vegetables
  • 1 medium onion sliced thin
  • 1 clove of garlic minced
  • 1 to 2 tablespoons of Maesri green curry paste or another curry paste of your choice.
  • ¼ cup of fresh cilantro stems chopped
  • 2 to 4 tablespoons of vegetable oil I use avocado oil as it has a high heat point
  • 1 can of light coconut milk
  • 1 pound of uncooked shrimp peeled and deveined (if using tofu then chop into squares and drain liquid before adding to dish)
  • 2 limes for juice and garnish
  • A handful of fresh basil leaves Thai basil if you can find them – if not, standard basil leaves are tasty too.
  • Salt to taste
  • 1 tsp Cornstarch (optional)

Instructions

Instructions:

  • Cook noodles, linguine or rice to instructions.
  • In a large wok or frying pan saute the onion in a tablespoon of oil until translucent. Add the garlic and cook until fragrant. Remove onions and garlic from pan.
  • Cook the curry paste and cilantro stems in oil over medium heat until very fragrant. Stir frequently. Remove and put aside with onion mixture.
  • Add another tablespoon of oil. Saute the zucchini until bright green (you do not want zucchini to be olive green and they will cook a bit more with the sauce so keep that in mind). If using other vegetables such as carrots, then cook accordingly (carrots will take longer to cook than zucchini).
  • Put all the cooked vegetables back in the pan. Add the coconut milk. Season with salt. Bring to a simmer and cook about 2 minutes until thickened slightly.
  • Stir in shrimp and cook until opaque and pink
  • If sauce seems thin, add a teaspoon of cornstarch to thicken the sauce.
  • Remove from heat.
  • Serve over choice of noodles, rice or linguine. Serve with lime wedges and cilantro leaves.

Hard Rock Hotel Cancun Family Vacation Review

We love to travel and usually travel internationally with our girls at least twice a year. These days with the pandemic, I have been doing more #armchair travel and reminiscing about past trips. Today’s post is about a family vacation at the Hard Rock Hotel in Cancun.

Mexico is a favorite family destination, and we have stayed at the Club Med in Ixtapa and Cancun as well as the Hard Rock Hotel in Cancun. Today, I am sharing our review of the Hard Rock Hotel in Cancun, Mexico where we enjoyed a fabulous Spring break.

Why did we choose Cancun?

Our East Coast winters are tough….full of snow and ice. So, come April we are looking for guaranteed weather. Sunshine please. I have never had anything but spectacular, sunny weather in Mexico so we checked that box!

Second, Cancun is an easy trip from the East Coast. We leave out of New York airports typically, and you can get a direct flight to Cancun. So nice! We flew Jet Blue which on the way down was super easy, and we left New York in the morning and were at the hotel for a delicious, buffet lunch. The Cancun hotel district (where the Hard Rock is located) is about 15 minutes from the airport. Super convenient which is great for a one week vacation where you want to maximize your stay and not be traveling too much.

Why did we choose the Hard Rock Hotel Cancun?

We had stayed at the Hard Rock in Universal (Orland, Florida) (highly recommend). The food was delicious (we had chosen their club level for “free” h’ors d’oeuvres). They also have a nice points program.

For Cancun, we chose the all inclusive option at the Hard Rock hotel. Mr SB and I do not like to pay for every meal, drink and excursion when on vacation. So having it prepaid and knowing it met our budget was worth it as it relieves that constant nagging feeling and risk of over spending. It was also a great value. Pictures of the ocean and hotel did not hurt either…

Hard Rock Hotel Cancun Beach

Our Stay

So let’s get to the good stuff. What is it like to stay at the Hard Rock Hotel, Cancun?

First, there is never a dull moment. With two teen daughters we were looking for a place on the beach where there was always something to do and with an entertaining atmosphere. Let’s just say the HRHC has that in spades.

Ambience and Decor

The lobbies are decorated in the classic Hard Rock style of posters and memorabilia from famous bands and musicians. The activity is non stop. From the games in or beside the pool to the bands that play all day long to entertainment – magic shows, comediens etc. at night. If you want a quiet hotel this is probably not for you. With two teen girls – it was perfect.

The hotel has 601 rooms with a gorgeous location right on the ocean and the main beach in Cancun. One drawback – the exterior is a typical high rise hotel. This construction makes for some beautiful views but the exterior of the building is not that charming. For us this was not an issue as the gardens, pools, terraces and interior are lovely.

A Room with a View

Rooms face the bay or the ocean. I recommend the ocean view. It was worth the upgrade. Make sure you specify this when you reserve and that it is included in your deal. We did have some issues upon arrival with the “fine print.” The hotel staff graciously figured this out for us, and we had a spectacular view of the ocean with a balcony perfect for reading. There is also an opportunity for club level rooms which have their own pool. We opted for the regular (non club) room, and that level suited our needs perfectly. We actually enjoyed the constant pool activity.

The room was well appointed. The one drawback was a large jacuzzi tub which maybe some guests enjoy. We preferred to use the whirlpools by the pool, and the one in the room just took up space. The fridge was well stocked with complimentary rum and other alcohol. We also found that unnecessary but well – Cancun is a party town so depending on your tastes maybe that works for you.

Beach, Pool and Amenities

First the beach is spectacular as my photos show. White sand and clear blue water. On a windy day it can get rough so we did not swim too far out when there was a strong breeze.

Pool Hard Rock Hotel Cancun
Infinity pool at Hard Rock Hotel Cancun

There is also a gorgeous infinity pool pictured above with ocean views and two swim-up bars where I can assure you Mr. SB and I enjoyed a few mojitos and pina coladas.

Bar Hard Rock Hotel Cancun
Mojitos!

The girls and I also enjoyed the spa – very reasonably priced manicures and pedicures. Mr. SB and I even had massages. All wonderful.

The gym is beautiful – two floors outfitted with weights, Peloton bikes and more – and if you like there are fitness classes.

Dining and Restaurant Reviews

Ok now let’s get to the good stuff. Food. The food was delicious and with six restaurants there is a choice of Italian, Mexican, Japanese, South American (Churrascaria) and a buffet that serves all kinds of foods.

If you have picky eaters there was always pasta, fries, pizza and other items you would typically find on an American kids menu. Also, while sometimes travelers (Americans) can fall ill while visiting Mexico as they are not used to the water – we have never had an issue in Cancun or at the Hard Rock. They are used to travelers from all over the world and take the necessary precautions on site.

The Buffet

The breakfast area has an all you can eat buffet with smoothies (my favorite was the mango), American and Mexican breakfast items, and an omelet and pancake/waffle station. We love smoked salmon and that was a daily treat included on the buffet. The fresh fruit is amazing. With Mexico’s sunny climate you can count on mangos, watermelon, pineapple, melon and more.

Every day at the pool there are grills with delicious, fresh fish/meat, vegetables and more. They also served woodfired pizzas all day long.

We loved every restaurant and had difficulty choosing which one to go to each night.

Hard Rock Hotel Cancun Food

Zen – Sushi and Hibachi

Since we adore Asian food, Zen was a top choice. You can get hibachi or sushi. The space is a large and with the murals and hibachi chefs it makes for an entertaining evening.

Murals Zen Hard Rock Hotel Cancun
Murals at the Hard Rock Hotel Cancun Zen Restaurant

Ipanema – South American Steakhouse (Churrascaria)

Ipanema, the Brazilian churrascaria, was also delicious. All kinds of meat, poultry and seafood which they bring to your table to slice as well as an extravagant salad bar. The restaurant also looks out on the pool and ocean so if you sit in just the right spot the view is beautiful.

Frida – Upscale Mexican

Frida, the Mexican restaurant, has a fantastic decor and is actually outside (but covered). With low lighting and local Mexican art it really sets the mood. The food was super fresh and delicious (and if you have not had really good Mexican food you are in for a treat…this is a far cry from Mexican fast food commonly found and thought to be “Mexican food” in the States).

Frida Restaurant Hard Rock Hotel Cancun

Ciao – Elegant Italian Cuisine

Ciao, the Italian restaurant, is beautiful and has an upscale feel with neutral walls and rich, heavy drapes. The food is classic, upscale Italian and like the other restaurants – fresh and delicious.

Each restaurant was so different in terms of food and ambience that it was almost like leaving the hotel to go to a new place each night (but without the hassle!).

You may want to reserve even before you arrive if you have preferences.

Service at the Hard Rock Hotel Cancun

Everyone was so nice at the hotel. We had a favorite bartender who made delicious mojitos (both virgin and with alcohol). Service at meals was attentive and friendly. Our room was kept clean and tidy. I do recommend you make sure you put the door hanger out so the staff knows when it is free to clean. The women in the spa were lovely. My one negative was that the manicurist did not seem to know how to do a professional manicure. Nice enough for the price but an area for improvement. However massages were delightful and well priced.

What is there to do at the Hard Rock Hotel Cancun?

Well that is up to you. We opted to stay at the hotel enjoying the pool and beach to read and relax with occasional, long walks down the beach. The pool always has activity – games, dancing, bands…

There are numerous excursions available from the hotel. Mexico has a rich cultural heritage. You can take a full-day to the Maya ruins at Chichén Itzá (admission not included in the all inclusive pricing), the Ik Kil cenote, and Valladolid. If play is more your thing then there was a trip to a local water park.

You can also fish, sail and enjoy numerous other water sports. The hotel also has access to a golf course. In my opinion it was a bit hot to play golf but if you are an avid player or visiting when the temperature is more moderate, it is available.

Have you stayed at a Hard Rock Hotel? Have you visited Cancun? Please leave your comments below. I would love to hear your thoughts!

Blueberry Crumble Bars

Blueberry Crumble Bars are full of tangy blueberries with a hint of lemon atop a rich, shortbread crust and covered in a delectable, crumbly topping.

July is blueberry season, and Mr. SB picked up a huge container at Costco which ended up in the back of the fridge. Luckily I caught the berries before they went bad! And, even luckier, I found Deb Perelman’s (of Smitten Kitchen) recipe for Blueberry Crumb Bars to make a batch of delicious creations – think rich, short-bready, crumbly with a deep blueberry scrumptiousness that tastes like a summer’s day.

A few notes

Blueberry crumble bars were easy to make too, and will be part of our shore picnics for the rest of summer (if they make it past breakfast). I adapted the recipe slightly. As I made these in the evening I was feeling a bit lazy so I used bottled lemon juice and skipped the zest. I am sure it would be that much better if I used fresh lemon juice and took the time to grate the zest. Good news – the bars are unbelievable even with this shortcut.

I also ran out of granulated, white sugar so I had to sub in some brown sugar which actually I think added some depth. I also love a touch of cinnamon with any fruit dessert, and the amount I add does not clash with the lemon at all. And I used an entire egg. Part of me hates wasting the egg white when recipes call for just the egg yolk. Thriftiness took over this time and again, the results were amazing.

I refrigerated the bars overnight, and then took them out so they were room temperature for breakfast. I had a cup of coffee with mine on the deck. The girls each grabbed one too as part of breakfast. Great way to start the day – or end it. There is no bad time for a blueberry crumble bar!

Blueberry Crumble Bars

Blueberry Crumble Bars

Delicious, crumbly, tangy blueberry bars. Easy to make and taste like a summer's day.
Prep Time: 20 minutes
Cook Time: 45 minutes
Course: Dessert
Cuisine: American
Keyword: Bars, Dessert, Dessert bars, Fruit dessert
Servings: 9
Calories: 278kcal
Cost: $5

Equipment

  • 8 by 8 pan
  • Mixing bowls
  • Standard oven

Ingredients

For the Blueberry Layer

  • 2 cups fresh blueberries
  • 2 teaspoons cornstarch
  • 1 tablespoon lemon zest if you have the patience
  • 1 tablespoon freshly squeezed lemon juice or bottled lemon juice lazy girl’s way turned out just fine with the bottled
  • 1/4 cup granulated sugar I used organic cane sugar

For the Bottom Layer & Top

  • 1 and 1/4 cup all-purpose flour spooned & leveled
  • 1/2 cup granulated sugar
  • 1/2 teaspoon baking powder
  • 10 tablespoons unsalted butter cold (1/2 cup plus 2 tablespoons). It is very important that the butter is cold as that is what helps keep the topping crumbly.
  • 1 large egg
  • 1 tablespoon packed brown sugar
  • 1 tablespoon granulated sugar
  • ¼ teaspoon of cinnamon
  • teaspoon of nutmeg

Instructions

Instructions

  • Preheat the oven to 375F degrees. Line an 8×8 inch square baking pan with aluminium foil and grease with butter or shortening.
  • In a medium bowl toss together the ingredients for the blueberry layer (blueberries, cornstarch, lemon zest, lemon juice & sugar). Put aside.
  • In a separate large bowl whisk together the flour, 1/2 cup granulated sugar and the baking powder.
  • Cut in the butter & egg yolk using a fork until the mixture is crumbly.
    Crumbly dough for blueberry crumble bars
  • Press about two thirds to three quarters of the mixture into the bottom of the prepared pan. Pour the blueberry mixture over top.
    Blueberry mixture on top of dough
  • To the rest of the flour mixture, stir in the brown sugar and remaining 1 tablespoon of granulated sugar.
  • Crumble the remaining dough over the blueberry mixture using your hands to distribute on the top.
  • Bake in the oven for about 45 minutes, until you see the blueberries bubbling and the crumble layer starting to turn golden.
    Blueberry Crumble Bars
  • Allow to cool fully to room temperature and ideally put in the refrigerator to chill . Then lift the bars out of the pan using the aluminium foil overhang and cut into squares. I used a pizza cutter which worked well. I also let the bars warm to room temperature which really brings out the flavors.
    Blueberry Crumble Bars how to cut
  • Enjoy!

Video

Notes

Bars are best stored in the fridge.

Nutrition

Serving: 1g | Calories: 278kcal
Tried this recipe?Let us know how it was!

The Best Pumpkin Bread

Welcome to my very first blog post on Sunday’s Bread which also includes a recipe for pumpkin bread.

This blog will be my mini Martha Stewart (very mini) where I share odds and ends about my life in an effort to help others and connect too. So, I will be sharing recipes, budget tricks, organization tools, how to be budget-wise  in an excessive world, decorating and other tips.

Why Sunday’s Bread?

Why Sunday’s Bread? Well for the last month or so in an effort to be more budget-minded, I have been cooking more and more from scratch. I also meal plan every Saturday because, as a working mom, I must or I end up not having meals ready for my two teen age girls and us (my husband and me).

Baking on Sunday

I love to bake and as I took stock of our pantry and what is around (black bananas I am looking at you).  I started to become creative and have been baking a loaf of quick bread or muffins every Sunday for the upcoming week’s breakfast. This has also turned into a nice routine. The house smells delicious and I can’t help but think it must be nice as my girls do homework on Sunday afternoon and my husband is watching football or some other sport – it creates just the right atmosphere. I also find baking and creating very relaxing so it is a wonderful way to end the week.

Can you guess what I made the last two weeks given that it is fall? Not surprisingly I made some delicious, moist pumpkin bread.

Here is the recipe which I adapted from Once Upon A Chef. I try to limit gluten (although we are not allergic) and prefer coconut oil to butter. I also had pumpkin pie spice on hand so it was easier to use versus having to create my own. Enjoy (it is particularly delicious with a bit of nut butter on it which also adds some nice protein in the morning).

Pumpkin Bread Recipe:

Servings: Makes 2 loaves Prep Time: 20 Minutes.  Cook Time: 65 Minutes Total Time: 1 Hour 30 Minutes

  • 1 cup all-purpose flour, spooned into measuring cup and leveled-off
  • 1 cup of gluten-free flour (I use Trader Joes brand)
  • 1/2 teaspoon salt
  • 1 teaspoon baking soda
  • 1/2 teaspoon baking powder
  • 1 Tablespoon of pumpkin pie spice
  • 3/4 cup coconut oil, melted
  • 1 cup sugar
  • 2 large eggs
  • 1 15-oz can 100% pure pumpkin (I use either Trader Joe’s or Whole Foods organic but Libby’s would work too)

Instructions:

  1. Preheat the oven to 325°F and set an oven rack in the middle position. Generously grease two 8 x 4-inch loaf pans with butter and dust with flour.
  2. In a medium bowl, combine the flour, salt, baking soda, baking powder and pumpkin pie spice. Whisk until well combined; set aside.
  3. In a large bowl of an electric mixer, beat the coconut oil and sugar on medium speed until just blended. Add the eggs one at a time, beating well after each addition. Continue beating until very light and fluffy, a few minutes. Beat in the pumpkin. The mixture might look lumpy and even a bit curdled but it is supposed to look that way.
  4. Add the flour mixture and mix until just combined.
  5. Turn the batter into the prepared pans, dividing evenly, and bake for 60 – 75 minutes, or until a cake tester inserted into the center comes out clean. I usually check loaves at 55 minutes.
  6. Let the loaves cool in the pans for about 10 minutes, then turn out onto a wire rack to cool completely.