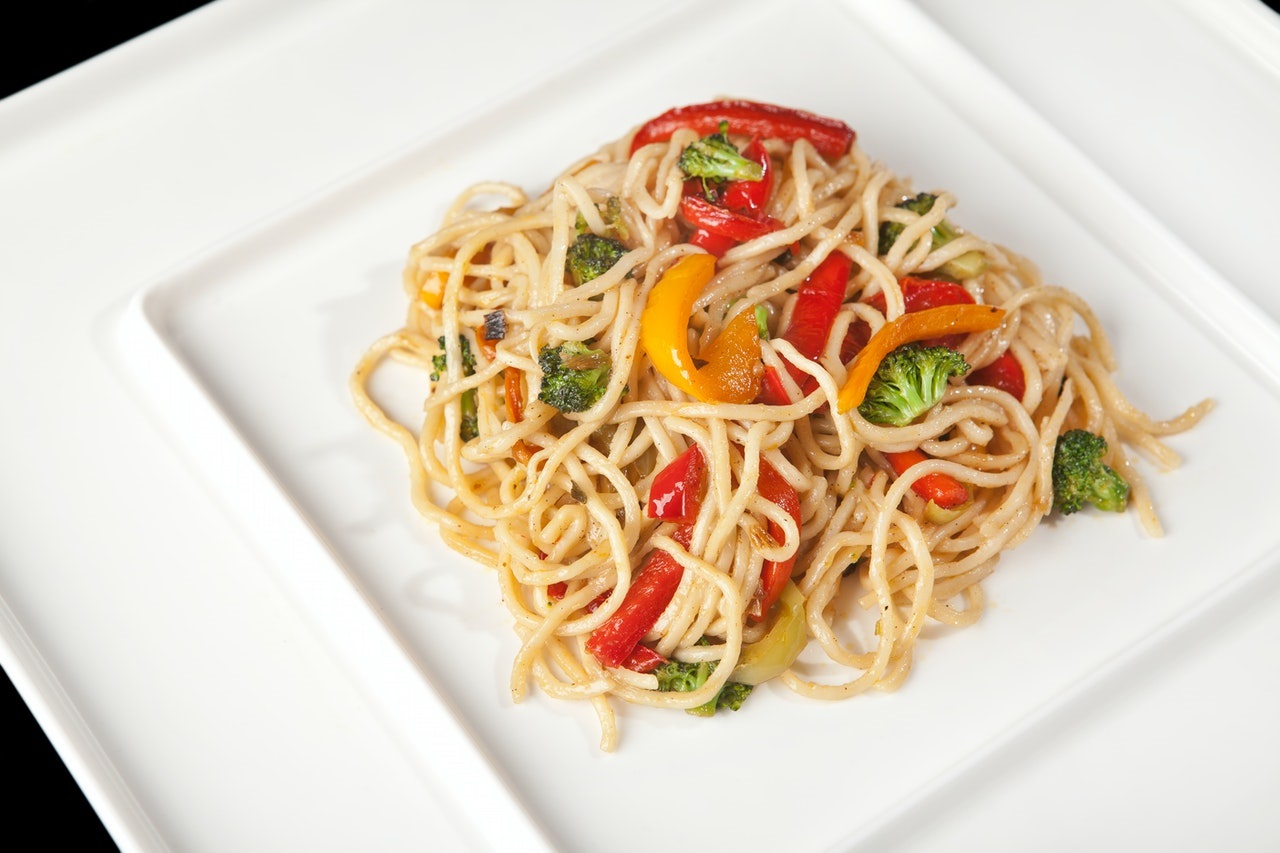
Stir Fried Saucy Udon noodles (using supermarket ingredients)

Hi there friends. It has been a while as 2022 has started out even busier than 2021 ended.

The SB family took a fantastic vacation to Mexico (hoping to write about it soon) and have been back at work/school catching up. I have also been making my usual new year’s effort to organize the house (ski clothes were yesterday). So, with all of that going on (plus work and school of course) it is just the right time for some super simple recipes that taste like your favorite takeout but may take even less time than it takes to dial the number (and a whole lot less money!).

Today’s post is for stir fried saucy udon noodles using supermarket ingredients that you can get at mainstream grocery stores. I have been craving noodles and some spice post holiday. I found myself staring at the pantry and freezer and realized I had some ingredients (nothing fancy) that may just suffice.

It was so nice to make a recipe from standard stuff that is easily found in the international foods aisle at my local Stop N Shop. So let’s run down what you will need on your next shopping trip because I am sure you will love this recipe. It takes all of 20 minutes to whip up (and that includes clean up) so it is great for days when you are short on time too.

Asian Noodles

The first step to making saucy stir fried udon noodles is getting your hands on some noodles. Ever wonder how your favorite Asian restaurant gets that chewy goodness? I have, and frankly what I just discovered is that you can buy it! Yes, look for Asian noodles where you find tofu in the refrigerator section. Lo and behold there are some very nice options. I tried Fortune brand’s Yaki Soba noodles. They come with a sauce packet, but I discarded that as you make a super easy (and healthier) sauce for these noodles. Other options at the market were dried noodles and packages of udon noodles in the Asian food’s aisle. I plan on testing the latter and will let you know how that goes.

The sauce and vegetables/protein for stir fried saucy udon noodles

The sauce here is very easy. A bit of dark soy sauce (or regular if you can’t find dark), oyster sauce, brown sugar and rice vinegar. Once again, all of these items are available at your regular old supermarket (as well as big box stores too). Next up on the ingredient list is a bag of stir fried vegetables. I used easily found Bird’s Eye brand. Again I did not use the sauce (by the way the store sauces are full of questionable ingredients…MSG, thickeners etc.). I happened to also have some fresh peppers which I sliced into thin strips and sauteed ahead of time, as well as some green onions and toasted sesame seeds for a nice crunch. You can easily add protein – sauteed chicken, shrimp or protein would go nicely. So without further ado, here is the recipe.

Stir Fried Saucy Udon Noodles (made from easy to find ingredients!)

Chewy, slightly spicy, saucy udon noodles are stir-fried perfection and just like your favorite take-out. They are also so easy to make (cheap too:) and use ingredients that you can find at any supermarket. Friendly for weeknights as you can have the noodles on hand along with a package of frozen stir-fried vegetables. Easy to add protein – tofu, chicken or shrimp are all delicious with these noodles. You will have this recipe on repeat!
Course Main Course, Side Dish
Cuisine Asian
Keyword Asian cuisine, budget friendly, noodles
Prep Time 10 minutes
Cook Time 15 minutes
Total Time 25 minutes
Servings 4
Cost $7

Equipment

  • 1 Wok or large frying pan

Ingredients

  • 3 tablespoons dark or regular soy sauce I typically use low sodium soy sauce
  • 2 tablespoons oyster sauce
  • 1 tablespoon brown sugar
  • 1 tablespoon rice vinegar
  • 1 bag refrigerator section udon noodles
  • 1 bag frozen stir fry mix veggies
  • Tofu, shrimp or chicken, cooked to add if you like (or keep this as is without the added protein up to you!)
  • 1 bunch green onions (or to taste) sliced thin
  • 1 to 2 tbs toasted sesame seeds for topping I like Costco brand – already toasted for you

Instructions

  • Sauce: Shake up all the ingredients in a jar or stir with whisk in a bowl.
  • Udon: Heat your wok or pan over medium high heat. Add oil. Add the noodles and enough sauce to coat. Stir-fry and then leave for a minute or two to caramelize. Microwave your frozen veggies and drain any water (important to drain the water or it will make the sauce runny).
  • Add the veggies. Combine and let cook for a couple more minutes until everything is covered in sauce and nice and hot.
  • Remove from heat. Add toppings and enjoy!

Chicken Tortilla Soup (Instant Pot or Slow Cooker)

Hi all! How are you? I hope well. Busy as I am? Phew…it never stops. Work has been crazy, and now we are almost at the holiday season. Today I will share a favorite soup, chicken tortilla soup in the Instant Pot (but you can make in the slow cooker too) and also a quick catch up.

Fall has just flown. High school girl has been busy applying to colleges and yes, it affects parents too. Long gone are the days when I crammed 6 applications into Christmas break. The tours start as early as sophomore year and beyond. You can catch our tour of a few southern colleges from last summer. We had a few last minute ones too but closer to home. The good news is that she is into one school (IU) as it has rolling admissions.

With my eyes on Thanksgiving, I am already planning my menu and will likely cook much of last year’s menu (which was delicious….that stuffing is the best I promise) as well as trying at least one or two new recipes. This recipe for a fall, butternut, greens salad caught my eye yesterday from Smitten Kitchen (love her!). I am trying it tonight at home so will share the feedback if it is as good as it sounds. I plan to use dried cranberries instead of the pomegranate.

It is also countdown to Christmas. I have learned this is a great time of year to organize. I went through each closet and identified what to give away. Cleaning out the fridge and pantry are next as I prepare for holiday cooking. Now is the time to figure out if you have enough baking supplies and other ingredients. Trust me…am a pro at this point!

With all that is going on, something easy and tasty for dinner and lunch is a must. I adore soup especially in the fall and winter. Lentil and bean are two favorites, but I found myself craving something with a bit more heat. This chicken tortilla soup fits the bill perfectly. I think you could easily sub in chicken breasts or make it vegetarian and add another can of beans for some extra protein and staying power. You can also vary the spice too. By accident, when fiddling with my recipe, I added an entire can of chilies in adobo (fortunately I realized it and was able to remove all but two!). The toppings are optional (but are they really?). A squeeze of lime, some grated cheese, a dollop of sour cream and chopped cilantro taste so fresh and flavorful. If you want to lighten up, replace sour cream with plain Greek yogurt.

Without further ado, here is the recipe for Chicken Tortilla Soup. Enjoy!

Chicken Tortilla Soup (Either Instant Pot or Slow Cooker)

A flavorful, healthy, budget-friendly soup that is perfect for supper or lunch.
Course Main Course
Cuisine American, Mexican
Keyword Beans, budget friendly, Soup, Supper
Prep Time 30 minutes
Cook Time 6 hours
Cost $7

Equipment

  • Instant Pot
  • Slow cooker

Ingredients

  • 2 tablespoons vegetable oil I use avocado
  • 1 medium yellow or white onion diced
  • 2 medium jalapeno seeded membranes removed, and diced
  • 1 red or green bell pepper
  • 3 cloves garlic minced about 2 teaspoons
  • 1 teaspoon chili powder
  • 1 teaspoon ground cumin
  • 3/4 teaspoon salt plus additional to taste
  • 1 pound of boneless skinless chicken thighs or chicken breasts (about 2 breasts if you are using breasts)
  • 1 28- ounce can crushed tomatoes
  • 2 chipotle chiles in adobo chopped NOTE: I purchase these in a can and save the rest for another use – they freeze well. DO NOT use the whole can in this recipe as the soup will be too hot
  • 1 15- ounce can pinto beans rinsed and drained
  • 1 can of Mexican style corn
  • 4 cups chicken stock or broth
  • Corn tortilla strips or corn tortillas or tortilla chips. I also like the tortilla strips you buy as salad toppings.
  • Shredded cheddar or Mexican style cheese
  • Diced avocado
  • Chopped fresh cilantro
  • Lime add a slice on the side to squeeze over
  • Sour cream or plain Greek yogurt
  • Optional: Trader Joe’s Chili Lime seasoning delicious on top if you can find it!

Instructions

  • Turn Instant pot to saute, or if using your slow cooker heat a pan on the stove and heat on medium heat. Once hot, add the onion, jalapeno and bell pepper. Cook until the vegetables are softened, about 6 minutes or so. Stir in the garlic, cumin and chili powder and cook until fragrant, about 30 seconds.
  • Transfer mixture from the skillet to the bottom of a 6-quart or larger slow cooker or if using Instant pot, turn off saute function.
  • Arrange the chicken breasts on top of the mixture. Add the tomatoes, chicken stock, chilies in adobo and salt. Stir gently.
  • Turn Instant Pot to slow cooking function. Cook on LOW for 5 to 6 hours, until the chicken is falling apart tender. Dice or shred the chicken, then return it to the slow cooker. Add the canned pinto beans and Mexican corn. Let cook on low for 20 more minutes to allow the flavors to combine and everything to heat.
  • Taste and add salt or seasonings as needed. If the soup is thicker than you would like, add in the remaining 1 cup chicken broth until it reaches your desired consistency. Enjoy!

Lentil and Quinoa Chili in the Slow Cooker

Hi friends. Well with about three feet of snow on the ground (it snowed yet again yesterday) I have been looking for comfort food. To date, I have not been as healthy as I should be with snacks… This time, chili fits the bill so well with its satisfying heartiness and a touch of heat. The bonus with this recipe for Lentil and Quinoa Chili in the Slow Cooker is that it is healthy (and practically effortless) too! The recipe is actually vegan, although I like to add some grated cheese and sour cream so in that case it would be vegetarian. You could skip those toppings of course if you are following a vegan diet.

My vegetarian diet

I was a vegetarian for two years when I lived in California (definitely influenced by the Southern California get healthy vibe) before getting married. As Mr. SB is an avowed omnivore I have transitioned our household to more of a meatless Monday or even Tuesday, Wednesday type of diet.

Why? Plant based diets are so good for you even if you may need to plan a bit to ensure you are receiving all of the nutrients you need. Vegetarian recipes are also flat out cheap (meat is always the most expensive part of the grocery bill here) and so much better for the environment. I heard on a podcast recently that skipping meat for just one day of the week actually equals saving the carbon emissions for one cross country trip (coast to coast). Wow! Imagine if the entire country committed to at least a meatless Monday?

Benefits of lentils and quinoa

Often I find that some vegetarian recipes lack texture and sometimes I am still hungry – not this recipe for lentil and quinoa chili. It is full of texture and flavor. The combination of the nutty lentils and the quinoa which naturally thickens the sauce makes it super satisfying.

The recipe is full of health benefits too as both lentils and quinoa are considered superfoods. Lentils have been associated with improved digestive health, sustainable weight loss and healthy blood sugar levels. One cup of lentils has about 18 grams of protein and almost a full day’s worth of folate. A serving of lentils is also high in manganese and potassium. Quinoa is another superfood and is actually not a grain but is a seed. It is also a complete protein possessing all 20 amino acids which is key if you are following a vegetarian diet. One cup cooked quinoa also offers tons of health benefits.

How do you make lentil and quinoa chili in the slow cooker?

This recipe is one of what I call, “On my last nerve” recipes. I keep the ingredients on hand in the pantry. I use both black and red kidney beans for some variation. Cans of beans are fine but if you have pre-cooked beans that would work too. I like the Costco quinoa which is already pre-rinsed to save a step. Trader Joe’s chili lime spice is a wonderful addition if you have a TJs on hand. If not, regular chili powder works just fine and then feel free to squeeze some lime on top at the end. Basically you stir everything together and let it slow cook for eight hours or four on high. Add your favorite toppings. Mine include cilantro, lime, avocado and a small dollop of sour cream. So without further ado, here is the recipe. Enjoy!

Lentil and Quinoa Chili in the Slow Cooker

Hearty, healthy and just what you need on a cold winter's day. The recipe is vegan but you may want to add some sour cream, grated cheese too. Fresh cilantro and a squeeze of lime perfect this protein packed, superfood-rich dish.
Course Main Course
Cuisine American
Keyword budget friendly, lentils, Perfect Slow Cooker Pot Roast, Quinoa, Superfoods, vegan, vegetarian
Prep Time 20 minutes
Cook Time 8 hours
Servings 8
Cost $5

Equipment

  • Slow cooker

Ingredients

  • 1 yellow onion
  • 2 cloves garlic
  • 1 15 oz can petite diced tomatoes with liquid
  • 1 6 oz can tomato paste or I like the tubes of past and I use two tablespoons
  • 1 15 oz can black beans drained
  • 1 15 oz can red kidney beans drained
  • 1 cup brown lentils uncooked
  • cup of quinoa
  • 1 Tbsp chili powder or if you can find it 1 and ½ Tbsp of Trader Joes Chili Lime powder
  • 1 tsp smoked paprika
  • 1 tsp ground cumin
  • 1/2 tsp onion powder
  • 1/4 tsp garlic powder
  • 1/4 tsp cayenne pepper
  • 1/2 tsp salt
  • A pinch freshly cracked black pepper
  • 4 cups vegetable broth
  • 1 cup of water
  • Fresh chopped cilantro
  • Sour cream guacamole, avocados, lime juice or other toppings you desire

Instructions

  • Dice the onion and mince the garlic.
  • Add the onion and garlic and all ingredients to the slow cooker. Stir to combine.
  • Place a lid on the slow cooker and cook on high for four hours (or low for 8 hours).
  • After cooking, the lentils should be tender. Taste the chili and add salt to taste.
  • Serve hot with your favorite toppings.

Instant Pot (no soak) White Bean and Ham soup

Hi there from snowy CT! We have about three feet of snow on the ground and it is still snowing…dreaming of summer days around here. Last weekend we headed up to NH to ski at Gunstock Mountain Resort which has the most lovely views of Lake Winnipisaukee. Yours truly was taken out a by a teen skiing out of control. Fortunately just a few bumps and bruises…I was worried about my knee but it seems fine a few days later (phew). Sunday, I decided not to ski (but still enjoyed my favorite apres ski recipe for buffalo dip) and instead made this perfect, easy, no-soaking the beans instant pot ham and bean soup. Trust me on this one – it comes out perfectly every time and not having to soak the beans saves time and allows this soup to be a last minute dish. So here is to snowy days and hot soup.

Tips to making no soak instant pot white bean and ham soup

I recommend Northern white beans for this recipe. You can use Cannellini or other white beans too but Northern beans really hold up well to pressure cooking. Also, this soup is very versatile. With my French husband, I tend to use a generous tablespoon of herbs de Provence. If you prefer though you could Italian seasoning or any mix of herbs that you like. I also recommend chopping the onion, celery and carrot roughly (mirepoix) for some texture against the creaminess of the beans. Lastly, if you want a vegetarian option, skip the ham, add more salt to taste and use vegetable broth instead of water. Serve the soup with some crusty bread and a salad and your winter day will be that much warmer!

Instant pot no soak white bean and ham soup

Super easy and relatively fast recipe as there is no need to soak the beans. Tender white beans in a rich stock and plenty of vegetables and salty bits of ham make a delicious and economical soup. Freezes well and heats up too for lunch or supper now or when you need it.
Course Main Course, Soup
Cuisine American, French
Keyword Beans, Instant Pot, No soak beans, Soup
Prep Time 35 minutes
Cook Time 35 minutes
Servings 8
Cost 5

Equipment

  • Instant Pot

Ingredients

  • 1 pound dried Great Northern White Beans picked over and rinsed. Cannellini beans would work here too but reduce the cooking time by five minutes.
  • 1 tablespoon cooking oil olive or I like avocado oil
  • 1 white or yellow onion diced
  • 3 stalks of celery roughly chopped
  • 3 medium carrots peeled and chopped
  • 3 cloves garlic finely chopped
  • 1 heaping tablespoon of herbs de Provence or another seasoning mix you like such as Italian seasoning
  • 1 bay leaf
  • ¼ pound of ham or a ham hock bone (with some meat on it). If going for the vegetarian option then leave out the ham.
  • 4 cups of chicken stock or vegetable and 4 cups of water (if using a very meaty ham bone you may want 2 cups of stock and 6 cups of water as the ham will be salty).

Instructions

  • Turn Instant Pot on sauté setting and heat olive oil in the insert.
  • Add onion, celery and carrots and sauté until starting to soften, a few minutes (keep an eye on it as they can burn if you are not careful…stir occasionally).
  • Add garlic, stir a few seconds until you can smell the garlic.
  • Then add herbs and bay leaf, stir and turn off the sauté function.
  • Add the dried beans to the pot along with the ham shanks.
  • Pour in the stock and water and combine gently.
  • Close lid and seal pressure cooker.
  • Cook on high pressure and set timer for 35 minutes. It will take about 25 minutes to reach pressure and then the timer will start. When finished cooking, let pressure naturally release for 20 minutes.
  • Manually release any remaining pressure, carefully open pot (only after all pressure is released).
  • If using a ham bone or shank, then remove ham shanks to cutting board and shred/cut meat into bite-sized pieces. Add back to soup and season with kosher salt and black pepper to taste.
  • Serve with a salad and some crusty bread for a delicious lunch or supper.

5 Ways To Make Frozen Pizza Taste Like Take Out (at a Fraction of the Cost)

Transforming a cardboard-like frozen pizza into a delicious meal is entirely doable, super easy and economical. In fact, you can easily make your frozen pizza taste like takeout with a few simple steps.

We have all been there…dinner needs to be on the table and we have nothing prepared…

It is also one of those recipes for what I call “on your last nerve” meal ideas. “On your last nerve” recipes do not really qualify as “recipes” but may just save your “last nerve” mid week (or anytime). When I meal plan on Saturdays and Wednesdays (usually) I always factor in a few items that can be stored in the freezer and easily made for mid week. I find these options are particularly handy after a long work day or driving around to extra curriculars.

What is a On Your Last Nerve Recipe?

Sometimes these are items I cook myself and have frozen for a quick reheat in the microwave or instant pot. Occasionally they are freezer favorites from Trader Joes or Costco, and often they may have a base of store prepared food with a few items to doctor it up for something way better than what could be served directly from the freezer. I always keep a few items in my freezer such as Costco’s frozen cheese pizza (4 for $9 in my area) and recommend that you do too.

How to Make a Frozen Pizza Taste Like Something You Want to Eat?

Normally I am not a fan of frozen pizza. The cheese never freezes well (as is usually the case with dairy items), and the crust is like cardboard. Additionally, in my book, there is never enough cheese or any of the toppings that make pizza so delicious. So here are my go-to tips:

  1. Shop your fridge and pantry: Either fresh or leftover vegetables make excellent toppings. Leftover cooked mushrooms, peppers, onions and eggplant are delicious as a topping. In the summer I always have a basil plant too that I will top the pizza with fresh shards of that summery goodness.
  2. Keep ingredients on hand. I also always have onions and garlic. A quick sauté with some Italian seasoning or oregano can really up the flavor. Canned, sliced olives are delicious too. Costco Pesto, and pretty much any brand of pasta sauce are good bases. And, I always have flatbread (Aldi and Trader Joes have good options) as well as the Costco cheese pizza with a breadcrumb crust. Spices are key too. Nothing fancy – just some dried oregano and basil and maybe a bit of garlic salt if you like.
  3. Cheese! If you buy a frozen pizza the cheese is awful. Cardboard shreds. I usually don’t bother to scrape it off but always add either fresh mozzarella or if I don’t have that at least some of the sliced variety.
  4. Freezer toppings. Sliced, uncured pepperoni and salami are always in the freezer. I take them out a few minutes beforehand (or take a few slices and defrost in the microwave). Other toppings might include frozen pre-cooked rotisserie chicken or if we are doing a Meatless Monday we leave out the meat.
  5. Finish with a yummy glaze. Balsamic glaze adds just the right touch of tartness to the melted cheese. I have also known to drizzle a little truffle (fancy!) oil or garlic infused oil too. This pizza is so economical no matter how you finish it that I say go ahead…be fancy!

A Few Last Recommendations to Make Frozen Pizza Taste Like Takeout

We all have those nights when we are on our last nerve. For those moments, I always keep frozen pizza and some add ons to make frozen pizza taste like takeout. Make a quick salad of pre-washed lettuce and some favorite veggies and you are done…very little clean up too!

Instant Pot Chicken Curry

Instant pot chicken curry has quickly become a family favorite around here.  It is creamy, simple, flavorful and can be made in 30 minutes flat.  This recipe is also gluten, dairy free and low-carb so it checks a lot of boxes.  I use a mild curry powder (which you can add heat to if you prefer your curry spicier). 

What is curry?

Curry means sauce with spice.  It also refers to any variety of dishes in a number of countries that uses a combination of spices.  The word “curry” was created by the British in the 19th century when India was still a British colony.  Curry is actually anglicized for kari, a word that means sauce.

Curries can be found in India, Southeast Asia and the Caribbean.  Indian style curry powder dates to the 18th century when it is thought that Indian merchants prepared spice blends for the British Colonial government and army who would return to Britain.   The primary spices found in Indian style curry powder are coriander, cumin and turmeric (which gives the blend the signature yellow color).  By the way, traditional Indian chefs and cooks do not use curry powder.  This recipe is admittedly an Americanized Indian curry (but I am OK with that as it is delicious).

Is curry healthy?

This dish has numerous healthy ingredients.  Indian style curry powder typically has turmeric in it.  Turmeric has been shown to reduce inflammation.  There are over 12,000 peer reviewed studies that show the benefits of turmeric! 

Other healthful ingredients include onions which are high in antioxidants.  Chicken provides vitamins, minerals and protein.  This dish is also versatile so you could add in some peas or other vegetables.  Carrots, celery and peppers would all make nice additions.

What do you need to make this Instant Pot Chicken Curry?

Spices are at the heart of any curry, and this Instant Pot Chicken Curry is no different.  Toasting the spices in coconut oil extracts the spices’ flavors (please do not skip that step!).  

This dish calls for a few spices that you should be able to find at any major grocery store chain.  If you can not, I highly recommend Penzey’s spices which are always fresh and delicious.

Here are the spices you will need:

Indian Curry Powder:  Make sure you check the spice level.  Typically you can find hot or sweet curry powder (or if it is not marked, it is likely on the milder side).  The last time I made Indian Chicken Curry I used McCormick’s brand which was not too hot and should be widely available.

Garam Masala:  Garam Masala is a warming spice blend which can vary dramatically depending on the location in India.  You should add the Garam Masala at the end of a dish.

Ground Cumin:  Cumin is from a plant found from India to the Middle East and has a nutty, distinctive taste (it is also often used in Mexican cuisine).  I used my local supermarket’s brand which worked well.

A note on other ingredients:

I used Costco’s Kirkland organic chicken tenderloins which cook quickly and are easy to chop and are well priced.

I also use full fat coconut milk (canned).  Fresh lime and chopped cilantro add some freshness, and cut the richness of the curry.

How do you make Instant Pot Chicken Curry

I started off by saying how easy this recipe is – and it is!  The full recipe is below but here are a few notes.

First you toast the spices (all except Garam Masala) in coconut oil for a couple of minutes which really adds a great flavor dimension.  As it is made in the Instant Pot you can simply do this with the saute function (love my Instant Pot…one pan to clean!).  Another important step is to deglaze the pan of the brown bits.  This is a classic step in many dishes and once again with an Instant Pot it is super easy. 

Instant Pot Chicken Curry

Instant Pot Chicken Curry

Instant pot chicken curry is easy, full of flavor and a recipe the entire family will love. Creamy curry sauce with tender chunks of chicken and vegetables make a go-to weeknight dinner as you can have it on the table in 30 minutes flat.
Print Pin
Course: Main Course
Cuisine: Indian
Keyword: budget friendly, curry
Prep Time: 10 minutes
Cook Time: 15 minutes
Servings: 6
Calories: 375kcal
Cost: $10

Equipment

  • Instant Pot
  • Small Bowl
  • cutting board
  • Sharp chopping knife

Ingredients

Ingredients

  • 3 Tbsp coconut oil
  • 3 Tbsp curry powder
  • ½ tsp garam masala
  • 2 tsp cumin
  • 1 tsp turmeric
  • 3 tsp fresh ginger
  • 2 cloves garlic finely minced
  • 2 Tbsp tomato paste
  • ½ cup chicken broth
  • 1 yellow onion
  • 2 lb boneless skinless chicken breast or tenderloins I like Kirkland, organic chicken tenderloins
  • 1 tsp salt
  • 1 Tbsp cornstarch
  • 1 can coconut milk full fat
  • Cilantro and/or parsley chopped to taste
  • Fresh lime juice to taste

Instructions

Instructions

  • Press the “Saute” function on your Instant Pot. Add coconut oil and heat for a minute or two. Add in the curry powder, cumin and turmeric. Stir continuously to toast the spices, 1-2 minutes.
  • Add the onion, garlic, and ginger. Stir to coat in the spices and saute for 2 minutes. Watch carefully to ensure the mixture does not scald (add a spoonful of water if it seems to be over cooking).
  • Add the tomato paste and stir with the onions. Cook 1-2 minutes.
  • Add ½ cup chicken broth to the pot. Stir and scrape up any browned bits.
  • Add the diced chicken and salt and stir all ingredients.
  • Press the “Cancel” button to turn off the “Saute” setting. Secure the lid, ensure the pressure valve is set to “Sealing” then program to High Pressure for 5 minutes. It will take 8-10 minutes for the pot to come to pressure. Perform a quick release once the timer goes off.
  • Mix the cornstarch with one tablespoon of water in a small bowl. Whisk briskly until smooth. Pour the cornstarch mixture and coconut milk into the pot, then stir; simmer 2-3 minutes or until the sauce has thickened. Add the Garam Masala with one minute left.
  • Add the fresh lime juice and cilantro. Taste for seasoning and add salt if needed. Serve immediately over steamed rice or serve with Naan or pita bread.

Notes

Instant Pot Chicken Curry

Nutrition

Calories: 375kcal

Easy Thai Green Curry with Shrimp and Noodles

Easy Thai Curry with Shrimp and Noodles is such an easy and delicious recipe. It can also be made vegetarian by replacing the shrimp with tofu.

Thai curry is usually one of my favorite take-out foods. The creamy coconut curry sauce paired with shrimp really hits the spot. The coconut milk offers a sweetness that is complemented by the heat of the curry. Vegetables, that are not cooked too much, round out the dish adding some crunch and plenty of vitamins and fiber to make Thai curry healthy too.

When I make Thai Curry with Noodles at home, I like to pile the curry over a mound of Thai rice noodles or regular linguine or maybe rice. Then I add just a squeeze of lime, and some chopped, fresh cilantro. Perfection.

An Easy & Budget-friendly Recipe

It was a great surprise when I realized how easy and versatile Thai curry is to make at home. Making a take-out copy cat at home is especially helpful these days when we are not going out to dinner as frequently (or hardly at all!). Similar to a soup or stew Thai curry with noodles is also a great way to use up vegetables – carrots, celery, onions, and this time of year zucchini!

You can also adjust the heat level (spice wise) to your own tastes. Additionally, I love this recipe because it uses the stems of cilantro. I hate waste! The stems are full of flavor and while they may not work in a salad they are perfect for curry.

By the way green curry refers to the green chilies used in the sauce. While its origins are Thai, apparently it has been adapted by Thai expats to the rest of the world.

As a last note, I really like Maesri curry paste. If you have an Asian grocery story you should be able to find this brand of curry there for a reasonable price. It is also available on Amazon.

Ok, so how do you make easy Thai-curry noodles?

Thai-curry with shrimp and linguine

Easy Thai Curry with Shrimp and Noodles

Easy Thai Curry with Noodles tastes like my favorite Thai restaurant version but at half the price.
Print Pin
Course: Main Course
Cuisine: Asian, Thai
Keyword: curry, dinner, easy, seafood, shrimp, tofu
Prep Time: 20 minutes
Cook Time: 25 minutes
Servings: 4
Cost: 15

Equipment

  • wok or frying pan
  • sauce pan
  • cutting board

Ingredients

Ingredients:

  • 12 oz linguine or asian noodles
  • 1 medium zucchini or as I note you can sub in other vegetables
  • 1 medium onion sliced thin
  • 1 clove of garlic minced
  • 1 to 2 tablespoons of Maesri green curry paste or another curry paste of your choice.
  • ¼ cup of fresh cilantro stems chopped
  • 2 to 4 tablespoons of vegetable oil I use avocado oil as it has a high heat point
  • 1 can of light coconut milk
  • 1 pound of uncooked shrimp peeled and deveined (if using tofu then chop into squares and drain liquid before adding to dish)
  • 2 limes for juice and garnish
  • A handful of fresh basil leaves Thai basil if you can find them – if not, standard basil leaves are tasty too.
  • Salt to taste
  • 1 tsp Cornstarch (optional)

Instructions

Instructions:

  • Cook noodles, linguine or rice to instructions.
  • In a large wok or frying pan saute the onion in a tablespoon of oil until translucent. Add the garlic and cook until fragrant. Remove onions and garlic from pan.
  • Cook the curry paste and cilantro stems in oil over medium heat until very fragrant. Stir frequently. Remove and put aside with onion mixture.
  • Add another tablespoon of oil. Saute the zucchini until bright green (you do not want zucchini to be olive green and they will cook a bit more with the sauce so keep that in mind). If using other vegetables such as carrots, then cook accordingly (carrots will take longer to cook than zucchini).
  • Put all the cooked vegetables back in the pan. Add the coconut milk. Season with salt. Bring to a simmer and cook about 2 minutes until thickened slightly.
  • Stir in shrimp and cook until opaque and pink
  • If sauce seems thin, add a teaspoon of cornstarch to thicken the sauce.
  • Remove from heat.
  • Serve over choice of noodles, rice or linguine. Serve with lime wedges and cilantro leaves.