Well hello! It has been a minute! I thought I would do a general update today because sooo much has been going on since I last posted. This blog is a hobby for now so I do apologize for the long delay. I have been sporadically posting on Instagram so please do follow me there for more regular snippets.
Travel – Mexico and Japan
The big news for 2024 is that we have already taken two fantastic trips. Right after Christmas we headed to Punta Sam, Mexico to stay at the Villa Del Palmar. We loved this resort and highly recommend it. We booked the entire trip including flights through Costco!
It is a beautiful, beach front resort with the most amazing food (and even more incredible it is an all inclusive!). We had a full suite which included a kitchen and washer/dryer. Very comfortable for a family of four. Girls had a pull out in the living room but with their own bathroom too. We took the ferry over to the Isla De Mujeres and explored and enjoyed the beach. We also booked a snorkeling tour which was really fun – the underwater museum a particular highlight. Hoping to do a more comprehensive review with photos. In the meantime, here I am enjoying sunset on the beach:)
And, last week, we just returned from Japan! This was a trip that technically we planned before Covid and to celebrate our 25th wedding anniversary! Japan exceeded our expectations in every way. I knew it would be interesting and that we would love the food, but I did not expect it to be sooo beautiful. It is a stunning country. We were also there for the cherry blossoms which really are spectacular. More on this trip but in the meantime, here is a favorite photo of Himeji castle.
This and That in CT
What else has been going on? Well as I may have shared, I am an entrepreneur. With empty nesthood I have really been able to focus on business which is so exciting. I have juggled parenthood and career for two decades and would not trade it for the world but now, in a different phase of life, I find my work really interesting and fun – especially as my business is growing. I have been reading a few excellent books – which may be of interest to fellow entrepreneurs:
Built to Sell
Traction
7 Figure Agency (very specific to the agency world)
Anyways, I adjusted my morning routine where I read business books first – apparently this is when we can focus the most. So far, I have gleaned so much.
On the home front, I am happy to be home with spring and summer to look forward to – I love winter too and we did some great skiing at Stowe, VT and in NH but this time of year is really fun. Our beach/boat club opens up and all kinds of outdoor activities. A big milestone is also approaching – CG1 is graduating! Yikes. Where does the time go. We could not be prouder of this girl – navigating Covid during college was no joke and she is graduating strong – maintaining her merit scholarship the entire time! Both girls should be home for awhile – we look forward to having the family home.
Well that is all for now. Hope your day is going great and please do check back – I will be sharing more details on Japan for sure!
Hi there friends. Yes, it has been months since I have blogged. A few tech difficulties (don’t use Bluehost if you are planning a blog!) and just busy. So, given that it has been so long, today’s post is a look back on 2023, in particular the holiday season and a few notes about 2024. So here goes!
2023 Highlights
Well like every year, there was a mix of good and not so good. The good:
This year we were back to traveling. College girl 1 (CG1) was in Florence so CG2 and I visited for a fantastic trip to Italy (read my full post here).
Mr SB and I celebrated our 25th anniversary with a trip to Bermuda.
CG2 really flourished second semester which was so fun to see – lots of new friends (and a few visits back home to CT with them)
Summer at our shore club was as amazing as always – lots of entertaining, sailing, clamming and beach.
Fall brought tailgates at my alma mater (and where CG2 attends) as well as a fun visit to VT to see CG1.
On a the list of not so great – we lost our wonderful cat Harry. Not a day goes by without thinking of him. He had such a personality and was with us since 2011 and brought us so much joy. He was also a Christmas cat as I adopted him as an adult cat from our local shelter just in time for Christmas. I miss you Harry. RIP my little guy.
Holidays 2023
The holidays were very full – exhausting but fun. Through the years I have figured out a system – I call it the holiday waves – waves of organizing and planning to stay sane and enjoy the Christmas season.
Wave 1 – this starts in October or possibly sooner when I start thinking about the holiday card. Some years I order our card before Halloween! I also do some organizing in October/early November. Clean out the pantry, take stock of clothing etc. to prepare for thoughtful gift giving and entertaining.
Wave 2 – Thanksgiving weekend. We cut down our own tree the Saturday of Thanksgiving weekend. You can read all about our tailgate party where the sliders and caper mayo take center stage. This is literally my favorite day of the year. We gather with friends for a low stress tailgate party. Getting the tree up early makes the house smell great and get’s the holiday decorating underway. I also order as many gifts as I can online for Black Friday and Cyber Monday.
Wave 3 – now that tree is up and gifts start to come in I love wrapping presents, watching Hallmark Christmas movies and getting into the holiday spirit! This year these afternoons were some of my favorite holiday memories – sometimes you need to slow down and a sappy movie while wrapping gifts for loved ones is perfect!
Wave 4 – food. I usually bake starting a couple of weeks before Christmas. Cookies freeze really well and this year was no exception. I made the following: Gingerbread Latte Cookies, Monster M&M Cookies and Hot Cocoa Cookies all from Half Baked Harvest. They all came out great and I was able to send some in care packages to the girls.
Wave 5 – getting ready for Christmas guests and dinner. This year we hosted 18 for dinner! I set the table a few days before. I get out platters, silverware, holiday linens about a week or so earlier to see if I need to polish, replace or buy extras. This year I did not buy anything except some new papergoods.
Wave 6 – Buy food. With guests at home I have learned to go to Costco early. This year I went Thursday for a Monday Christmas. This was good timing and I escaped the worst of the crowds. Here was our menu:
Saturday Lunch – sausage on the grill (if weather permits this is a great way to avoid dishes – no pans!), Costco Mac N Cheese, Salad, Christmas Cookies for dessert.
Saturday Dinner – I made this broccoli casserole which was quite good although next time I think I would lighten up on the cheese (great idea to have a casserole that is both vegetable and starch for a crowd). Mr SB had smoked some pulled pork. We had salad, cheese and birthday cake. Appetizers included my famous buffalo dip with a charcuterie board.
Sunday Breakfast – Costco croissants, bread, coffee, yogurts, fresh fruit
Christmas Eve we head to my sister’s for a wonderful dinner. Christmas Eve during the day I cook everything for Christmas. This year our menu included:
Christmas Day – Breakfast casserole (a favorite!). I make the ham and cheese hashbrown casserole – everyone loves it. Could not be easier! For lunch I buy sliced ham, cheese and bread – everyone makes their own sandwich as Christmas dinner is underway!
This year’s Christmas dinner menu:
Appetizers: Smoked Whitefish Pate and Crackers, Duck Pate with Truffles, Charcuterie board with assorted cheese and meat. Baked Brie. Note to self – put more appetizers in the living room near the bar.
Christmas salad – greens with citrus champagne vinaigrette, oranges, pomegranate seeds and goat cheese.
Main: Smoked Brisket (Mr. SB’s special recipe) and Glazed Ham.
Mashed Potatoes (Costco – loaded and regular Yukon Gold)
Smoky Sweet Carrots with Yogurt Sauce.
Crispy Brussel Sprouts in the air fryer
Green Beans – steamed lightly and then roasted.
Assorted desserts – cake, cookies.
Everything was delicious and we had such a wonderful holiday.
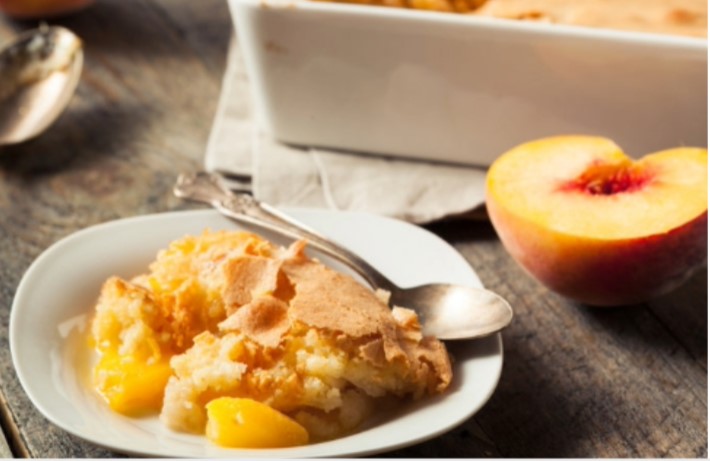
Hi there! How is your summer going? Ours has been a busy one, and fortunately the weather finally turned in CT so we have had some gorgeous weekends. This past week end was pretty close to perfect and a great one to try a recipe I have had my eye on for a few weeks – peach cobbler with a hot sugar crust. I honestly think this is one of the best recipes I have made in a very long time.
This method brings out a crackly sugar crust yet a tender inside to the topping. The fruit just has a bit of lemon and a tiny bit of sugar (which you may not need depending on the fruit you use. I adapted the recipe from chef Renee Erickson’s version and had read about it in the 5 Star Weekend by Elin Hildebrand (she is a great food writer too!). If you have read my blog you know I am partial to fruit desserts – my apple crisp is on repeat all fall, and the blueberry bars are too during the summer. This recipe for peach cobbler with a hot sugar crust will be added to that list!
Ingredients for Peach Cobbler with a Hot Sugar Crust
In addition to spectacular results, I also really liked that the ingredient list was simple. Flour, butter, milk and sugar with some baking powder and a bit of salt. The filling is lemon juice, peaches and a tablespoon of sugar. I also added some blueberries and a plum I had that was not going to keep for much longer in a second batch. I made two dishes in 8 by 8 pans. I made the fruit cobbler in the morning and then heated it up right before dinner after we had been at our club all day. I served it warm with Turkey Hill’s Cookie Butter Ice cream on the side. It was delectable! So here is my version of Peach Cobbler with a Hot Sugar Crust.
Peach Cobbler with a Hot Sugar Crust
A crackly sugar crust forms over a tender topping and a mass of juicy peaches. The taste of summer!
6 to 7largeripe peaches or a mix of plums, blueberries and peaches
1lemon
1/2cupunsalted buttersoftened
2cupsgranulated sugar
1 1/2cupsall-purpose flour
2teaspoonsbaking powder
1teaspoonkosher salt
3/4cupwhole milk
1/2cuphot water
Ice creamfor serving (if you can find cookie butter flavor I highly recommend!)
Instructions
Heat the oven to 375°F with rack in the center. Line a large rimmed baking sheet with aluminum foil.
Arrange the peaches in a 9 by 13-inch or two 8 by 8 baking pans.
Cut the lemon in half and squeeze lemon juice over the top. If your peaches and/or fruit is not at ideal sweetness – sprinkle an extra tablespoon of sugar over the fruit.
In a stand mixer fitted with the paddle attachment, cream the butter and 1 1/2 cups of sugar on medium speed until creamy but still crumbly, about 1 minute. Add the flour, baking powder, and salt and beat on medium speed until all the flour is mixed in and the mixture is evenly crumbly, about 30 seconds more. Scrape down the sides of the bowl. With the mixer on low speed, slowly pour in the milk. Increase the speed to medium and beat until the batter is light and fluffy, about 2 minutes.
Scoop the batter in about 6 large blobs over the peaches. With the back of a big spoon, carefully spread the batter evenly over the fruit so it’s no more than about 1/2 inch thick in any one place.
Sprinkle the remaining 1/2 cup sugar over the batter. Drizzle the hot water evenly over the sugar, using it to melt the sugar topping. Trust me – this part seems counter intuitive…just go with it!
Set the pan on the foil-lined baking sheet and bake the cobbler until the top is golden brown and cracked about an hour. A toothpick stuck in the topping should come out clean or with just crumbs clinging—be sure to check in a few places.
Let the cobbler cool for about 30 minutes to firm up (if you can wait that long!).
What is your perfect summer weekend? Coming off of this past one I think it was pretty perfect or at least close. Some time ago I had read that to make every day a good one – eat something tasty for breakfast, read something interesting and exercise. I like that list and have actually tried to make that happen on a daily basis. I would also add – find time to connect with a friend or social group and get outside.
It started out on Friday – I was not technically off but decided to take the afternoon. Saturday and Sunday had bluebird skies which was fortunate as it was our club’s annual clambake. So let’s get into what makes a summer weekend perfect around here. Would love to hear from you on your idea of a perfect summer weekend.
The Weather
This summer the weather has been unpredictable to say the least with a lot of rain. I realize much of the country has had oppressive heat and last summer we had zero to little rain. I am not complaining. But for me, the perfect summer weekend is hot but not too hot and sunny as well as dry. This weekend fit the bill. We woke to beautiful weather starting on Friday and it just kept coming through Sunday.
Friday Afternoon + Saturday Morning
When the weekend can start a bit early then why not? CG2 has turned me onto thrifting so we headed to Goodwill. I was seriously doubting this idea but I have found some great stuff on Thred Up lately so figured why not? I really love that we are actually reusing and recyling in the most basic way. I am sold – found a Vineyard Vines shirt for $10 in perfect condition. She picked up Abercrombie sweaters.
Friday dinner I tried a new Thai marinade for chicken from Damn Delcious (it was damn delicious!) and paired it with my Thai curry but only used it for the vegetables. It was delicious and light. The week had been a WEEK so turned in early.
I love going to yoga on Saturday morning. I do some pretty intensive exercise all week – HIIT classes, running, spinning, weights – so come Saturday it is time to stretch and calm my mind. Afterwards I headed to our darling farm store at our local organic farm. I picked up some real summer tomatoes and other super fresh vegetables. Here is the entrance – like living in a postcard around here.
So lucky to have this organic farm nearby
We headed to our club shortly after lunch.
The Book
Ahhh summer reading. I have read a number of books this summer including Normal People, Sunflower Sisters and The Vanishing Half. I loved the first two – I found the Vanishing Half to be a bit dull although I was moved by the depiction of the transgender boy as it really brought home how important it is to try to understand. His pain was palpable and the laws at the time preventing them from being together was tragic.
While these were well worth it to read – nothing says summer like an Elin Hildebrand book! I scored The Five Star Weekend from my library and got busy Saturday on the beach digging in. I think it is my favorite of hers thus far. Since I adore Nantucket, well I can’t get enough of her descriptions.
It is easy to write her off as a beach read but frankly her character development is fantastic. Coming at her book as a mom with two college kids, well I suppose I fit her demographic perfectly. It is like she writes about me and my friends, people I know – or at least could know but all in Nantucket. I live in a historic, picturesque town with some of the same similarities as Nantucket. One likeness includes our town having some very wealthy people along with a more “normal” middle class – a theme she touches on frequently with her assessment of the “summer people” and the islanders. Highly recommend the book – for the beach or otherwise!
The Food
The original advice to eat something good for breakfast. My weekday breakfast before heading to the gym is a blueberry protein smoothie. On the weekend I prefer something a bit more decadent. I had some farm fresh eggs and my favorite Jordan Marsh blueberry muffins in the freezer. Saturday and Sunday I took one out and microwaved it with some Kerry gold butter. Delicious. Add a cup of good brewed coffee with a bit of hazelnut creamer and I am off to a great start!
Would it be summer without a traditional clambake? We are so lucky that our club puts one on – right on the beach looking out at Long Island Sound. They are old school – collecting the seaweed, building a pit, cooking lobsters, sweet corn, little necks and mussels – topping it all off with blueberry and peach pie. Of course we started out with some rose and mojitos along with a charcuterie board. This is literally my favorite night of summer.
Perfect New England Clambake
Nature
Getting outside always lifts my spirits. This weekend’s perfect summer weather made it easy to do. Sunday morning I gardened and replanted some zinnias that I had planted from seed and now are ready to bloom soon. The most gorgeous butterfly landed on one.
Sunday night was time for a glass of wine on the deck after we had a great day sailing and beaching it at the club. We are so fortunate to have so much privacy. It is quiet and peaceful. There are so many studies that show being outdoors is key for mood – I lived in NYC for five years – even a stroll in the park is great. Just do it as they say.
What is your favorite summer weekend? Any good book recommendations? Dishes to share? Would love to hear from you!
Summer is in full swing around here (finally) after a rainy start. We are taking the good days when they come! Two fun meals most recently included Mr. SB’s birthday dinner held at our club on the shore as well as my book group (held on our deck and dining room as thunderstorms made it impossible to have at the shore club).
Shore Menu (including lemon tart for the birthday dessert)
Last Sunday was a hot one on the shore. I was on Race Committee for the club and after a long day on the water was looking forward to a yummy dinner and at Mr. SB’s request, I had made his favorite lemon tart. As usually he loves cheesecake and is a picky French guy – a special request for lemon tart means something!
Our friends joined us for both happy hour and a dinner of teriyaki salmon on a cedar plank, caprese salad with fresh basil from my garden, mediterranean pasta salad and the tart! Good club friends stopped in spontaneously and let’s just say you know you are having fun when the club staff tell you they are closing soon and it is time to pack up!
Book Group Menu (including lemon bars)
I made two tarts actually – as this recipe works so well in bar form too – I made one in an 8 by 8 pan. My book group came over on Wednesday so I made the bars and tart on Saturday and froze the bars but did not frost them. They came out great. As we had been planning on going to the shore the rest of the menu was picnic food – but worked well for a summer book group menu. Will make these again – here is the easy make ahead menu.
Charcuterie board with prosciutto, salami, Boursin, dried apricots, nuts and grapes (enjoyed on the deck before a rain storm)
Super easy to make ahead and delicious! Here is the recipe for Mr. SB’s favorite frosted lemon tart or bars. Enjoy!
Frosted Lemon Tart or Bars
Tangy, creamy filling topped with a tart, sweet frosting. Easy to make and with ingredients that can be stored easily (so usually on hand!). Mr. SB requests it for his birthday! I have also made this for book group and two dinner parties. It comes out perfect every time.
Keyword: Citrus, Dessert bars, Fruit dessert, Lemon
Servings: 8
Cost: $3
Equipment
1 Tart pan
1 8 by 8 pan
Ingredients
Crust
1cupUnbleached, all purpose flour
8tbspUnsalted butter at room temperature (1 stick)
1/4cupConfectioners sugar
Filling
1cupGranulated white sugar
2Large eggs
2tbspUnbleached, all purpose flour
1/2tspBaking powder
3tbspFreshly squeezed lemon juice
1tbspFreshly grated lemon zest
Frosting
2 1/2tbspUnsalted butter at room temperature
1 1/2cupsConfectioners sugar
1tbspLemon juice
1tbspFreshly grated lemon to sprinkle on top
Instructions
Preheat oven to 350 degrees and place a rack in the center of your oven
For the tart or bar crust – combine 8 tbsp of butter 1 cup of flour, and 1/4 cup of confectioners sugar with a fork or pastry blender (I prefer the latter) until the flour is absorbed into the butter in a course mixture. Take the mixture and put it into your bar or tart pan. Press it down to an even layer. I like to use a ramekin to press it down. Bake until the crust is a light brown. Watch it carefully after about ten minutes (it will take between 10 to 16/17 minutes).
Make your filling by whisking together the eggs, granulated sugar, 2 tbsp of flour, baking powder, 3 tbsp of lemon juice and the lemon zest until combined. Pour over the partly baked crust and continue baking until the filling is firm, about 25 minutes or so. Let the tart or bars cobol completely before frosting. If freezing (and this recipe freezes really well), do not frost.
For beat the frosting – beat 2 1/2 tbsp of butter with 1 1/2 cups of confectioners sugar until smooth. Add the lemon juice until the frosting is at a good spreading consistency.
Spread icing over the bars once completely cooled (or if you freeze ahead of time, remove from freezer and let thaw). Sprinkle lemon zest on top. Let sit for at least an hour before cutting into squares or slices of tart. Enjoy!
Well it’s been a minute since I have blogged but here I am. I have some good excuses. In May we took an anniversary trip to Bermuda. CG1 came home from Italy and CG2 from college. So with a full house (and full heart), the month was crazy busy (throw in our anniversary, my birthday and Mother’s Day as well as a family wedding and you get the picture!).
End of May brought Memorial Day and our beach and boat club officially opened. It was a gorgeous weekend. Unfortunately, the weather has not cooperated in CT since. This weekend looks rainy (after a beautiful, sunny week!).
I am not complaining after a drought last year, but still maybe I’ll complain a tiny bit as we love our club so much and it is weather dependent. Oh well.
I have been spending a lot of time in the garden (a Covid pasttime that stuck). I am growing Zinnias and Nasturtiums from seed, bought a bunch of perennials and of course annuals. So far, everything looks great (fingers crossed I may actually have some lasting flowers). Check out the photo of last year’s Nasturtiums…they were gorgeous!
Two recommendations for fellow gardeners both novice and expert. I love the app Picture This. You can photograph a plant and it will tell you what the plant is and even if it is healthy or not. This saved me at the nursery where I was about to purchase some sick perennials! I find it helpful too as I often am drawn to flowers that frankly won’t grow well in the conditions in our yard.
Second recommendation is the podcast A Way To Garden with Margaret Roach. She is an expert gardener of course as well as a NYTimes columnist and author of several books. Some of the episodes are a bit too in depth for me but most are really helpful and interesting. With these two sources of knowledge, I’ve taken the gardening game up a notch!
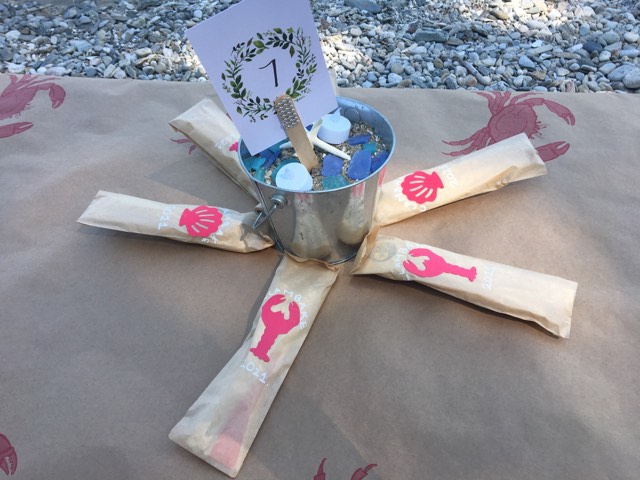
So that is a brief summary of what I have been up to – coming weeks are some of my favorites with the 4th of July, annual clambake and more. Sharing a pic of last year’s lobster dinner (and my tablescape).
Check back for some recipes I am trying out and hopefully a review of Grotto Bay and Bermuda. Have a great weekend!
April is upon us and while it has been very cold in the CT area, I have been very fortunate to enjoy some spring in Italy! I am very excited to share our one week itinerary to Florence and Venice, Italy.
While we have traveled to Mexico and other spots, it had been awhile since we made it to Europe. Our trip really could not have been more perfect and while I was originally worried we were trying to do too much in one week – our experience proved otherwise. CG1 is studying abroad in Florence so this trip was a must (of course) to visit her. Today’s post (and possibly a few future posts) will go over what we did, where we stayed, ate and other important tips to plan a fun one week itinerary for Florence and Venice, Italy. Our trip also included visiting the CinqueTerre and Siena, Pisa, San Gimignano as well as the Tuscan countryside.
Travel to Florence Practical Details
Being in CT, we decided to fly out of JFK, the largest airport in the New York area that has most of the international flights. We flew to Zurich, had a short layover and then headed to Florence. Of note, you do not need to claim your bags at a stop over in Zurich if flying Swiss Air (of course check to be sure). They checked our bags right through.We were greeted with the most amazing sunrise over the Swiss alps – breathtaking (see photo below). We left around 4:30 EST and without delays on Swiss Air landed in Florence at around 9 a.m. The Florence airport is on the small side and easy to navigate. We quickly picked up our luggage. There is a taxi stand outside the entrance and it was very simple to take a taxi. We confirmed the price (about $26 Euros with a few extra dollars for our luggage).
Day 1 in Florence
We take a cab from the airport to check into the Hotel Orto De Medici. The hotel is lovely and on a quiet street. Our room is off of the courtyard where Michelangelo was a student in the Academy that was held there. It is full of history and close enough to the main sites. We meet CG1 at her apartment and explore (note – better not to sleep if you can avoid it – it is good to be very tired that evening and get over the jet lag).
We walk to the Duomo admiring its dark green and white facade. The Duomo, consecrated in 1436, is a central feature of Renaissance art and easy to use as a landmark. After a lunch at a cafe and more sightseeing, we climb to the Piazza Michelangelo and then head to dinner at Osteria del Gatto e la Volpe for pizza with prosciutto, pistachios and burrata – one of many delicious meals we will eat. I also order the chicken Sorrentino. We head to bed after being finally struck with jet lag.
We are not tired…really…
Day 2 in Florence
We awake on Sunday to a delicious breakfast at the Hotel Orto de Medici. The sun filled atrium is the perfect place to enjoy eggs, pastries, and of course a fresh cappuccino as well as blood orange juice that is fresh squeezed with a special machine.
The first Sunday of the month, the museums are free in Florence which is perfect. We head to the Accademia to see David. David is as impressive and memorable as I recall when I visited my own junior semester abroad. I still love Botticelli’s Venus and so many other incredible paintings.
I had not visited the Church of Santa Croce before and wanted to see it this time so we headed there right after the Accademia. Santa Croce is a gorgeous church off of a plaza where jousts used to take place. Galileo and Michelangelo are buried there.
Santa Croce is not too far from the leather market and surrounding shops. It is time for some retail therapy, and I buy an Italian wool scarf from a boutique, and an orange pebbled leather bag from the leather market.
Lunch is at the Mercato Centrale which reminds me of Chelsea Place in NYC. Full of stalls with the most delicious pizza, panini, fresh pasta with wine bars not far away. We have a panini. Italian food here is so fresh. Even something simple like salami on bread takes on a new dimension. You can taste the freshness of the charcuterie, the bread and the olive oil.
Afternoon brings a tour of the Ponte Vecchio (or old bridge as it translates) which stretches over the Arno river. It is full of wonderful shops. We then enjoy an aperitif at CG1’s favorite café which is also a floral shop and boutique. Dinner is at the Trattoria Za Za – very reasonable prices and a lot of food! I particularly loved the spread of Tuscan appetizers.
Just a few appetizers Tuscan style…
Tuscany and Florence is known for beef. The Bistecca is a large, t-bone type of meat cooked rare. I pass on this but enjoy the local white beans. Bruschetta is everywhere, and it is, for some reason, so much better than home? The next day we head to Cinque Terre so we turn in for the night at a reasonable hour.
Day 3 Hiking the Cinque Terre
On Monday we wake early to head to Cinque Terre, a UNESCO protected site and national park. The park is also the third most visited site in all of Italy. It is pouring rain in Florence (is this not a great day to hike the Cinque Terre we ask ourselves?). I have booked this tour through Viator which we had an excellent experience with for all of our excursions.
Our guide is Alessandro, and he is excellent. We take a coach bus to La Spezia, which at one time was a beautiful city that was included in the “Grand Tour” for wealthy Americans. Sadly it was destroyed in WWII – even the cathedral and a hospital were bombed. We pass marble quarries on the way. Apparently Italy is a huge producer of both marble and marble dust. L’Oreal owns the mountain where so much of the dust comes from as make up uses a lot of marble dust (as does tooth paste!).
We take the train to Manorola for the first views of the Tyrrhenian sea. Luck arrives with good weather. We walk to Corniglia where we dine at Ristorante Cecio. Lunch includes a seafood appetizer and a delicious pasta with home made pesto. Pesto here includes seasonal nuts, basil, green beans and even potatoes.
Seafood appetizer…delicious!
After lunch we hike and are not disappointed.
This region, Liguria, is known for seafood. According to our guide, everyone in the Cinque Terre knows how to scuba dive as they go down into the crevices to fish for octopus.
After lunch we hike to Vernazza. The hike is fairly challenging so much of the group decides to forgo it. We forge on – the views are beautiful and there are air bnbs along the way (which I would love to stay at!).
Vernazza is our favorite town. There is a small beach, a beautiful church and a number of cafés. We sit down and enjoy the local Limoncino (similar to Limoncello but not the same). We buy some souvenirs in the local shops. We then head to Manorola which is the largest town and in our opinion, not as charming. You can take a boat here but the weather did not permit it so we moved onto Rio Maggiore.
Rio Maggiore is gorgeous. The best photo is here and we love the colorful houses and bright fishing boats that line the beach. We buy a bottle of the local, white wine to enjoy later. Tiny vineyards dot the hillsides (along with other crops) and the local, small farmers can sell to the larger cooperative to make wine to sell.
We return around 8:15 and are tired so we head to the Mercato for some wine and food from the stalls.
Day 4 Onward to Venice
CG2 and I are up early to head to Venice. We enjoy a last breakfast at the Orto de Medici, take a short walk in the area and then head to the train station. The station is quite large with numerous boutiques. We enjoy shopping a bit before boarding our train. Our hotel is about fifteen minutes from the train station.
The Hotel Moresco in Venice is a gem. We are greeted with a glass of prosecco in the lovely parlor adorned with stained glass windows and beautiful, antique furnishings. The hotel is in the Dorsoduro neighborhood of Venice which is quieter but still lively. We walk to the Piazza San Marco, the Rialto bridge and shop a bit. We love a small leather and paper boutique where the artisan is cutting paper and leather in front of us. We purchase a journal and a paper book mark for CG2.
The hotel offers cicchetti, or Venetian snacks with an assortment of drinks. The food is delicious and the ambience relaxing. Our fellow guests are largely British. We venture out for dinner and happen upon the Osteria Oniga. The place is crowded and has more than one table of Americans (it is top ranked on Trip Advisor). The black “cuttlefish” pasta is divine. I have the three course menu which includes “sour sardines” (sardines with sauerkraut).
Day 5 Tour of Basilica and Doge’s Palace in Venice
Wednesday: The hotel has a delicious buffet with eggs made to order. Honeycomb honey is delicious by the way (they serve an entire honeycomb on the buffet!).
We stroll and shop the morning, stopping for artichoke pizza (the food is amazing here and each restaurant is charming – even for simple food!). We have a tour booked at 2 p.m. to see the Basilica di San Marco and the Doges Palace. Our tour guide, Nicoletta, gives us an in depth tour. So much to learn! The church is over a thousand years old and is full of tiny (real) gold mosaic pieces. St. Mark’s “relics” are here. Each ceiling is even more fantastic than the next. Apparently the Doge was head of the church (it did not report into Rome). The style is modeled after the St. Sofia in Istanbul. Our tour includes the balcony where we can see the Piazza San Marco as well as the bell tower and working clock which has two statues that move when the time changes.
The Doges’ Palace is full of Tintoretto murals – each one more impressive than the last. The largest painted canvas in the world is here in the Senate room.
Post tour we relax with a gondola tour which does not disappoint. Something about seeing Venice from the water makes this city even more magical.
We enjoy appetizers again that evening. Dinner is at a darling restaurant where our waiter is fully entertaining. Alexia enjoys the cuttlefish pasta again while I try a sampling of cod.
Day 6 Touring the Venetian Islands of Murano, Burano and Torcello
Thursday: Thursday we are up early to enjoy breakfast. Today we are touring the islands in the Venetian lagoon. I booked a tour to Murano, Burano and Torcello. Originally I thought we might figure out our own water taxis but it was daunting especially as we had to catch a train later that afternoon.
The tour is perfect – a “taste test” of each island. I plan to return to stay longer. On Murano, home to famous blowned glass, we see a short demonstration of glass blowing and then stroll the darling streets that line the canal. We purchase a glass sail boat at a shop where the artisan is in residence.
Burano is my favorite. The houses are so colorful. Burano is known for hand made lace as well as S shaped cookies. We buy some cookies, a tiny Venetian mask and enjoy a tiramisu cannoli.
Torcello is the quietest. Hemingway and Princess Diana have eaten at one of its famous seafood restaurants. There are two very old churches here and the feeling is very peaceful and natural. Back in Venice we have a delicious panini (we marvel at how the simplest food is so good in Italy!). Onward by train back to Florence.
We check into the hotel Perseo. It is not fancy but the people are very friendly and welcoming. It is also right next to the Duomo and close to CG1’s apartment.
Day 7 Siena, Pisa, San Gimignano and Tuscan Winery Lunch
Friday: Our last day will feature a tour of Tuscany and the cities of Pisa, Siena and San Gimignano.
First stop is Siena another UNESCO site,. Siena is an ancient city which once rivaled Florence until much of its population was struck down by the plague. Siena has a number of sestieres (or neighborhoods) each one represented by an animal. The year’s highlight is a horse race where the neighborhoods compete. Siena has a number of rules as it is a UNESCO site. There are approved colors for the building colors and shutters (green, brown, grey).
We visit the impressive cathedral which has one part that was never fully constructed due to the plague. Inside there are statues carved by a young Michelangelo. The floor is inlaid with scenes from the bible and the library is a gem.
Next stop is a Tuscan winery and farmhouse. We sit with two Macedonian women and other study abroad students. The wine is delicious. Lunch starts with charcuterie, cheese, fresh bread with virgin olive oil and balsamic vinegar. Chianti “Classico” (which is the best mark for Chianti) as well as a light white wine. The main course is pasta Bolognese – perfectly cooked with just a little bit of meat and a perfect tomato sauce. Dessert includes a rose wine with some biscotti. Naptime on the bus!
After lunch we visit San Gimignano – a medieval town known for its slim towers and now – award winning gelato. We purchase some divine, lemon soap and of course have to sample the gelato which is the best we have ever had.
The last stop is Pisa. The tower, featured all over the world, is actually beautiful – white with carvings. The basilica is also gorgeous. We have to take the tourist photos.
Back to Florence for our last dinner. We head to Acgua Al Due – which I realize I dined at way back when I visited Florence junior semester abroad. We have a long wait but the food is excellent. The salad sampler is sooo good (especially the pear salad with nuts and cheese). I order chicken with wild mushrooms. The girls have ravioli with pear and cheese. Dessert is the sampler and the tiramisu is more delicious than I remember.
The perfect ending to a fantastic week! Can you do a comprehensive trip to Italy in one week? Well, maybe not…but hopefully you enjoyed this one week itinerary for Florence and Venice Italy!
Hey there! After a fantastic long weekend on the slopes, today’s post is about where to ski in New Hampshire.
Our family loves a day of skiing with après ski either on mountain or maybe at home – with our favorite buffalo dip appetizer.
I grew up skiing in New Hampshire and Vermont. While I have skied all over the U.S., New Hampshire has a charm of its own. No nonsense, not too fashion conscious and full of down-to-earth folks who love a good brisk day on the slopes (with plenty of après ski afterwards). And, if you have an Epic pass, you won’t want to miss the three resorts that take it.
Where to ski in New Hampshire for Epic Pass Holders
This past weekend, Mr. SB and I decided to explore New Hampshire resorts. We focused specifically on those that took the Epic pass – Wildcat, Attitash and Sunapee. We started off with Wildcat mountain.
Wildcat Mountain – Know before you go
Wildcat is the furthest away (of the three) from southern New Hampshire and the Boston area (where many skiers make day trips). You wind your way through North Conway, NH which has a very extensive outlet shopping area and many quaint restaurants and shops. The drive up from our place near Winnipesaukee was beautiful. We drove along a pristine river and some darling small towns.
Wildcat is known for its stunning views of Mt. Washington. Mt Washington is the highest peak in the East (East of the Mississippi) at over 6,000 feet. While half the size of some of the Rocky Mountains, it is impressive. The week before it also held the world’s attention as temperatures dipped to 100 below zero degrees.
I recommend checking the weather carefully and in particular the wind conditions at Wildcat which I will get into next. As you can see, I prepared well by wearing all the layers and being sure to cover my face!
I am somewhere in there!
What it was like to ski Wildcat
Thankfully Saturday was a balmy 32 degrees going up to 40. Not surprisingly, there was some wind. Wildcat, being so close to Mt. Washington, can be very windy. Two of the lifts were closed when we arrived. Unfortunately, the Express to the top was one of those lifts. We took the triple up halfway and while the views were beautiful, we did not have the complete Wildcat experience until the Express lift to the summit opened.
Wildcat has some of the longest runs from the top in the state. We were not disappointed. In addition to a beautiful view, the skiing was superb and with blue skies and excellent snow we had a great day. Be sure to snap a photo in front of Mount Washington with the sign telling you the altitude (see my main photo for the view).
We love après ski as much as we love to ski. Wildcat’s lodge, while basic looking on the outside, had a charming pub. Food prices in the cafeteria were also very reasonably priced. Epic pass holders get 20% off!). All in all, Wildcat is a hidden gem that I wished I had not waited this long to try!
Attitash: Know before you go
Next up on our Epic pass New Hampshire tour, was a visit to Attitash Mountain. We skied Attitash a few years ago with the girls on a cold and icy day. Frankly, I was not too happy with the experience. While you should always check the weather before skiing, I would say it is particularly important for Attitash.
What it was like to ski Attitash
Attitash was amazing this past Sunday. Skiing Super Bowl Sunday will now be a tradition chez SB! We felt like it was our own mountain for the day. The skies were blue, the snow was great, and temperatures were like spring skiing. Attitash has 68 trails and 8 lifts. Almost every trail was open.
Trails wind past some lovely ski chalets. I loved the wooded feel of many of the runs.
The lodge has entertainment almost every Saturday with live music. There was a cute pub. We ate in the cafeteria which offered typical ski food. Mr. SB enjoyed a bratwurst while I sampled the chili. Both were tasty and while a bit overpriced – in line with typical ski lodge pricing and quality.
After skiing we decided to stop in at the outlets in North Conway. There are numerous brand name outlets including: LL Bean, J Crew, Talbots, Loft and more. I picked up a cute puffer vest at Talbots for $30 (retails $150 and even on sale is about $100) while Mr. SB scored some $10 J Crew shirts. Definitely worth a trip!
Sunapee: Know before you go
Mr SB and I took the day off Monday to ski Sunapee. Sunapee is the closest of the three resorts to Boston so it can be crowded on the weekends with day skiers. I would avoid long weekends in particular as well as school vacations for both Massachusetts and New Hampshire.
Mount Sunapee looks over Lake Sunapee which is a beautiful lake surrounded by summer homes.
The view of Lake Sunapee from the slopes
What it is like to ski Mount Sunapee
Skiing Sunapee was highly enjoyable. The ski resort boasts 66 runs. Of the three resorts, we found the skiing to be the easiest. The views were gorgeous as you see the lake and five other ski resorts in the distance. As it was a Monday, we skied ten runs in two hours!
After skiing we hit the pub. The lodge where it is housed, was a bit on the older side – typical seventies ski lodge look. Of note, you will not get the Epic pass discount in the pub. The chili was tasty. Mr. SB had a turkey avocado wrap which he said was delicious.
Where else to ski in New Hampshire?
While this mini get-away focused on the Epic resorts, we have also skied Waterville Valley and Gunstock. I grew up skiing Waterville. It is a favorite. There is only one road in and out of Waterville Valley and it is stunning. Last I skied there, it still had the old double lifts that go all the way to the top. I remember skiing that terrain when I was about six years old!
Gunstock has gorgeous views of Lake Winnipesaukee. We also love their local pub for lunch. For non skiers there is a mountain coaster which our girls tried and said it was great fun. There is also an outdoor sports center where you can rent cross country skis. We tried that one day and loved it too. Lastly, fun fact, Gunstock also offers night skiing.
Where to ski in New Hampshire? Try one of these options or explore others. For a great day with some old New England charm thrown in, I highly recommend trying these resorts. Until next time – happy skiing!
Well, the weeks fly by, and it is hard to believe it almost mid-December. Today, it is a holiday catch up (and catch up in general). Let’s talk Christmas trees, holiday decorating and food!
Christmas Tree Tailgate
Are you a faux tree devotee or an all-natural tree lover? Not surprisingly we are all in on the natural tree that we actually cut down at a tree farm. We love the atmosphere of tailgating families, hayrides and an adorable holiday village and stores (all at Maple Row Tree Farm in Easton, CT). We like to support thelocal farm (they replant the trees of course).
We also love to tailgate with friends. Every year we always include some favorite menu items – Mr. SB’s sliders with caper mayo and my ever famous buffalo dip. Mimosas are usually the drink of choice. It may just be my favorite day of the year. It is one of the happiest places I have ever experienced!
I adore the smell of fresh pine and the traditional look of it all. However, when I lived in California, I remember thinking a natural tree would not really be my desired look – the warm weather threw me off. However, in a colonial town in CT, it is perfect.
Years ago, my girls decided they wanted colored lights which I happily obliged. But a few years ago, we all agreed that we wanted an all-white light tree. I love how it coordinates with our family room and it fits the many ornaments we have so much better than multicolored. I usually start with the lights and then wrap gold ribbon around the tree for a garland. Our angel goes on top and then the girls and I decorate with the rest of the ornaments – some are over one hundred years old and passed down from my grandparents! I love to collect ornaments from places we have been.
Wrapped presents for under the Christmas tree
I love to wrap presents (see an entire post about it here). A great tip gathered from my favorite mom blogs is to buy some coordinating wrapping paper. I tend to do gold and white with a few accents of dark green. Too much red does not work in my color scheme. Homegoods has beautiful, thick wrapping paper. It is such high-quality that I usually even reuse it the next year for the larger gifts!
I also collect ribbons and ornaments to decorate the packages. Costco, Christmas Tree Shops and TJ Maxx/Homegoods all have beautiful, wired ribbon.
This year’s house decor will follow previous years for the most part. I did buy a new front door mat – has more of a winter theme then holiday so I think we can leave it out until Spring. I used magnolias on my mantle and layered on some decorative elements just like last year.
I purchased this funny sign and plan to put it on the bar for Christmas day when we host 16 for dinner and cocktails beforehand. I have a Santa too that will go right next to it:)
This year’s Christmas dinner menu
This past weekend we hosted friends for dinner. First, we hiked nearby to work up a good appetite. Then back to our house for appetizers and drinks and then dinner. Mr SB made short ribs braised in red wine I made twice baked potatoes (but left out the bacon in the Pioneer Woman recipe and used light sour cream and less butter), smokey sweet carrots (hope to post that recipe soon) and steamed green beans. Delicious, winter meal! My friend brought a delicious apple crisp. It was a perfect night to enjoy the fire and chat afterwards.
We usually host Christmas dinner, so we have a list of favorites that we usually make. This year is no different – here is what I am planning (as of now) –
Glazed ham
Brisket (smoked on Mr. SB’s big green egg)
Seared mushrooms in sherry cream sauce with dill
Mashed potatoes (thanks to Costco just heat, serve and put in a pretty bowl)
Green beans
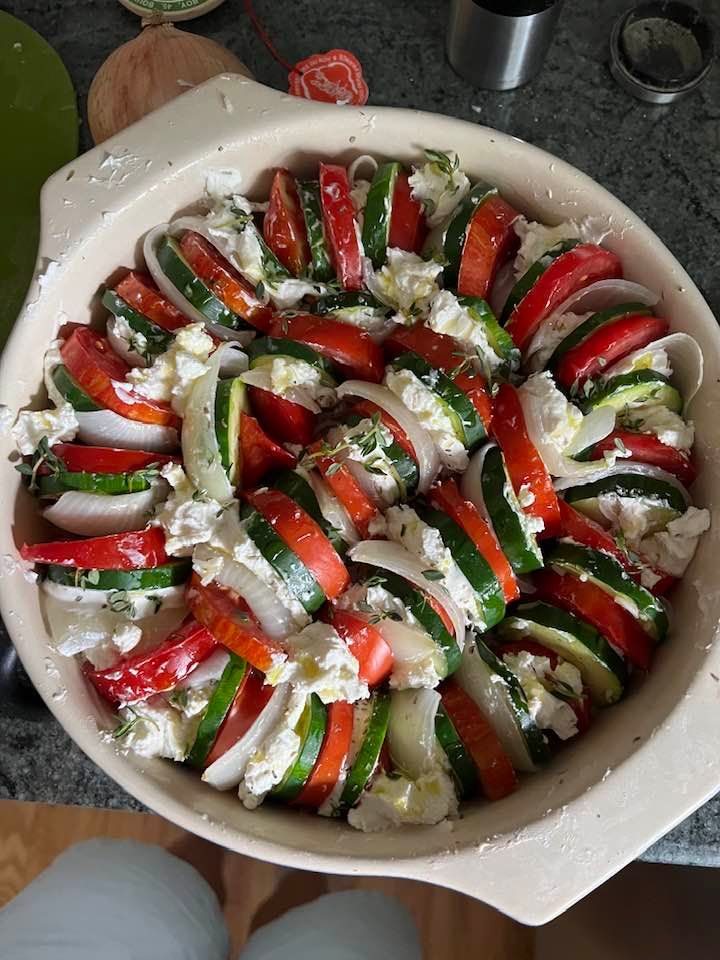
Tian with zucchini, tomatoes, onions and goat cheese
Smokey sweet carrots (recipe to come!)
Dessert – still thinking about it. Likely assorted holiday cookies and possibly a chocolate cake.
Well that about sums up what has been going on at the SB house. Hoping your holiday season is going well! What are you planning to make the season festive?
Truth – I wrote this post weeks ago. Just posting now. A few tech issues and too much going on…but happy to share what I made that weekend and wanted to share – Trader Joe’s Mixed Seafood Alfredo (Hack Recipe). By the way, if you have not listened to the Trader Joe’s podcast that features their hacks you are missing something…but I digress.
Also for a bit more recent goings on – we have had a fun but busy fall. Both girls are in college so we have been visiting. CG2 is in the Boston area and there have been so many fun tailgates. CG1 is in Vermont and well, fall in Vermont can not be beat. Trips to the farmer’s market, hiking and soaking in the wonderful New England atmosphere made the weekend perfect. Thanksgiving is around the corner – tonight I am making homemade stock and starting to plan (see my post from last year). My one major tip is to make the stock ahead of time! It freezes beautifully and you will be so happy you do! Something about having to make stock and then do all that cooking takes some of the joy out of preparing the meal. Happy late fall and now –
Here is the post from September.
We had such a nice restful weekend that I was able to do a bit of cooking. We have been tailgating up a storm lately making favorites such as sliders and buffalo dip. These travels to see our girls in college have involved traveling too. With piles of laundry everywhere and a garden in need of some love, it was time to stay put. While I did have time to cook some more elaborate meals, I also whipped up this super easy Trader Joe’s hack – Trader Joe’s Mixed Seafood Alfredo (hack recipe alert!).
All you need is a bag of frozen mixed seafood from Trader Joes, a jar of alfredo sauce, half a lemon, some dry white wine (optional) and some dried tarragon. It is hardly a recipe! But here goes read on for Mixed Seafood with Lemony Alfredo Sauce!
Trader Joe’s Frozen Mixed Seafood Lemony Alfredo Pasta
It does not get any easier than this…tasty seafood that you cook quickly from frozen with a creamy, lemony alfredo sauce. Easy and delicious!
Course Main Course
Cuisine Italian
Keyword easy, Pasta, seafood, Trader Joes
Prep Time 10 minutesminutes
Cook Time 10 minutesminutes
Ingredients
1BagTrader Joes Mixed Seafood (frozen) There are other brands too but Trader Joes is the one I used for this recipe
1Jar of Alfredo SauceI used Trader Joes but you can use any supermarket brand
1/2Lemon
1tspDried Tarragon
Instructions
Sauté mixed seafood in a wide frying pan. Add in a bit of white wine if using. Once cooked add the alfredo sauce. Simmer until nicely warmed through. Sprinkle tarragon and add in fresh lemon juice at the end. Serve over pasta, with a loaf of bread and salad for a delicious, super easy meal!
Summer flew by! We happily hosted friends all summer long at our club on the shore as well as at home. As I mentioned a few posts ago, Life is Meals right? My trusty blue journal has been filling up with this summer’s favorite menus. I noticed the other day, that more than a few meals had a favorite side dish – zucchini, tomato, goat cheese Provençal tian.
The dish is actually a tian, which is a French dish and really refers to the type of cookware. The main ingredients for this version are zucchini, tomato, onions, goat cheese on a bed of white rice drizzled with olive oil and a balsamic glaze. I also add in a generous handful of fresh, chopped thyme and some dried herbs de Provence.
It is a perfect side dish in the summer with zucchini and tomatoes being at their peak. That said, this dish has also graced my Christmas dinner table too. Even winter zucchini and tomatoes are still tasty prepared this way. The green and red of the dish are festive too. I also love how it is both a vegetable and starch which makes meal planning much easier.
Recipe to follow but let’s talk favorite summer menus first.
Menu #1 Short Ribs, Zucchini Tomato Goat Cheese Provencal Tian
A rundown of our weekends and favorite menus of course –
Late June, good friends of ours from business school made the trip to see us. They are also a couple comprised of a French husband and American wife so we have lots in common. J and Mr. SB are also excellent cooks and in fact J passed along the wonders of sous-vide cooking last year with some delectable lamb chops.
Mr. SB was not to be outdone so this menu features his sous-vide short ribs which are finished on the grill. I served a green salad, the zucchini, tomato goat cheese Provençal tian and this blueberry crisp with a side of vanilla ice cream. Note on the blueberry crisp I would not use as much flour as is called for in the recipe. It was a most memorable meal (in spite of the copious amounts of French Bordeaux we drank with it:)
Saturday arrived with picture perfect weather. Blueberry muffins, fresh orange juice, coffee and eggs were on the menu for breakfast. Dinner that evening included an appetizer of fresh clams and oysters (dug up by J and Mr. SB). The main course was salmon grilled on a cedar plank, grilled zucchini and eggplant, pasta salad. For dessert, well of course we had s’mores at the fire pit while we watched the sunset.
Menu #2 Zucchini Tomato Goat Cheese Provençal Tian
A few weeks later good friends arrived from London. Mr. SB once again decided to cook sous-vide this time, lamb loins. Lamb (and really any meat goes well with this dish), tian Provençal and salad. I also made this peach crisp which was delicious (the pecans really add to the flavor).
Peach crisp with a crunchy, pecan topping
Breakfast once again included: the famous Jordan Marsh blueberry muffins, along with zucchini bread, fresh orange juice, fruit salad and plenty of coffee and tea.
So enough about meals (or can there ever be enough?) and onto the tian. Years ago, we visited my in-laws, and I first tried Zucchini Tomato Goat Cheese Provencal Tian. The creamy goat cheese, sweet tomatoes and fresh zucchini and onions came together so perfectly. My sister-in-law gave me the magazine copy – it was from a French magazine (which I have since lost and forgotten the magazine name).
Through the years I have adapted it. Their version had the vegetables cooking together and as zucchini takes far less time than onions, there were a number of times when the zucchini was overcooked. She also shared a trick, take a knife to spread the goat cheese onto the zucchini coins. It is much easier than trying to cut goat cheese into slices.
I also shorten the recipe by occasionally using store bought balsamic glaze. If you are a purist (or don’t have glaze on hand), then you can boil down some balsamic vinegar for that part. I also love garlic olive oil, and I use that to coat my dish. As for the dish, I have an Emile Henry 4 quart casserole dish with a cover. You can use any 4 quart dish frankly although I do recommend a cover for part of the cooking.
So here is the recipe. Also, as it is always eaten so quickly, my photo is a “before” I put it in the oven…will try to add the cooked version at a later date!
Summer's favorite vegetables, assembled easily with crumbled goat cheese, fresh herbs on a bed of rice. Perfect accompaniment to any meal (and any season!).
Course Side Dish
Cuisine French
Keyword French, Goat Cheese, Provencale, Side Dish, Tomato, Zucchini
Prep Time 30 minutesminutes
Cook Time 40 minutesminutes
Servings 6
Cost $8
Equipment
1 4 quart dish suitable for baking
Ingredients
4medium zucchini or 2 large
4 tomatoes
1large onion or 2 small
1log of soft goat cheeseCostco has an excellent one that comes in a two pack
15clde vinaigre balsamique
White rice – enough to cover the base of your casseroleabout 2 cups
1cloveof garlic
1teaspoonor more of chopped thyme
Herbs de Provence to taste
Extra virgin olive oil
Salt and pepper
Balsamic glaze
Instructions
Preheat oven to 350
Wash all vegetables and dry. Slice zucchini into 1/4 inch or so coins. Spread goat cheese on top. Slice tomatoes and onions. Put onions in microwave for a minute or two until starting to cook (they should not be fully cooked as you will cook them some more in the oven).
Grease casserole with olive oil. Run a sliced garlic clove around greased sides and bottom or use garlic olive oil.
Spread rice on bottom of casserole. Layer zucchini, goat cheese, tomato, goat cheese, onion on top. I like to layer so it looks pretty. Sprinkle chopped fresh thyme on top. Sprinkle herbs de provence on top too.
Bake covered for a half hour. Uncover and bake some more until vegetables are fork tender.
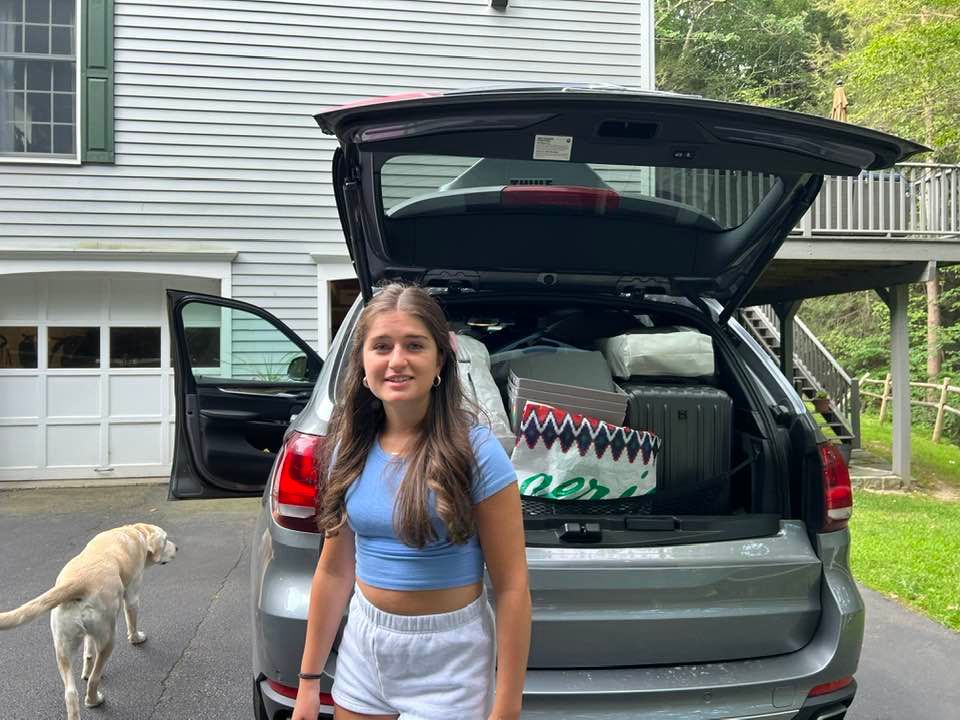
So we just returned from dropping CG1 off at college. We are officially empty nesters. If you read my last post about saying goodbye, you know that when we get to this stage with an official goodbye, we are really saying goodbye to all of those other stages that we did not know we were saying goodbye to – that last time we picked them up, read a bedtime story, put out the Easter bunny candy and many more. That tiny baby who could not walk or talk, the kindergartener who soon was graduating from fifth grade or that confident high schooler crossing the stage for her diploma.
All of this was in my mind but I also realized that this milestone is reason for celebration too. CG1 and CG2 are in the right places, both ready to thrive and become the adults we have worked so hard to help them be.
Mentally we moms try to get ready. Packing the memory foam mattress topper, an extra set of Twin XL sheets, surprise snacks and maybe a pillow personalized with her zip code. It keeps us all busy and for us, this was so much fun. Both girls and I love to decorate and plan.
The day arrives, the car is packed and loaded to the top of the Thule. Mr. SB and I are ready right? We arrive at college. Lots of helpers to unpack. And, CG2 and I unpack and decorate the room. Her roommate is super nice, and the roommate’s parents are too.
Oh and CG2 is attending my alma mater. It sure has changed. Really hard to get into (am sure I would be rejected now:) but it is the same in so many ways. This makes it both easier and harder as I recall my own struggles as a freshman.
It is time to say goodbye. We hug, and yes, we are misty eyed. Of course we know that texts and Facetimes await us anytime we want but nothing beats being in person.
Mr. SB and I drive off. I see a dad giving his son a hug. It is an emotional day to say the least.
I call it happy/sad or sad/happy depending upon the day. Happy because seeing your children grow and achieve important milestones is one of life’s greatest joys. Sad, because frankly the day-to-day won’t ever be the same. The “What’s for dinner?” or “Mom I need new ballet shoes can we go after school?” days are mostly over.
I know there is also so much to look forward to. In our case, football games, tailgates and parents weekend in a few weeks. October break where both girls should be home.
And, in my empty nester new life, more time to work peacefully without interruption. Time to exercise (after work which I have not done since the girls were born). Time for new hobbies such as gardening, sailing/kayaking/hiking, skiing for two and more. Travels for Mr. SB and I (and not during summer or breaks when everyone else travels and it is expensive and crowded).
As the saying goes, if you have done your parenting job right, then you are out of a job at some point. We may not be quite there…but hopefully we are on track for that promotion. If not, we have not really done our job now have we?
And this was a fun day in spite of the bittersweet feeling. Decorating her college dorm and knowing lots of fun adventures and challenges lay ahead is a memory I won’t forget.
This morning, bright and early, College Girl (who I will now refer to as CG1) left for her junior year and a new apartment in Burlington, VT. I was fine. I really was until I saw high school girl (soon to be referred to as College Girl 2 or CG2 as she is no longer in high school) with tears rolling down her face.
You see, this year, CG2 will be embarking on her own college journey so I think we all realized at the hour of 6:30 a.m. that our little family won’t be the same…at least not on a day-to-day basis. Even G our 80-pound pile of Labrador love felt it trying to squeeze herself into the front seat:)
I am sure no one will notice me here…
The past few weeks have been a flurry of getting both girls ready for college. CG1 has a new apartment so she needs items like pans, cleaning supplies, silverware. CG2 is moving into a typical freshman dorm so the shower caddy, twin XL sheets and comforter, frames for pictures and all kinds of storage were on her list. So off we went to Ikea, Target and the girls even hit a local flea market for one-of-a-kind items. We have been busy, busy, busy.
Time Flies
Some of this is surreal. I mean it was yesterday that Mr. SB and I were looking at CG1 in the delivery room. We said her name, and she turned to look at us. There was no mistake she had heard our voices in utero and knew exactly who she was looking at now in the world. I mean this was yesterday, right?
Or watching the first time she ate real food, skied, rode and then jumped a horse, rolled over for the first time onto her stomach (this last one was with my mom which was so special). All of those school memories too. Getting on the bus for kindergarten (without a glance back), presenting at fifth grade graduation, having her girlfriends for a sleepover in middle and high school, earning National Honors at her high school, calling us from babysitting to tell us she was accepted at her dream college.
CG2 entered the world two years later – sleeping all day and up at night (threw out my strict schedule that I had for CG1 when she was first born). I remember she smiled so much even at a sick visit doctor appointment. The doctor was sure I was an inexperienced mom and she was just fine. How could she be sick with that beaming smile? She had a 102 temperature by the way – I was not inexperienced at all!
Or the day she was chosen for the spelling bee, read her essay on the danger of drugs to the entire fifth grade, starred in the fourth-grade play, went to her first dance, toured colleges in the south with me last summer, shouted with joy at her acceptance to her dream school, right up to walking across the stage for her high-school diploma? Where does the time go? It plays tricks on us for sure.
The Days are Long but the Years are Short
You see what has hit me is as we say goodbye as they embark on this new stage of life away from us (at least for nine months) – we are also saying goodbye to that baby, toddler, kindergartener, awkward middle schooler, confident high-schooler. We never said goodbye to those younger versions. They just disappeared as we unwittingly moved onto the next phase not really realizing that they had left.
Those early years of parenting had some of the longest days…but as they say, those years were also painfully short.
Of course, our kids come back. Of course I have, as of the time of posting this, had a Facetime tour of her new place. Of course, I will be sending a care package this week (complete with my care package chocolate chip cookies). Of course, we have so much to look forward to (including fall college visits to see them). Of course, empty nest hood will mean time for things that we have put to the back burner.
While this is all true, this time, I know the last phase is over and a new, exciting one is about to begin. I will hug them tight, shed a tear, allow myself to process it all. We parents have been so busy getting them ready to leave for college, it is now time to get ready for our next step too.
If you read my last post you know that for me, memories, places and food have always gone hand in hand. Many years ago, I visited a friend’s home on Wellfleet, Cape Cod for the weekend. After making the long trip from Boston (complete with bumper-to-bumper traffic), we awoke to a brilliant, blue-sky Saturday. This house had a panoramic view of the Atlantic Ocean. Breakfast, served on the deck, was comprised of some good strong coffee, freshly scrambled eggs, sausage and the most delicious blueberry muffins. My hostess shared that the recipe was supposedly based upon the legendary Jordan Marsh blueberry muffin recipe. The “secret” was the addition of mashed up blueberries to the batter.
Maybe it was the sea air, the in-season, local blueberries or maybe it really was the recipe. Fast forward many years, and I have recently found myself on a hunt to know all about these amazing muffins named after the now closed, but once famed Jordan Marsh department store.
What is Jordan Marsh?
Jordan Marsh was a department store, founded in 1841, with a flagship in Boston’s downtown crossing. The store is deeply engrained in my memory. My aunt Mae always bought my Christmas present from “Jordans” when I was a kid. Usually, the gift was a very high-quality wool skirt and matching Shetland sweater (both in a size or two too big with the idea I could grow into it:).
Occasionally my sisters, mom and I would venture into Boston to shop Filenes Basement as well as Jordans. Jordans sadly closed in the early nineties. But the lore of one of the first American department stores and those muffins lives on today.
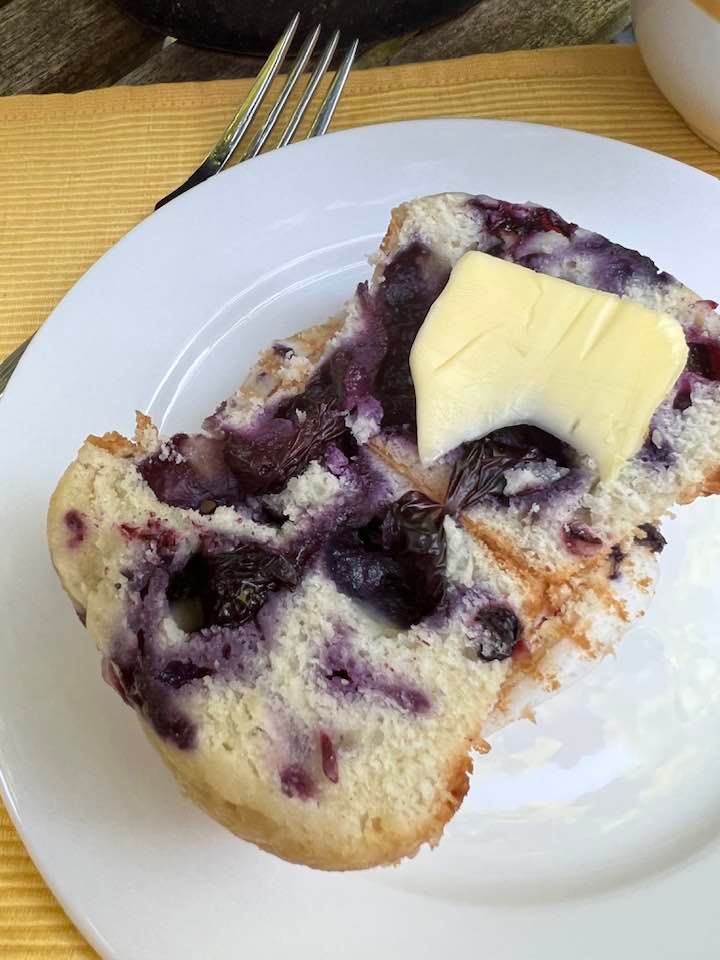
The legendary Jordan Marsh blueberry muffin recipe was once a coveted and secret recipe. Now there are variations all around the web and dozens of other muffin recipes of course. In fact, I recently made some fresh blueberry muffins for friends joining us for the weekend.
My muffin was well received. My friend bit into the home- made muffin and affirmed that a real blueberry muffin tastes sooo good. Homemade is nothing like the overly sweet, often greasy, tinny, minimal on the blueberries sort of muffin you tend to find at the supermarket.
While my muffin was very good, it was not “twenty years later I still remember it while looking out at the Atlantic Ocean good.” I recalled how so many years ago my friend had said that the mashed blueberries made all of the difference. But there had to be more, so I decided to do some research.
Secrets from the original Jordan Marsh baker
First, the baker, John Pupek, who originally created the recipe was interviewed on TV! John explains, that yes, you want to mash up some of the blueberries. You also use a blend of flours – one is pastry flour (I found the Bob’s brand on Amazon). The interview also indicates that John likely used shortening instead of butter (or maybe a blend). I could not personally bring myself to use shortening knowing all of the adverse health effects. A good sprinkle of sugar on top gives it a crunchy dome as well.
So here is what I think is pretty close to the real Jordan Marsh blueberry muffin recipe. Grab a cup of your favorite tea or coffee, spread with some good butter and enjoy!
The legendary Jordan Marsh blueberry muffins were a treat for many Bostonians visiting downtown crossing. The recipe was a secret for years. SB researched just what made those muffins so good (hint it is more than mashed blueberries). Read on for the recipe and a bit of history.
1 Stand or electric mixer This recipe is very easy with a stand mixer outfitted with the paddle attachment. You can use an electric hand mixer if you don't have a stand version
Ingredients
8Tablespoonsunsalted butterroom temperature
1cupgranulated sugarplus extra for topping
2extra large eggsJohn Pupek refers to fortified eggs. These could be Eggland’s Best. I used farm fresh eggs instead and the muffins came out perfectly
2teaspoonspure vanilla extract
1¼cupbread flourspoon and leveled (substitute with all-purpose flour if not available)
¾cuppastry flourspooned and leveled (substitute with cake flour if not available)
2teaspoonsbaking powder
½teaspoonsalt
½cupwhole milk
2 ½cupsfresh blueberriesdivided
2Tablespoonsflourused to coat 2 cups of blueberries (can be any flour)
Instructions
Preheat oven to 400°F, position oven rack in the center. Spray a muffin tin with non stick spray including the top of the pan. Line with muffin paper liners (due to blueberries, these muffins can stick to the pan)
In a stand-alone mixer fitted with a paddle attachment, cream butter (if you don’t have a stand mixer, you can use an electric hand mixer). With the mixer on low, gradually add 1 cup granulated sugar. Scrape the sides down then beat on medium speed until light and fluffy, about 5-7 minutes.
Gradually add the eggs, one at a time, and beat until blended. Add the vanilla extract. Beat for a few minutes on medium until light and fluffy.
Spoon and level 1¼ cups of bread flour (substitute all-purpose flour) and ¾ cup cake flour (substitute pastry flour), 2 teaspoons baking power and ½ teaspoon of kosher salt. Sift together over a mixing bowl and whisk to combine all the ingredients.
Add the dry and wet ingredients to the creamed mixture alternating between flour and milk, starting and ending with flour and scraping down the sides as you go. Beat on low just to combined. Don’t over mix (or you will have tough chewy muffins)
Remove the mixing bowl from the stand-alone mixer and scrape off any batter from the paddle attachment.
In a small bowl, mash ½ cup of blueberries. Fold into the batter with a spatula. In a separate bowl, coat and toss whole blueberries with 2 Tablespoons of flour and fold into the batter.
Generously fill each muffin cup to the top. Sprinkle a teaspoon or so of granulated sugar over each muffin.
Note: I used 1 teaspoon of sugar as a measuring unit, but in the original recipe, enough sugar was spread over the top to completely cover.
Bake at 400°F for 5 minutes. Lower temperature to 375 and bake for another 20. Muffins may need another five minutes for a total of 30 minutes. Tops should be lightly golden.
Insert a toothpick to test for doneness. If it comes out clean, remove the muffins from the oven and allow to cool in the pan for about 30 minutes.
Remove and finish cooling on wire rack.
For me the best way to eat these is right out of the oven with some good quality butter. Enjoy!
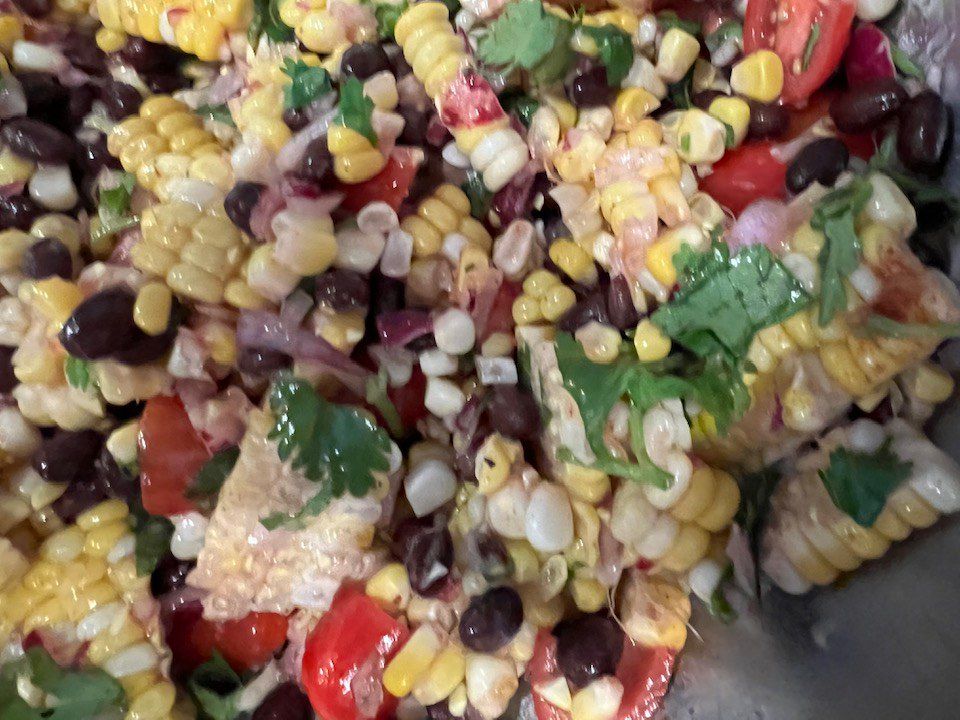
Summer is in full swing, and we have been making the most of our beach club on the CT shore. Every weekend we eat dinner there (weather permitting) and this past weekend was no exception. We have had a steady stream of guests too, so I have wanted to mix up the sides from the usual pasta salad. Mr. SB tends to grill (this past weekend it was his famous ribs recipe) so sides are my thing…it is not quite corn season here, but I was able to find some fresh corn from Georgia at Whole Foods and dove in to make fresh corn salad with lime vinaigrette.
What ingredients do I use for Fresh Corn Salad with Lime Vinaigrette?
For last week’s version I used fresh corn (of course but you could use canned or even frozen), tomatoes, cilantro, red onion, chives and black beans. This recipe is super versatile though so you could add some red or green peppers, scallions and mix up the spices too – parsley would work just fine.
The lime vinaigrette is also so easy to make. I used a very mild olive oil (avocado would work well too), fresh lime juice, garlic, some white wine vinegar, salt and some chili powder. If you have access to a Trader Joes I love their chili lime spice (available online too), and have used that too in both the salad and the vinaigrette.
What does the salad go well with?
Most summer fare would work with this salad. We ate it one night with some burgers and then again at our fourth of July celebration. I have been known to put some tortilla chips out and serve it as a dip. It is also delicious as a salad topper. The flavors are the taste of summer!
Fresh Corn Salad with Lime Vinaigrette tastes like summer! Fresh corn combined with ripe tomatoes, fresh cilantro, black beans, and a hint of red onion with a zesty, lime dressing makes a perfect side for ribs or whatever you are grilling.
Course Side Dish
Cuisine American
Keyword Sides
Prep Time 20 minutesminutes
Cook Time 5 minutesminutes
Servings 6people
Cost $5
Ingredients
Corn Salad
5ears of corn shucked and steamed or boiled.
1red pepper cut in small dice
1cupgrape or cherry tomatoes halved
1/2cupchopped cilantroor to taste
1can of black beansdrained and rinsed
1/4cupchopped red onion
Lime Vinaigrette
Fresh lime juice from one limeor to taste
¼cupof white wine vinegar
¾cupof mild tasting olive oil
1/8teaspoonof cayenne pepper
1teaspoongarlic salt
1teaspoonof sugar or honey
2teaspoonsof Trader Joe’s chili lime spice mixor 1 teaspoon of chili powder if not available
Instructions
Instructions
In small bowl whisk lime juice, honey (or sugar), ground cayenne pepper, garlic salt and chili powder or Trader Joe’s spice. Slowly drizzle in olive oil; whisking continuously.
Remove corn from cobs (I angle a knife to remove kernels)
In a large bowl and add the cooked corn, diced red peppers, grape tomato halves, cilantro, black beans and red onion. Drizzle with the lime vinaigrette and toss to coat.
Notes
If at all possible use fresh corn. Either white, yellow or bi color corn. I cook corn by putting about two inches of water on the bottom. Once it boils the corn steams. I check it after two minutes (early season corn is more tender and takes less time to cook). Then I cut it right off the cob once it cools.
• In a hurry? Make the lime vinaigrette the day before. You can also use leftover corn.
• Dice and cut your vegetables small. You want all your vegetable to complement the corn.
Before I get to a summer update and my recipe for fresh corn salad with lime vinaigrette (my next post) – a spring update is in order! I realize my last post was from our spring break in Indian Rocks Beach, Florida. So much happened after that as it was high-school girl’s senior spring.
Senior year is a year of “lasts”, so each event was very bittersweet. Fortunately, I knew it would fly by, and so I made sure to soak in every second. With college girl, that was not an option as senior spring ended March 13, 2020 due to Covid.
First up was senior prom. All, heads up for you newbies – one starts shopping for the dress in February (no that is not a typo). This is far more complex than when I went to the mall with my mom to pick out a dress. Girls log their dresses on Facebook so no one will have the same one. After the stress (and a bit of drama) it all worked out. She and her date looked so great (lavender dress with lots of detail). We were fortunate to go to two beautiful pre prom parties and took dozens of photos. After no real junior prom, the kids so enjoyed themselves (and we did too!)
Up next was the last dance recital. Dance has been a fantastic outlet for high-school gal, and she started at age 3! After staring at her older sister’s dance class, the dance instructor finally let her in to the class! I don’t consider myself a dance mom but let me tell you every recital is like watching them grow in technicolor. I have loved watching her dance and am so glad she stayed with it (even after many other sports were tried). Dance introduces you to music, culture and of course is physically challenging (especially if you dance six days a week as she does!). I will miss the rhythm of the Nutcracker (camp begins in the summer with an intensive) and that spring recital too. Empty nest hood awaits – maybe I should start dancing again?
Next it was senior awards night. This mama was so proud as little miss earned the Civic Leadership award from the Social Studies department plus a service award for her involvement in Save the Children and two scholarships! That same week was the end of year Girl Scout ceremony. Bittersweet for me again, as I have been a leader for nine years and she has been a Girl Scout for 13. She was awarded another scholarship (more on this to come…Girl Scouts is a fantastic opportunity for college applications (in addition to being a great organization in general).
Lastly, before we knew it, she was crossing the stage for her diploma. Again, missing a real graduation in 2020 (and I am not complaining as I know so many lives have been lost to the pandemic so these events took the backseat to all of that sadness), we soaked it all in. Next thing you know it was the fourth of July this past weekend! As this post is rather long I will save my fresh corn salad, tablescape tips for the next post. Glad to be back blogging!
Hi all…April has been a whirlwind and I have been meaning to blog but am just getting around to it. I have not been cooking much as we have been traveling and really busy with work and end of year planning. So today’s is more of a this and that jumble of what I have been eating, seeing, thinking!
Travel to Indian Rocks Beach Florida
High school girl and I took a trip to Florida for her last high school spring break. We flew into Tampa and stayed in a VRBO in Indian Rocks Beach. Our house (nothing fancy) was a short walk to the beach and within walking distance to lots of restaurants, cafes and more. Weather was great. Would recommend the area for a trip with teens that won’t break the bank. We had some nice meals too. Seafood was delicious at Guppy’s on the Beach and the folks at the Indian Rocks Cafe were so friendly. We enjoyed super fresh sandwiches, smoothies and muffins.
Couple of Good Instant Pot Recipes
While I have not been experimenting much with my own recipes this month, I did find two fool-proof recipes at Creme de La Crumb. Our weather in CT is still on the chilly side and I had stew beef in the freezer ready for a cozy meal. With my French husband that meant one thing – Beef Bourguignon. This recipe was easy and delicious. I added some extra fresh rosemary too. She has a few other Instant Pot recipes that are on my list to try. Will let you know how they go.
Personal Finance Podcasts
I love podcasts as they give me something interesting to do when I am walking my dog. I recently discovered The Financial Feminist which I am enjoying. I really liked the interview with Sallie Krawcheck. I am probably too far along for some of the other episodes but if you are dipping your toe into finance or just want a female perspective this is worth the listen. Of course Jean Chatzky is also interesting and I think there is a time and place for Dave Ramsey too. I would probably disagree with Dave on a number of his non-financial ideas but I think his get out of debt baby step plan is worth following if you find yourself in debt which many Americans are…
On the Bookshelf
With the travel came time to read! I was delighted to read The Storied Life of A.J. Fikry If you are a book lover you will enjoy this book about a curmudgeonly bookstore owner who surprisingly ends up raising an orphan girl. My favorite part is his attitude towards books and in particular – short stories. It is also on Nantucket (at least that is my hunch even though it is disguised as Alice Island).
I also finished The Lost Girls of Paris, another excellent read about women spies during WWII. Plenty of intrigue and twists and turns. So happy to have loved both books for my vacation.
Next up…
Now we are countdown to graduation for Miss High School (soon to be College Girl 2). College girl 1 landed an internship and will be home soon. Watch out for the fighting over the car! I am sooo looking forward to summer and getting out on the water. Will be back soon with more recipes and updates! XO, Mimi
Hi all. Not sure where winter went (although not quite done here in CT). Super busy at work but not complaining. Having a lot of fun – you know what they say when you enjoy what you do, and they pay you? #blessed. That said this poor little blog has been ignored…so today’s post is a bit of a catch up, and I am sharing what is hardly a recipe it is so easy (but so good)…Simple Artichoke Dip. It is delicious and takes all of 5 minutes to mix up and another 15 or so to cook in the oven. Read on for what may become your go-to dip for whatever entertaining you have planned.
January/February Catch Up
Winter is ski time around here and this winter was no different. We had a great time up at Mount Snow and at Stowe in Vermont. Of course, I made my famous Buffalo Chicken dip. There really is nothing better après ski! Serve with nacho or pita chips or maybe even just some thick slices of bread.
In adorable Stowe, VT, we stayed at the Green Mountain Inn. It is such a cute, historic inn complete with an outdoor heated pool and jacuzzi – nothing better after a day of skiing. Our room was spacious – it was actually two rooms and two bathrooms which worked well as we had our girls with us. We enjoyed afternoon tea and the general vibe of a cute Vermont inn on a cold, snowy day. At night we ate some yummy fondue at Swiss Fondue by Heinz. The vintage ski posters and chalet atmosphere made it a perfect place to dine. I recommend ordering the apples along with the bread to dip into the delicious Swiss fondue.
Simple Artichoke Dip
So that is the highlight of January and February…but let’s get to the good stuff – simple but delicious (as in I can’t stop eating it) artichoke dip.
Where did this begin? I seemed to recall something addictive, cheesy but full of texture that my mom made years ago. I remembered that it used a can of artichokes – yes the plain old ones that you get at any supermarket. Then you add some mayo and parmesan cheese. Mix it up. Maybe add some garlic powder and a bit of cayenne (or not). Bake it. That’s it. Sometimes life is complicated. This is not.
We went to friends for dinner this past weekend, and I made the dip. I prepared it at home but then put in a bowl and microwaved it at their home for a minute – just to reheat. Served with olives, pita chips, baby carrots and some hummus for a platter. There was nothing left. So, without further ado, here is the recipe for simple artichoke dip. It really does not get simpler or more delicious for a dip than this!
Hi there friends. It has been a while as 2022 has started out even busier than 2021 ended.
The SB family took a fantastic vacation to Mexico (hoping to write about it soon) and have been back at work/school catching up. I have also been making my usual new year’s effort to organize the house (ski clothes were yesterday). So, with all of that going on (plus work and school of course) it is just the right time for some super simple recipes that taste like your favorite takeout but may take even less time than it takes to dial the number (and a whole lot less money!).
Today’s post is for stir fried saucy udon noodles using supermarket ingredients that you can get at mainstream grocery stores. I have been craving noodles and some spice post holiday. I found myself staring at the pantry and freezer and realized I had some ingredients (nothing fancy) that may just suffice.
It was so nice to make a recipe from standard stuff that is easily found in the international foods aisle at my local Stop N Shop. So let’s run down what you will need on your next shopping trip because I am sure you will love this recipe. It takes all of 20 minutes to whip up (and that includes clean up) so it is great for days when you are short on time too.
Asian Noodles
The first step to making saucy stir fried udon noodles is getting your hands on some noodles. Ever wonder how your favorite Asian restaurant gets that chewy goodness? I have, and frankly what I just discovered is that you can buy it! Yes, look for Asian noodles where you find tofu in the refrigerator section. Lo and behold there are some very nice options. I tried Fortune brand’s Yaki Soba noodles. They come with a sauce packet, but I discarded that as you make a super easy (and healthier) sauce for these noodles. Other options at the market were dried noodles and packages of udon noodles in the Asian food’s aisle. I plan on testing the latter and will let you know how that goes.
The sauce and vegetables/protein for stir fried saucy udon noodles
The sauce here is very easy. A bit of dark soy sauce (or regular if you can’t find dark), oyster sauce, brown sugar and rice vinegar. Once again, all of these items are available at your regular old supermarket (as well as big box stores too). Next up on the ingredient list is a bag of stir fried vegetables. I used easily found Bird’s Eye brand. Again I did not use the sauce (by the way the store sauces are full of questionable ingredients…MSG, thickeners etc.). I happened to also have some fresh peppers which I sliced into thin strips and sauteed ahead of time, as well as some green onions and toasted sesame seeds for a nice crunch. You can easily add protein – sauteed chicken, shrimp or protein would go nicely. So without further ado, here is the recipe.
Stir Fried Saucy Udon Noodles (made from easy to find ingredients!)
Chewy, slightly spicy, saucy udon noodles are stir-fried perfection and just like your favorite take-out. They are also so easy to make (cheap too:) and use ingredients that you can find at any supermarket. Friendly for weeknights as you can have the noodles on hand along with a package of frozen stir-fried vegetables. Easy to add protein – tofu, chicken or shrimp are all delicious with these noodles. You will have this recipe on repeat!
Course Main Course, Side Dish
Cuisine Asian
Keyword Asian cuisine, budget friendly, noodles
Prep Time 10 minutesminutes
Cook Time 15 minutesminutes
Total Time 25 minutesminutes
Servings 4
Cost $7
Equipment
1 Wok or large frying pan
Ingredients
3tablespoonsdark or regular soy sauceI typically use low sodium soy sauce
2tablespoonsoyster sauce
1tablespoonbrown sugar
1tablespoonrice vinegar
1bagrefrigerator section udon noodles
1bagfrozen stir fry mix veggies
Tofu, shrimp or chicken, cooked to add if you like (or keep this as is without the added protein up to you!)
1bunch green onions (or to taste) sliced thin
1 to 2tbstoasted sesame seeds for toppingI like Costco brand – already toasted for you
Instructions
Sauce: Shake up all the ingredients in a jar or stir with whisk in a bowl.
Udon: Heat your wok or pan over medium high heat. Add oil. Add the noodles and enough sauce to coat. Stir-fry and then leave for a minute or two to caramelize. Microwave your frozen veggies and drain any water (important to drain the water or it will make the sauce runny).
Add the veggies. Combine and let cook for a couple more minutes until everything is covered in sauce and nice and hot.
Phew…it has been a crazy few weeks. This blog is clearly run by a real person…what other blogger (or corporation…as many blogs are not as personal as they may seem) does not blog all of the time around the holidays? Me. My full-time work recently included an offsite. With Covid I decided to attend virtually but the work leading up to it and then the actual session was all consuming. Not to bash my male readers (if there are any) but I am struck that only men would plan an offsite right before the holidays! Nonetheless, aside from the offsite, I have been a busy elf…shopping (mostly online), cooking, decorating etc. Of course I have been baking too, and I am excited to share my basic cookie dough recipe that you can customize into multiple variations – so easy and delicious (and everyone will think you have been slaving away for days with all of the different kinds!).
Christmas Tree Tailgate
As the tradition dictates, this family goes to a darling tree farm and cuts down the freshest tree. Our girls were tots when we started this tradition, and it is my favorite day of the year (not kidding!). From the Christmas market complete with oxen (yes you read that right) to the hayride into the tree “forest” it is always so much fun. In recent years we have included a tailgate with friends complete with Mr. SB’s sliders and lots of goodies. This year was no different. It was on the cold side, but we enjoyed sliders with caper mayo (a must), seven-layer bars (a throwback), plenty of mimosas (and just plain old champagne), chili and more. Our tree is a tad smaller this year but beautiful all the same.
Wrapping Presents
I have always loved wrapping gifts. It was my job way back when my mom and I would prepare for Christmas. I love having a blog as I can now see last year’s ideas! This year, I stuck with my gold and white theme – it just works really well with our decor. I included some holiday ornaments on the gifts and of course plenty of fluffy bows. Can’t wait to hand out gifts on Christmas day.
Holiday Goodies – Basic Cookie Dough Recipe
I have been baking cookies for years and frankly what I realized is that almost all cookies are a variation on one basic recipe. Today am excited to share this basic cookie recipe. It creates delicious, chewy cookies. By the way you do need to refrigerate the dough – apparently this step hydrates the flour and helps your cookies keep their shape (ever wonder why they look like pancakes…you need to put the dough in the fridge for at least two hours to avoid that fate!).
I love all of the varieties. I happened to have white chocolate chips, cocoa powder as well as dried cranberries so I made those two variations plus good old chocolate chip. Here is the recipe… Enjoy. I am signing off until the new year – may you and yours have a wonderful holiday!!
Basic Cookie Dough (with many variations)
A wonderful base to add in mix-ins for countless varieties of cookies from the classic chocolate chip to chocolate with white chocolate chips – feel free to be creative!
In a large mixing bowl add in melted butter, sugars, eggs, and vanilla extract and whisk together until combined.
In a separate bowl, mix together flour, baking soda, and salt.
Add the dry ingredients to the wet and stir with a spatula to form the cookie dough.
Chill the dough for a minimum of 2 hours. This step will prevent cookie spread!
Scoop even spoonfuls of dough onto a cookie sheet.
When ready to bake preheat the oven to 375ºF
Roughly shape the cookies back into balls of dough before placing the cookies on a large parchment-lined cookie sheet about 4 inches apart.
Bake for roughly 8 to 10 minutes or until you can still see it is doughy in the center but browning around the edge. Don’t bake for longer as you will over bake it and lose that gooey center.
Let cool on the sheet for 5 minutes then enjoy. Store in an airtight container for up to 3 days. Cookies also freeze really well so feel free to put some in the freezer to enjoy when you wish.
Enjoy!
Notes
Variations – Divide your dough into four sections or more (the measurements below are for four though so please keep that in mind)Classic Chocolate Chip Cookie
2 tablespoons chocolate chipsOatmeal Raisin Cookie
2 heaped teaspoons rolled oats
1 tablespoon raisinsChocolate White Chocolate Chip Cookie
2 heaped teaspoons cocoa powder
2 tablespoons of white chocolate chipsPeanut Butter Cookie
1 tablespoon peanut butter
1 tablespoon Reese’s pieces, (chopped)Keep going as you like – I also added white chocolate chips and dried cranberries (about one tablespoon each).
It is countdown to Thanksgiving (and Christmas really). We are so excited for a real Thanksgiving around here. Last year we enjoyed a very small gathering and while that was nice, we missed our larger get together. I have learned through the years that the way to peaceful and enjoyable holidays is for mom (me:) to prepare ahead. So, today’s post is about my Thanksgiving countdown and prep!
Holiday Launch
We always kick off Thanksgiving with a Friendsgiving the night before when we get together with my college room mate and her family. We are actually lucky enough to go to a relative’s gorgeous home for Thanksgiving day. As much fun as that is, I have to have turkey and the trimmings for leftovers so we started the tradition years ago. I have so many fond memories of Thanksgiving hosted at my house growing up. I have to have the pumpkin bread and butternut squash exactly as mom made it. Those memories and flavors are a must! So through the years I have created a Thanksgiving countdown and prep to make our Friendsgiving day go smoothly.
Thanksgiving countdown and food prep
Ok, so one of my most favorite things to do is to sit on the couch on a leisurely Saturday or Sunday and plan menus. Pinterest is my go to and I also look back on previous menus which I usually jot down post holiday. I recommend doing this one to two weeks ahead of time or if not your thing, you can make our menu from last year:). I make myself try one new recipe every year to keep it fresh and keep experimenting. This year, a leek and potato gratin is on my list. I like how it is not too fussy – chunks of potato, leeks and of course cheese all cooked up to melting yumminess. I hope it tastes as good as it sounds.
I also always make home made cranberry sauce which is easily frozen ahead of time – not sure why canned cranberry even exists. This recipe could not be easier and the tart cranberries are such a great accompaniment to Thanksgiving fare.
Lastly, I make pumpkin bread. I usually make my own recipe, but this year, I made Smitten Kitchen’s version with some adaptations. I did not use the entire amount of sugar – 1 2/3 cup of sugar in one loaf is just too much (hello blood sugar?). I also use the prepped pumpkin pie spice which is just the necessary spices pre-dosed. The loaves came out amazing so I highly recommend the recipe! I particularly like her technique of mixing the baking powder etc. before you fold in the flour. Over mixing flour is never good with quick breads. I may need to update my own recipe.
Adapted version of Smitten Kitchen pumpkin bread…so good
Last year, this menu was a hit largely because the stuffing is so good. Do yourself a favor…make the stock ahead of time. If you forget, you can always use the store bought bricks, but trust me, home made stock is soooo much better and of course cheaper.
I use Alison Roman’s recipe, but I make mine in the Instant pot. After roasting some turkey parts (easy to buy at the super market or ask the butcher), I put everything in the Instant pot, cover with water, add bay leaves and spices and put on saute mode. After bringing to a boil, I simply put on the slow cooker mode and let it cook for 12 hours. So easy (but make it ahead – facing home made stock the day before or day of is a no-go for me!). I taste it after it cools. Today I decided to add some Better Than Bouillon and put it on saute mode again to boil down a bit. The result is fantastic. I froze it and can’t wait to use in the stuffing next week. Here is a photo (my photography skills are pathetic…at least you know this is a real woman behind the blog!). Those little glittery bits are what will make your gravy and stuffing divine…
Home made turkey stock in the Instant Pot
The start of holiday shopping
About two weeks before Thanksgiving I ask the girls to give me their lists. This is admittedly easier now that they are older (years ago it was always last minute for Santa…). I like to buy ahead for my own peace of mind and of course to take advantage of the pre holiday sales.
Normally, I would have ordered the holiday card by now. This year, no. Why? We did not have a good photo. Good friend will be snapping some shots of the family once college girl is back. I will likely head to Costco. We send out about 75. How about you? We used to send more but cut back in recent years. It seems others have too?
Lastly, my favorite day of the year is this weekend too. We go to a local farm to cut down our Christmas tree. Hopefully I will have more time to share that with you. Here are a few notes from last year’s tailgate where we grilled some sliders which were a huge success.
So Happy Thanksgiving to you and yours. I hope you enjoy cooking (if you like cooking) and eating a delicious meal with family and friends!
Hi all! How are you? I hope well. Busy as I am? Phew…it never stops. Work has been crazy, and now we are almost at the holiday season. Today I will share a favorite soup, chicken tortilla soup in the Instant Pot (but you can make in the slow cooker too) and also a quick catch up.
Fall has just flown. High school girl has been busy applying to colleges and yes, it affects parents too. Long gone are the days when I crammed 6 applications into Christmas break. The tours start as early as sophomore year and beyond. You can catch our tour of a few southern colleges from last summer. We had a few last minute ones too but closer to home. The good news is that she is into one school (IU) as it has rolling admissions.
With my eyes on Thanksgiving, I am already planning my menu and will likely cook much of last year’s menu (which was delicious….that stuffing is the best I promise) as well as trying at least one or two new recipes. This recipe for a fall, butternut, greens salad caught my eye yesterday from Smitten Kitchen (love her!). I am trying it tonight at home so will share the feedback if it is as good as it sounds. I plan to use dried cranberries instead of the pomegranate.
It is also countdown to Christmas. I have learned this is a great time of year to organize. I went through each closet and identified what to give away. Cleaning out the fridge and pantry are next as I prepare for holiday cooking. Now is the time to figure out if you have enough baking supplies and other ingredients. Trust me…am a pro at this point!
With all that is going on, something easy and tasty for dinner and lunch is a must. I adore soup especially in the fall and winter. Lentil and bean are two favorites, but I found myself craving something with a bit more heat. This chicken tortilla soup fits the bill perfectly. I think you could easily sub in chicken breasts or make it vegetarian and add another can of beans for some extra protein and staying power. You can also vary the spice too. By accident, when fiddling with my recipe, I added an entire can of chilies in adobo (fortunately I realized it and was able to remove all but two!). The toppings are optional (but are they really?). A squeeze of lime, some grated cheese, a dollop of sour cream and chopped cilantro taste so fresh and flavorful. If you want to lighten up, replace sour cream with plain Greek yogurt.
Without further ado, here is the recipe for Chicken Tortilla Soup. Enjoy!
Chicken Tortilla Soup (Either Instant Pot or Slow Cooker)
A flavorful, healthy, budget-friendly soup that is perfect for supper or lunch.
Course Main Course
Cuisine American, Mexican
Keyword Beans, budget friendly, Soup, Supper
Prep Time 30 minutesminutes
Cook Time 6 hourshours
Cost $7
Equipment
Instant Pot
Slow cooker
Ingredients
2tablespoonsvegetable oilI use avocado
1medium yellow or white onion diced
2medium jalapeno seededmembranes removed, and diced
1red or green bell pepper
3clovesgarlic mincedabout 2 teaspoons
1teaspoonchili powder
1teaspoonground cumin
3/4teaspoonsalt plus additional to taste
1poundof bonelessskinless chicken thighs or chicken breasts (about 2 breasts if you are using breasts)
1 28-ouncecan crushed tomatoes
2chipotle chiles in adobo choppedNOTE: I purchase these in a can and save the rest for another use – they freeze well. DO NOT use the whole can in this recipe as the soup will be too hot
1 15-ouncecan pinto beans rinsed and drained
1can of Mexican style corn
4cupschicken stock or broth
Corn tortilla strips or corn tortillas or tortilla chips. I also like the tortilla strips you buy as salad toppings.
Shredded cheddar or Mexican style cheese
Diced avocado
Chopped fresh cilantro
Limeadd a slice on the side to squeeze over
Sour cream or plain Greek yogurt
Optional: Trader Joe’s Chili Lime seasoningdelicious on top if you can find it!
Instructions
Turn Instant pot to saute, or if using your slow cooker heat a pan on the stove and heat on medium heat. Once hot, add the onion, jalapeno and bell pepper. Cook until the vegetables are softened, about 6 minutes or so. Stir in the garlic, cumin and chili powder and cook until fragrant, about 30 seconds.
Transfer mixture from the skillet to the bottom of a 6-quart or larger slow cooker or if using Instant pot, turn off saute function.
Arrange the chicken breasts on top of the mixture. Add the tomatoes, chicken stock, chilies in adobo and salt. Stir gently.
Turn Instant Pot to slow cooking function. Cook on LOW for 5 to 6 hours, until the chicken is falling apart tender. Dice or shred the chicken, then return it to the slow cooker. Add the canned pinto beans and Mexican corn. Let cook on low for 20 more minutes to allow the flavors to combine and everything to heat.
Taste and add salt or seasonings as needed. If the soup is thicker than you would like, add in the remaining 1 cup chicken broth until it reaches your desired consistency. Enjoy!
Hi there! Well fall is in full glory in Connecticut. Our leaves are turning and the weather has been beautiful. We have been busy with visits to Vermont which I hope to share some recommendations and up to Boston. Last weekend I finally had a chance to catch my breath and do some decorating to celebrate the season. The wreath in the picture was a Christmas Tree Shop find which I added a bow with some Michael’s ribbon (on sale now!).
Some fall cheer at the door
Other touches around the house include pumpkins, mums and some delightful Williams Sonoma fall soap for the powder room (I typically do not like pumpkin spiced scent so the cider option is wonderful). I also found myself in the kitchen making lentil soup and these amazing pumpkin blondies with white chocolate chips.
Pumpkin blondies with white chocolate chips are full of brown butter taste and the pumpkin flavor is not overpowering. You could easily make them with dark chocolate or milk chocolate chips too. I happened to have white chocolate chips on hand and loved how the white chocolate complements the pumpkin flavor. It took me a few tries to get the recipe just right. Needless to say this dessert was gobbled up! I may even try a teaspoon of ground ginger next time to add some depth (but they are delicious as in the recipe below).
The taste of fall in an easy-to-make blondie full of brown-buttery, pumpkin spice flavors with creamy white chocolate chips. Delicious for game day or as dessert or snack anytime.
Course Dessert
Cuisine American
Keyword Bars
Prep Time 25 minutesminutes
Cook Time 25 minutesminutes
Cost $4
Ingredients
½cupunsalted butter
¾cupbrown sugarpacked
1egg
1teaspoonvanilla extract
1cuppumpkin puree
1 ⅓cupall purpose flour
2teaspoonspumpkin pie spice or apple pie spice
¾teaspoonbaking powder
¼teaspoonsalt
1cupgood quality white chocolate chips
Instructions
Preheat oven to 350°F. Grease and line a 9×9 pan with parchment paper.
In a small saucepan over medium heat, melt the butter. Continue to cook, stirring the pan until the butter becomes a golden brown color. Watch it carefully to make sure the bits on the bottom of the pan do not burn. Remove from heat and cool slightly. It will look like the image when it is ready.
In a large bowl combine brown butter, brown sugar, egg, vanilla, and pumpkin. Stir until combined.
In a separate bowl, combine flour, pumpkin spice, baking powder, and salt. Add the flour mixture to the wet ingredients and stir until combined. Fold in the white chocolate chips. Batter will be on the wet side.
Pour batter into prepared pan and bake for about 25 to even 30 minutes, until a toothpick inserted into the center comes out without raw batter on it. Oven temperatures can vary so watch carefully after 20 minutes.
Happy Fall! This fall has been busier than ever. This post I will share a few short updates on what I have been cooking, where I have been going and a few fall items I purchased that I am loving. Grab a pumpkin/apple spiced beverage and let’s discuss.
First, with high school gal applying to colleges we have been doing some last minute rounds to see local schools (if you missed our tour of a few southern and PA schools you can read about it here). We made it to the Boston College home game, and boy it was fun. I loved the latest game day look for girls which included some cute tennis skirts (why do I remember us wearing baggie jeans?!). Our team (BC) won so it was a huge celebration and so great to see old friends.
We also headed up to see college girl in Vermont and catch some fall foliage. I had made a mean care package (if I do say so myself) a few weeks ago for a first bout of homesickness. I created the perfect cookie for care packages as it does not crumble. This time I planned to bring one with a fall theme.
With not much time to spare I lucked out with an easy pumpkin oatmeal cookie mix from Trader Joes. Chewy, oatmeal cookies with chocolate chunks and plenty of pumpkin flavor…I did add a few extra chocolate chips. These are another care package win as the cookies hold their shape and flavor. Pick up a mix when at TJs. I am adding some spiced tea and latte easily made with the electric kettle along with a few other goodies.
For some reason this fall I have wanted to buy clothes! Maybe after last year’s imposed home stay and nowhere to go it feels good to get out. I bought this J Crew coat. I love the raspberry color and think it works for both fall and spring. With temps falling in CT, I have been wearing it everywhere.
Anyone else craving sneakers? Stylish sneakers are my go-to shoes as I work from home and am often shuttling between the gym, car pools, dog walks and zoom calls. These New Balance ones caught my eye. Can’t wait until they arrive as they are so comfortable. I like the subtle animal print on the back too.
Next up? I have a bunch of fall recipes on the blog which I will be making for football games, hiking picnics and more. You can make them too:
What have you been doing to celebrate fall? Mums on the porch? Pumpkins everywhere? Halloween decorating? This is one of my most favorite times of the year, and I hope you are enjoying it as much as I am. Cheers!
Hi there! Fall for many of us means our kids are heading back to college. This year my daughter is a sophomore. Last year was a tough one. She ended up transferring from her dream school to a college closer to home. Transferring is never easy but during a pandemic it is even harder. So this year it is like she is almost like a freshman again. Along with getting into a routine, meeting two new room mates and taking on a full academic load comes some homesickness. What could be better than a care package to cheer her up? Cookies have to be part of it, but most of recipes create cookies that break easily or crumble. Not a problem at home, but throw UPS into the mix and she would have a mess by the time she opened the package. So, after experimenting a bit, I am sharing the perfect care package chocolate chip cookies.
What makes these cookies perfect for care packages?
These cookies are thick and chewy with some heft. They won’t break easily and are compact diameter wise. After completely cooling them, I put them into small zip lock bags and packed them snugly. I used UPS to send them to her dorm, and she received them two days later and said they were “yummy.” Apparently the room mates loved them too.
What are other items to put in a care package?
For my girl, I decided to add her favorite candy along with some hair styling product that I picked up inexpensively at TJ Maxx. I had some paper basket filler so I filled the bottom with it. Then I added a card and some funny print outs with reminders such as “share with your room mates.” Other ideas could include gum, other favorite foods that will keep a few days such as granola bars, dried fruit. Nail polish or self care items could work too.
A few other notes on missing your college student
Did you know that 70% of freshman are homesick the first semester? Don’t be surprised if this happens and frankly with the pandemic I can tell you it is hitting sophomores and other classes too who were online last year and now readjusting to college. If you are the one missing your kid, don’t feel bad. This is a huge adjustment for you too. I have been really enjoying articles from Grown and Flown and in particular the following posts:
So much to learn and think about…parenting really is a lifelong journey! Without further ado, make these perfect care package chocolate chip cookies…save a few for yourself if you are feeling blue and send some to your student. He/she will thank you for them!
Chocolate chip cookies that are easy to make, withstand travel and taste delicious. Make a batch for your college student or anytime you wish to send some love (or just eat some delicious cookies!).
Course Dessert, Snack
Cuisine American
Keyword Care package, Cookies, Dessert
Prep Time 20 minutesminutes
Cook Time 10 minutesminutes
Equipment
Cookie sheets
Mixing bowls
Electric or stand mixer
Parchment paper (or baking liner)
Ingredients
2 1/3cupsall-purpose flour
2teaspoonsbaking powder
1/2teaspoonsbaking soda
1teaspoonsalt
10tablespoonsunsalted butter1 stick plus 2 tablespoons softened
2/3cupbrown sugar packed
1/3cupgranulated sugar
1egg
2teaspoonsvanilla extract
12ouncebag semi-sweet chocolate chips
1/2cupof semi-sweet mini chocolate chips
Instructions
In a medium mixing bowl, whisk together the flour, baking powder, baking soda, and salt and set aside.
In a large mixing bowl (or the bowl of a stand mixer), cream the butter, brown sugar, and granulated sugar together with an electric mixer on medium speed until light and fluffy (about 5 minutes). Add the egg and vanilla and beat until combined.
Add the flour mixture and beat at medium speed just until combined. Stir in the chocolate chips. Note: the dough will be very firm and a bit crumbly but should form a ball when pressed together.
Shape cookies into small balls.
Preheat the oven to 375F.
Watch cookies carefully after about 10 minutes. I usually switch trays from top to middle and spin them around so far side is now the close side to the oven door for even baking. Remove when firm and with just the hint of toasted light brown tops.
Allow the cookies to cool on the cookie sheet for 5 minutes, then remove to a cooling rack to cool completely.
The cookies can be served warm or at room temperature.
Allow to cool completely before putting into zip locks bags or another wrapping for your care package.
Hi there. Hope all is well! Before I get into what a perfect day trip to Nantucket could look like, I have an anniversary to celebrate. It has been about one year (maybe a day short) since I launched Sunday’s Bread! Hopefully you have enjoyed the recipes and the few insights into chez SB. I realize I have a lot still to learn (photos in particular!). This is a journey so I look forward to sharing more and getting better at it!
Ok, so onward to today’s post – I have been wanting to share how to visit Nantucket just for the day. A couple of weeks ago the girls and I had the most perfect day on Nantucket. Today I will be sharing what a perfect day trip to Nantucket could look like. Yes you can go just for the day!
Why go for a day trip to Nantucket?
I adore Nantucket and have been visiting since I was a young child. We would cruise the coast on our boat and stop in to explore ports around New England. Nantucket and Martha’s Vineyard were my two favorite stops (all of those cute shops and ice cream:).
Then I went back to Nantucket in college. I had many friends who worked there for the summer or had family homes (where I was lucky to stay). Right out of college, when working in Boston, I would take off on Friday night from Boston, drive to Hyannis. I would catch the ferry in time to meet my friends out at a club called the Chicken Box. Very fond and fun memories.
So, I could not wait to show this darling island to the girls. We had visited when they were babies. So little that I recall remembering I was worried that the double stroller would not fit on the ferry. They do not remember any of that visit. We also visited the Vineyard a few years ago – my youngest loved Edgartown. So it was time to try the other island, Nantucket, which is only 11 miles away.
A day trip is perfect too. First, you can see how the weather will be. Nantucket is famous for its fog and frankly as much as I love it, it is very expensive. There is some risk of getting there on a not so great day weather-wise. We booked our ferry two days prior.
How do you get to Nantucket?
We were coming from Cape Cod after visiting some friends in Orleans. Orleans is about 45 minutes from Hyannis which is where I always pick up the high speed ferry. The high speed ferry will take one hour to get to Nantucket. As mentioned above, this is also doable from the Boston area.
We made reservations for the high speed Hy Line. As we were a couple of days out we could not park there as the ferry lot was full. If you are leaving early, as we were (8:30 a.m.) this is not an issue. There are numerous parking lots where you can park all day. We paid $35 and were about a block away from the ferry. I had packed some muffins but we grabbed coffee at the café right next to where you board. They have a selection of breakfast items to go, or you can sit for a larger meal if you have the time.
It was a gorgeous summer morning so sitting next to the docks sipping coffee was a great way to get started. On board, we sit up top to get the view and fresh air. I love the view of Nantucket from the ferry as you approach the island.
Where to go once on island
Nantucket town has a few primary streets lined with shops and places to dine. The harbor docks also have dozens of lovely boutiques. Our aim was to shop and eat so we set off and started browsing. Here are some of my favorite stores:
Murray’s Toggery Murray’s is the home to the famous Nantucket Reds, faded pinkish, red chinos for men and women. JFK famously wore them as he played golf and sailed. They have been around forever and anyone who has spent anytime on boats or near yacht clubs knows them well. Murray’s has far more than just the famous pants though. I purchased a beautiful cashmere wrap in hot pink (the girls’ suggestion), and we browsed lots of brands. The look tends to be preppy with some outdoorsy clothing too. All very fitting for Nantucket.
Pawsitivity We just discovered this adorable shop which sells beautifully made pet collars and leashes. The owner was so helpful and we enjoyed chatting with him (they also have a store in Vail…not too bad!).
Ack 4170 We headed here for sweatshirts and to browse some beautiful jewelry. I love following them on Facebook too.
Stop N Shop Hah yes the local Stop N Shop was a favorite as we could easily pick up bottles of water, kombucha and snacks. As we were only there for the day we did not want to even carry water bottles. Stop N Shop also has restrooms (the visitor center does too) so we stopped in a few times during the day.
Everything is adorable on Nantucket…how cute is this bike?
If you have not visited the Nantucket Whaling Museum I highly recommend it. Nantucket’s history is vibrant and the whaling industry (as sad as that is to me now) brought wealth. Many of the gorgeous historic homes date back to those times. You will need to make a reservation to visit (not sure if this is due to Covid or not). The museum has a notable scrimshaw collection. Many exhibits convey what it was like to be part of the whaling industry.
If you would like to see more of the island, you can also rent bikes. We opted not to do this as summertime is also high traffic time (stressful when biking). There is also a shuttle that goes all around Nantucket. We decided we would try that another time.
Where to eat on Nantucket when visiting for the day
There are many fine dining and casual eateries on Nantucket. A personal favorite has always been the Straight Wharf where I love the bluefish pate – soooo good. For us though our trip was short so we did not want to spend too much time dining. Instead we headed to Provisions which has been on Nantucket since I was a college student.
The Turkey Terrific sandwich is one of the best sandwiches I have eaten. It is “Thanksgiving on a sandwich,” as my daughter described it. Super fresh bread, yummy stuffing, cranberry sauce and turkey of course. They also have a delicious baked tofu sandwich which I ordered. Tip: If you are buying to eat on the ferry, leave plenty of time! Provisions is very popular so there was a wait and we saw two people have to leave without their food.
Right around 4 we stopped at the Juice Bar, another institution for some of the best ice cream ever. Feeling a bit full from lunch, we had a raspberry sorbet. The sorbet tasted like fresh picked raspberries. Post lunch we walked around town looking at some of the notable homes such as the Jared Coffin House. I love antiques and old homes so this was a delightful way to spend the afternoon.
Gorgeous Hydrangeas
Where to eat in Hyannis after a perfect day trip to Nantucket
We took the 6 o’clock ferry back to Hyannis. 10 to 6 was just the right amount of time. Mr. SB was waiting for us with our lab as the ferry pulled into Hyannis. He is a huge fan of whole belly fried clams (and I am too!).
There are two clam shack restaurants in Hyannis, Baxters and Spanky’s. We have eaten at both post Nantucket ferry (both are excellent for fresh seafood). Spanky’s was dog friendly so we opted to eat there. We ate outside and watched the sun set. It was delicious and a perfect ending to the perfect day trip on Nantucket.
Hi there. This post is as it says, a catch up, so here is a little bit about what we are doing, cooking, reading and more. Summer has been flying by and in spite of some rainy days in CT, we have been enjoying every minute. This past weekend we had so much fun at a clambake right on the beach. Of course there were s’mores afterwards and even some live music. I loved the table favors (see photo) and eating lobster on picnic tables covered in craft paper is ideal as it is a messy meal.
The perfect New England clambake
Last year we had our own clambake (you can catch my picture in the bio and see a glimpse of my nautical table scape. We also launched our new Hobie Cat. My husband has been working very hard on getting it ready for launch so it was indeed a busy weekend.
This summer is no different when it comes to the cooking. I am pulling out all of my picnic favorites and now that I have this blog I don’t have to search far! Here are the faves:
We have also been grilling a ton (that is Mr. SB’s specialty). His burgers with caper mayo are a stand by all year but especially in the summer. That caper mayo is also delicious on turkey sandwiches as well as veggie/turkey/salmon burgers.
My weekend days typically mean I head to the beach. I have discovered Elin Hildebrand for a great source of beach reads. Her books often take place on Nantucket, a favorite place of mine, so perfect for light reading and exactly what summer calls for – try The Rumor as a first book if you have never read her. I also have American Dirt on my reading list (was an Oprah pick). Much more serious but a friend said it is a can’t put down type of book. It is fiction but really portrays what people in Central America go through to come to America (and why they come). It is next on my list.
Lastly, my garden is crazy this year. During the cold winter months I went seed shopping and never thought I would grow anything from those little packets. My nasturtiums have proven me wrong thankfully. Could not be easier to grow and keep blooming, blooming, blooming.
My nasturtiums – could not be easier to grow from seed!
Well that is it for now. Am hoping to visit Nantucket soon so maybe I will some more to share on my favorite New England island.
Hi all. Well, last week was a whirlwind college tour. Little Miss High School and I road tripped it for a college tour of Virginia, North Carolina, Maryland and Pennsylvania. It was a lot of driving but also a lot of fun so I thought I would share some of the details.
University of Virginia
Our first stop was Charlottesville, VA to visit the University of Virginia. This was about a seven hour drive from Connecticut. We arrived in the late afternoon which was perfect as we could explore Charlottesville and do our own informal walk around of UVA. We stayed a Hilton Hampton Inn which was brand new and perfect for us. I even hit the gym in the morning while Little Miss slept in.
Charlottesville is home to Thomas Jefferson’s Monticello which we also wanted to visit. Unfortunately given that we had to drive to North Carolina after the tour we did not have time. We did however see the beautiful home from afar where it is perched on the river. UVA is very historic and was Thomas Jefferson’s conception. He had attended William and Mary but apparently saw room for improvement (according to our guide). He thought students and professors should live together for constant learning. Here is a picture of the lovely area where even today students live and professors live next door. In each of these rooms, there is a list of all residents. One list even has Edgar Allen Poe on it as he attended for a semester.
UVA Grounds
“Grounds” as the campus is called is gorgeous and for a history buff like me heaven! So what did Little Miss think?
She loved it too. And as any teenager does, took plenty of photos.
She is also very into history and after a year of intense AP US History was gobbling up the background of this picturesque university. We walked around that evening and explored downtown Charlottesville which is a quintessential college town in the best way. The next morning we arrived for a fantastic tour. Our guide was upbeat, really engaging and clearly very smart. We liked that you apply to Arts and Science but then apply for business at a later date (which is her interest). UVA also has D1 sports (my Little Miss is a sports fan), Greek life (35% though so plenty of students not involved if that is not your thing) and hundreds of clubs. The academics are stellar and of course it is very selective especially out of state. After a trip to the bookstore (Cavalier sweatshirt in tow), we headed to UNC Chapel Hill.
UNC Chapel Hill, Elon and Wake Forest
We drove about 3.5 hours from UVA to UNC Chapel Hill. The drive takes you through rural Virginia and North Carolina but was pleasant enough (Little Miss practiced her driving). I would recommend packing a sandwich or stopping in Charlottesville first (we ended up with fast food which is not my preference but was the only quick option).
UNC and Chapel Hill are beautiful. We did not have a formal tour though so we walked around on our own. Little Miss thought it may be a tad too large and spread out. She will do some more research. They also have great sports (basketball especially), a lovely town and excellent academics.
We then headed to Winston-Salem which is about an hour from UNC Chapel Hill. Much to our surprise, Elon University was right on the way so we decided to stop. Elon has a beautiful campus. We know many kids that attend, and it is especially popular in the Northeast. Brian Williams and his son put it on the map with communications. Little Miss liked the campus too. I think it will be on her list.
That evening we had reservations at the Wyndham in Winston-Salem which is called the historic Brookstown Inn and dates back to 1837. This hotel is actually on the national register of historic hotels, and it was adorable! Exposed brick, period furniture and very spacious rooms all at a reasonable, Wyndham price. We loved the warm cookies and milk served at night too. Little Miss and I headed to Willow (an easy walk) for dinner for tasty salads (to offset those cookies which came later!). The area is very charming and historic Salem is not too far either. The hotel is about fifteen minutes from Wake Forest University.
In the morning, after a traditional Southern breakfast (gravy, biscuits, eggs etc.) we headed to Wake Forest University for a formal tour. Wake Forest, founded in 1834, is lovely and in a very nice area with spacious homes and lots of beautiful greenery. Our tour guide was energetic and warm. It was hot though (note to tour guides…please bring your groups into the shade!).
Wake also has an excellent business school and again, you can apply after being admitted which is a plus (some schools you have to apply directly for business). Wake has about 60% in Greek life so that seems to be something you have to want to do (or be comfortable not doing but know that it is a big part of life for many students). The school is very well take care of and the buildings were gorgeous. Post tour we visited the business school which is brand new and impressive. We picked up an Einstein’s bagel sandwich for our road trip to College Park Maryland which is about four hours away. Little Miss is adding this one to the list for certain.
U. Maryland, Lehigh University and Villanova
Our trip to College Park took us through DC which was fun. We drove past the White House and other major buildings. On the other side of DC is College Park where the University of Maryland resides. Frankly, this one was just too big for Little Miss but if you are interested in a large school this may be the right one for you. The next day we were up early to hit Pennsylvania with a first stop at Lehigh.
Lehigh University is in Bethlehem, PA and is comprised of some lovely stone buildings on a hill. We would like to see town when the students are there as it was a little sleepy mid summer. We had lunch at a coffee bar, and then headed to Villanova University for a tour. Villanova is also a beautiful campus right outside of Philadelphia. Our tour guide led us around campus and shared some of the interesting facts such as every student takes a mission trip funded by an alum. When students become alums, they fund another student’s trip. Villanova has several schools. You can transfer to business although apparently it is difficult once enrolled as you will need to catch up. There is some Greek life too which is unusual for a Catholic university.
Exhausted and full of college facts, we headed back home through torrential down pours. Fortunately I know New York well enough to take the major highways as many of the smaller ones were flooded. Next up will be a tour of my alma mater, Boston College. Hopefully you have enjoyed this little peak into a college tour of Virginia, North Carolina, Maryland and Pennsylvania. Stay tuned!
Hi there. Summer has been so busy as we are at the shore every weekend, and the last two weekends we have hosted friends which has been so much fun. I finally had a chance to read a bit on Sunday at the beach and fell promptly asleep! As much as I love entertaining it can be tiring. So, this post is a bit of a catch up post. I will be sharing my recipe for classic clam chowder or as our clams come from right off of Cockenoe Island I am officially calling the clam chowder recipe, Cockenoe Clam Chowder! I will get to that in a bit.
What is immediately on my radar is the fourth of July. We will host friends this Sunday for a BBQ and to watch the fireworks from the shore. I am thinking of making the best Mediterranean pasta salad to go with Mr. SB’s amazing ribs. I am searching for a good bar recipe that will withstand the heat and of course we will have s’mores as we always do. We toast the marshmallows on the fire pit. It should be a great weekend to celebrate! I will try to share next week (although I will be college touring again so it may be after that…).
So to get back to the clam chowder, Mr. SB discovered how to go clamming/oystering last summer. He even received his shell fishing license and bought all of the equipment (well Santa actually brought some of it). Of course he had to go clamming as soon as possible. We had so many oysters and clams (all delicious and so, so fresh) that I had about 8 cups extra. The clams you find on the East Coast can range from the softer shell steamers to what we call in RI, quahogs, which have a very hard shell and are generally quite meaty. They are perfect for chowder (I also love to steam them and dip into butter). So I used a basic soup recipe and added cream and of course the classic white pepper. I recommend buying white pepper if you do not have it as it makes a difference. Below is the recipe. Enjoy!
Taste the ocean in this delectable and traditional New England clam chowder. Easy to make and freeze and the perfect use for any extra clams.
Course Appetizer, Soup
Cuisine American
Keyword Clam Chowder, Cockenoe, New England Clam Chowder
Prep Time 30 minutesminutes
Servings 6servings
Ingredients
7poundsclamsscrubbed and rinsed. I steam them first (7 cups includes the shells – there will be less once shells are removed)
3cupswater
4bacon strips
1medium-size Spanish oniondiced small
2tablespoonsflour
3large red or yellow potatoescut into 1/2-inch cubes
1teaspoonchopped fresh thyme
2tablespoonschopped fresh parsley
1cupheavy or light cream
1tspwhite pepper (or to taste)
Instructions
In a large soup pot over high heat, add clams to water. Bring to a boil and cook just until clams open, about 10 minutes. Remove clams from broth and set aside. (Discard any clams that don't open.) Strain broth through a sieve lined with a coffee filter and set aside. Picture of my steamed clams below.
Clean your soup pot; then, over medium-high heat, sauté bacon until it’s browned and fat is rendered. Using a slotted spoon, remove bacon to a paper towel (you won’t use the bacon so use for something else). Add diced onion to pot and sauté until translucent.
Stir in flour and cook 1 minute, being careful not to brown. Whisk in reserved clam broth. Add potatoes and thyme, and simmer 10 minutes.
Remove clams from shells, reserving liquid, and chop roughly. Strain liquid; then add clams and liquid to pot. Stir in parsley and cream; cook just long enough to heat clams through, about 3 minutes.
We love this chowder with fresh bread and a green salad.
Notes
Often we steam our clams ahead of time as after clamming we want to cook them right away. This preparation also reduces the work time when you are making the chowder. You could also pre cut your onion and potatoes so that the chowder comes together very quickly.
Hi all…Sunday Bread daughter here with a guest post. I made these no-bake energy bites for my mom on her birthday (her request), and they came out great! They are super easy to make and refrigerate well. My mom loves them for an afternoon snack or post workout. My sister and I think they taste like cookie dough. Yum. Healthy too apparently. Sometimes we double the health benefit by having one of these with my mom’s favorite blueberry cauliflower smoothie.
So here is the recipe for No-Bake Energy Balls.
Nutrition for No-Bake Energy Bites
These bites are super healthy. Flaxseed is full of omega threes and fiber. These energy bites also contain chia seeds which like flaxseed, contain omega threes and fiber, in addition to protein, calcium, and numerous antioxidants. The bites are also gluten free and if you would like them to be vegan you could sub out the honey and use maple syrup. Dark chocolate has magnesium and make the bites yummy. So no-bake energy bites are both delicious and nutritious!
No-Bake Energy Bites
These super simple energy bites are perfect for anytime whether it be a mid day pick-me-up or a post workout snack. They are easy to make and taste delicious!
1/2cupcreamy nut butter – I like a combination of the Mixed Nut butter from Costco and Trader Joe’s Sunflower seed spread
1/2cupground flaxseed
1/2cupchocolate chips – any kind you prefer
1/3cuphoney
1TBSchia seeds
1tspvanilla
Instructions
Stir everything together until combined. Stir with a big spoon to really mix well.
Cover the mixing bowl or container and place in the refrigerator for an hour or until the mixture can be formed into balls without falling apart. I use my hands to form balls. Store the balls in the fridge.
Hi there! So, yes it is June and at this point I would not expect to be sharing a post about lentil vegetable soup. However, with last weekend at 45 degrees and raining until late Sunday afternoon…I made a big pot of this soup, and it was delicious. It freezes beautifully and is super economical as it only uses a small amount of bacon. You can also easily make the soup vegan by omitting the bacon and using vegetable stock. I would also up the garlic and other spices in the vegan version to add some flavor. Lentils are very popular in France, and it is said that eating them on the first of the month brings luck. Now, to share a bit of info on nutrition.
Nutrition in lentil vegetable soup
Lentils are considered a pulse (funny word right?) and are very nutritious. They are full of protein, rich in nutrients and are good for digestion, heart health and more. According to Dr. Axe, “Lentils are considered a top “functional food” due to their high nutritive value, polyphenols, minerals, fiber and other bioactive compounds. While they’re known for providing protein and fiber, their polyphenol content is becoming the focus of ongoing research, since polyphenols are know play an important role in the prevention of degenerative diseases.”
While nutritious, I also find them delicious. Lentils have a subtle nutty flavor that pairs well with all kinds of vegetables. Lentils are also great room temperature, cold or hot as is the case with this soup. I love to make a batch and have them handy to add to salads and more. But right now, this soup fits the bill…enjoy!
Easy Lentil Vegetable Soup
Easy lentil vegetable soup is chock full of nutrition and taste.
1 – 14ozcan diced tomatoesI like the basil, garlic version for even more flavor
1teaspoonfresh thyme
1cuplentilsI use organic, green but you can use brown or red too
1teaspoonsaltOr to taste
pepper to taste
1/2cupwhite wine
4cupschicken brothor use vegetable broth if making vegetarian
2cupswater
1teaspoonbalsamic vinegar
Dried herbs de Provence or Italian blend to taste
Instructions
Brown the bacon in a large soup pot or dutch oven. Set aside and crumble. Leave bacon drippings in the pot. If making vegetarian, heat vegetable oil until hot.
Add onions, celery and carrots to the pot and cook, stirring occasionally, until softened. Add garlic, then stir in tomatoes and thyme. Cook for 30 seconds.
Stir in lentils, salt, and pepper; cover, reduce heat to medium-low. Cook 8-10 minutes.
Uncover, increase heat to high, add wine, and bring to simmer. Add chicken or vegetable broth and water, bring to boil, cover partially, and reduce heat to low. Add your dried herbs de Provence (or other dried blend).
Simmer for 20-30 minutes, until vegetables and lentils are softened.
Stir in vinegar, bacon if you are using it.
Top with some grated cheese and serve with some fresh bread for a delicious meal.
Hi there! Not sure where the time goes…college girl came home and my youngest is busy finishing up school. Hard to believe the year is approaching halfway through and we are almost in June! Checking in today to say hello and share the easiest strawberry shortcake recipe that I brought to friends last weekend. In CT, strawberry season is right around the corner in June but we start to get some delicious strawberries from California this time of year too. I also find myself really craving spring desserts and fruit in particular. Strawberries are also so good for you. I do buy the organic versions as apparently strawberries are one of the most sprayed for conventional produce.
This recipe creates a light, crumbly shortcake that can be made in one bowl – so super easy. It also looks really pretty on top of a cake plate (and needless to say it was a big hit!). So, without further ado, here is the recipe for the easiest strawberry shortcake recipe.
Easiest strawberry shortcake recipe
Delectable, crumbly shortcake is the perfect base for ripe, sweet strawberries and cloud-like soft whipped cream.
1 1/2poundsstrawberrieshulled and sliced in half or quarters
5tablespoonssugar
2cupsall-purpose flour
2teaspoonsbaking powder
1/4teaspoonbaking soda
2tablespoonssugar
3/4teaspoonsalt
1 1/2cupsheavy cream
1 1/2cupsheavy creamchilled
2tablespoonsconfectioners sugar
Instructions
Mix strawberries with 3 tablespoons of granulated sugar and refrigerate while juices develop (for at least 30 minutes).
Preheat the oven to 400 degrees F.
Sift together the flour, baking powder, baking soda, remaining 2 tablespoons sugar, and salt in a medium bowl. Add heavy cream and mix until just combined. Place mixture in an ungreased 8-inch square pan and bake until golden, 18 to 20 minutes.
Remove shortcake from pan and place on a rack to cool. Slice in half.
Spoon some of the strawberries with their juice onto the shortcake bottom then add the shortcake top. Spoon more strawberries over the top, add the whipped cream and serve.
Whipped Cream:
Using a mixer, beat the heavy cream, sugar, vanilla until soft peaks form, about 1 1/2 to 2 minutes. If you put your mixing attachments and bowl in the freezer the whipped cream will be fluffier.
Hi there. Goodness, it has been a whirlwind. In addition to being away for Spring break (college tours) I have been underwater at work, and the home improvement continues with the deck being painted this week. So my poor little blog has not been getting the attention it deserves. Hopefully, I will be able to share the kitchen cabinet reveal soon. If you missed the long process involved in picking the perfect white paint color for the cabinets, you can read that post here. We finally installed the new hood over the stove. While I could not use my stove for the last six weeks (due to no hood), I have been roasting everything. I am here to tell you that roasted leeks are delicious. Without further ado, here are a few fun facts about how super healthy leeks are and the roasted leeks recipe.
Are leeks good for you?
Like most vegetables, leeks are good for you. In fact, leeks belong to the allium family along with onions and garlic. Similar to these vegetables, leeks are a great source of vitamins A, K and C. They also have folate and fiber. Leeks have properties that fight heart disease and cancer as well as inflammation. Frankly, leeks have always intimidated me. I really did not know how to cook them other than in my best-ever Thanksgiving stuffing. I did quite a bit of research to learn how to cook them on their own. This roasted leeks recipe is adapted from Martha Stewart.
Roasted Leeks with Thyme
Leeks are roasted in a blend of white wine and broth and then sprinkled with thyme for a delectable side dish.
Preheat oven to 400°F. Trim dark-green tops and root ends from leeks. Cut leeks in half lengthwise. Remove thick, tough outer layers (2 to 4 total, depending on size). Thoroughly wash and drain leeks, keeping them intact. Arrange in a tight single layer, cut sides up, in a broiler-safe baking dish.
In a small saucepan, boil the white wine 30 seconds. Add broth and return to a boil. Then season generously with salt and pepper. Pour the mixture over leeks and sprinkle with thyme. Cover dish with foil.
Roast for 45 minutes. Uncover and continue roasting until leeks are very soft and broth mixture is reduced by half, 20 to 22 minutes.
At this point you can sprinkle with some grated parmesan cheese or even add some butter if you like. Serve as a side or light main dish.
Hi there! I am very excited to blog today about picking the perfect white paint color for kitchen cabinets. If you have been reading the blog recently you know that we are updating our nineties kitchen (on a budget!). The first step has been painting the orange-toned, cherry cabinets white. We decided to make this the first step as our hunch was that may be enough to seriously lighten and brighten as well as update the kitchen (versus a complete redo). In our case, we cook a lot (this blog was started to share recipes…) and the layout is perfect. The looks not so much – classic nineties kitchen with the orange tones and sage green counters. We had a feeling that a fresh, white coat of paint may do just the trick.
I have been eager to share this with you (spoiler alert I love the new white cabinets) but have been swamped at work and as I mentioned in my last post, you have to empty your cabinets (or you should), and even when you empty the cabinets dust still seems to get everywhere! Not for the faint of heart my friends…and especially not for a busy working mom with little time on her hands as it is! But, with that behind me, I can say it has all been worth it. So without further ado, today’s post is how to pick the perfect white paint color for your kitchen cabinets – I am sharing my favorite resources as well as the steps I took.
Steps to pick the perfect paint color
Ok, so like any other home improvement project mine always start with reading my favorite blogs, magazines and checking out Instagram and Pinterest. This is easy but I will say beware when it comes to paint colors. Just because a color (and especially white) looks good in a blogger’s home does NOT mean it will work in yours. So doing some browsing is great as a start but the devil is in the details. Do not just take what they have used and go buy the paint and put it on your walls!
After getting an idea of what family of color I want to focus in on, I head to the paint store. We are fans of Benjamin Moore so I usually stick with their palettes although I have found some great colors in Behr and the other brands. Pick out as many chips as you like at this point. The chips will help you narrow down your choices. Again, if I can leave you with two caveats. The above warning about blogger/decorator recommendations, and a second – do NOT pick your paint and actually paint your walls based on a tiny paint chip. Years ago I had chosen what I thought was a blue grey, and it ended up being light teal on the walls (fortunately I like teal!).
Which resources offer great advice on picking the perfect paint color for kitchen cabinets?
After several mishaps of trying to paint a room using a tiny paint chip as a way to visualize, I realized I needed to take one crucial step – painting the wall at least partly or by using a fantastic peel and stick paint sample in a large size to see what the color actually looks like on OUR wall (not some blogger or decorator’s home).
So at this point, I usually narrow down my paint chips to two or three and then I either go buy a sample of paint, or I order the color from Samplize which I absolutely adore. Samplize paints two coats of the color on a large, peel and stick wallpaper square. You can move the sample around to see it in different lights and locations. Folks this was a game changer! It is really worth the cost (around $6), and actually less expensive than buying a paint sample (not to mention messy and time consuming to paint it on your walls and have to look at an eye sore for days until you actually paint #beentheredonethat).
In addition to ordering colors I think would work in our home, I also have two blogs that I highly recommend you check out for their advice on picking a paint color. The first is my absolute favorite with paint expert, Kylie offering a great advice with a good dose of humor (dang that gal loves her wine:). You can really get technical here and learn about the LRV of a paint color (light reflecting value) and where to find it for each color. She also has so many before and afters, and what I love is that she works with people on a budget. I do not personally find it all that helpful to read about people with million dollar design budgets redoing their homes (hello…wouldn’t we all have a perfect home with that budget? And, what fun is that!?). Kylie also offers really great review of all colors and especially whites. White Dove? She has you covered? Simply White? That one too. She is a fantastic, free resource that helped me so much. Folks, you need to learn the difference between your cool whites and your warm whites if you are going to pick the perfect white paint color for your kitchen cabinets.
The second blog that I recommend is Maria Killam. She also has some excellent advice about paint colors in general as well as many photos that can help inform your decision. She explains how to understand a color’s undertones (goodness when did this all get so complicated?). Between Kylie and Maria, there is a ton of great advice and frankly I would have picked the wrong white paint color for kitchen cabinets without their wisdom. Thank you ladies if you ever read this!
How did I ultimately pick the perfect white paint color for our kitchen cabinets
So after setting up Pinterest boards, searching #whitekitchen on Instagram, reading blogs and finding the wonderful advice from Kylie and Maria, I took those paint samples from Samplize and pasted them on the wall. I looked at those dang samples in the morning, at night and at all hours of the day. I moved them around, held them up to my backsplash and asked everyone’s opinion (well maybe not everyone but my one daughter who is very into design).
We looked at White Dove (too yellow), Simply White (also yellow), Decorator’s White (icky sterile, hospital white in our lighting) and dozens more. Finally we decided on Benjamin Moore’s Swiss Coffee. It has no yellow undertones (again in our light) but was so much softer than the other whites under consideration. It also seemed to pair beautifully with another Moore color, Sail Cloth, which we decided to use for the walls. This entire process took about three weeks. If you don’t have that much time, you could possibly compress it…but I say, don’t rush it. Painting your kitchen cabinets is a big change so you want to get it right!
Next post – I will reveal the “after” photos. I am waiting for a new hood and we need to repair one part of the backsplash before I can share the photos with you. Until then, do your research before trying to pick the right white for your kitchen cabinets! Mimi
Hi all. It has been awhile but goodness we have had a lot going on…not the least of it an upgrade to our nineties kitchen. That’s right. The nineties called and they want their kitchen back! Oh and what a throwback it was. Orange stained cabinets with sage green counters. So, how do we update it on a budget? Well today’s post is short but I promise much more as I really wished someone had clued me into what goes into painting kitchen cabinets as a start! But what would a home decorating post be without a “before” picture? See below my friends.
The nineties kitchen – orange stained cherry cabinets and sage green counter tops….how do we update on a budget?
So first, this kitchen has delivered so many delicious meals and I realize just how fortunate I am to have it! Please do not think I am not grateful…but that said…well, it is time to enter 2021. We can still honor our possessions by giving them a facelift right?
So that is what we did. The details will be in posts to come (promise…I am still not 100% there as this involved emptying all of those cabinets, rewashing EVERYTHING as dust was EVERWHERE…). So, let’s call this a sneak peek and a post so y’all know I am still around:) Until then… Happy St. Patricks Day (I am part Irish so I love a good St. Patricks Day!). Mimi
Hi all. Today I am excited to share how to decorate with digital art from Etsy. It is inexpensive, creative and with the array of offerings on Etsy, the possibilities are limitless.
Like many of you, the months of hibernating at home has me evaluating every room with a critical eye. Recently I moved a large piece of art out of the foyer and into our dining room, and I love the new placement. However, as I searched around for a replacement for the front hall, to my dismay, I learned that without spending hundreds of dollars I could not find anything. Then I discovered some great matching brushed gold frames at TJ Maxx ($15 for 3 on clearance!). I bought six, and as it turned out, the frames were just the right size for some beautiful vintage and art prints that I downloaded and printed from our color printer. While it was a stroke of luck to find these frames, I have seen similar ones at Michaels and big box stores.
How to decorate with digital art from Etsy – first steps
So the first step is to assess your space. Is it casual? Formal? What is the color scheme? How big is it? For this particular project, the area is an alcove as you enter our main front entrance. Below the wall is a console table with some decorative objects. The feel of the area is slightly formal (but not stuffy) as the rooms that branch off of the foyer is the formal dining and living rooms. The walls area pale ivory with a hint of yellow (Benjamin Moore Niveous) and the floors are natural, hard wood. With that in mind, I started the fun part – searching for art.
Originally I was not looking specifically for digital art but I realized as I entered search terms that this option was available. Some of the art types and terms I considered included:
Asian art
Botanical prints (there are dozens of digital options here)
Abstract art
Mid century modern
Most of the Etsy shops also allow you to sort by color, size and type of art so other categories may appear as you get started. Beware, a few hours can go by as you surf around in Etsy (enjoyable hours I may add).
As I was looking for a slightly vintage, formal feel with those specs in mind I finally settled on Wonder and Chaos a delightful shop full of interesting and sometimes whimsical prints at very reasonable prices. Their vintage theatrical prints really caught my eye (see photo). I then found other prints that fit the feel and color scheme of the area.
What size to download?
A great benefit of digital art is that once you download the art you usually have access to multiple sizes. In my case I was searching for roughly 8 by 11 which would be easy to print at home and would fit into my beautiful, bargain frames. I noticed though that you can download a larger size and go to a photo processing site such as Shutterfly to print if you want one of those larger pieces.
Printing and other tips
The first time I printed out one of the prints I used plain white printer paper. This was not a bad idea to get a sense of layout. However, that quality paper is NOT going to give you the best print as I soon found out. I happened to have some very fine Cranes resume paper (remember when people actually used paper for resumes?). It was such a huge improvement to print on very high quality paper. While a box of high quality paper may be pricy compared to regular print paper, it is well worth it. Also, many of the Etsy shops offer printing tips which I highly recommend you read.
After printing out each print (I had chosen six), I grouped them together in different layouts. My bargain frames also had a great bonus of a paper template so I could tape up the gallery before putting in any nails. If you buy frames without that sort of template I would recommend tracing the frames onto craft paper and then cutting them out. A level is also key to ensuring that you hang the templates straight. Lastly, I used double sided tape to lay out the frames to give an idea of how I was going to display the art.
My paper templates to help me layout the gallery wall
I decided to slightly stagger my middle grouping for some interest. Then I hung the pictures (once again using a level). Here is the finished wall.
The finished gallery wall…all for a total of $60!
Above you can see the finished wall (and yes my photo is a bit cut off…still learning on the photography front!). The entire wall cost $60 which is a fraction of what I would have paid with paper prints and trying to frame them custom. I also have access to the larger sizes or can print multiple copies. All in all I have been so pleased with this find!
I hope you enjoyed this post on how to decorate with digital art from Etsy. Please share with your friends and come back often!
Hi friends. Well with about three feet of snow on the ground (it snowed yet again yesterday) I have been looking for comfort food. To date, I have not been as healthy as I should be with snacks… This time, chili fits the bill so well with its satisfying heartiness and a touch of heat. The bonus with this recipe for Lentil and Quinoa Chili in the Slow Cooker is that it is healthy (and practically effortless) too! The recipe is actually vegan, although I like to add some grated cheese and sour cream so in that case it would be vegetarian. You could skip those toppings of course if you are following a vegan diet.
My vegetarian diet
I was a vegetarian for two years when I lived in California (definitely influenced by the Southern California get healthy vibe) before getting married. As Mr. SB is an avowed omnivore I have transitioned our household to more of a meatless Monday or even Tuesday, Wednesday type of diet.
Why? Plant based diets are so good for you even if you may need to plan a bit to ensure you are receiving all of the nutrients you need. Vegetarian recipes are also flat out cheap (meat is always the most expensive part of the grocery bill here) and so much better for the environment. I heard on a podcast recently that skipping meat for just one day of the week actually equals saving the carbon emissions for one cross country trip (coast to coast). Wow! Imagine if the entire country committed to at least a meatless Monday?
Benefits of lentils and quinoa
Often I find that some vegetarian recipes lack texture and sometimes I am still hungry – not this recipe for lentil and quinoa chili. It is full of texture and flavor. The combination of the nutty lentils and the quinoa which naturally thickens the sauce makes it super satisfying.
The recipe is full of health benefits too as both lentils and quinoa are considered superfoods. Lentils have been associated with improved digestive health, sustainable weight loss and healthy blood sugar levels. One cup of lentils has about 18 grams of protein and almost a full day’s worth of folate. A serving of lentils is also high in manganese and potassium. Quinoa is another superfood and is actually not a grain but is a seed. It is also a complete protein possessing all 20 amino acids which is key if you are following a vegetarian diet. One cup cooked quinoa also offers tons of health benefits.
How do you make lentil and quinoa chili in the slow cooker?
This recipe is one of what I call, “On my last nerve” recipes. I keep the ingredients on hand in the pantry. I use both black and red kidney beans for some variation. Cans of beans are fine but if you have pre-cooked beans that would work too. I like the Costco quinoa which is already pre-rinsed to save a step. Trader Joe’s chili lime spice is a wonderful addition if you have a TJs on hand. If not, regular chili powder works just fine and then feel free to squeeze some lime on top at the end. Basically you stir everything together and let it slow cook for eight hours or four on high. Add your favorite toppings. Mine include cilantro, lime, avocado and a small dollop of sour cream. So without further ado, here is the recipe. Enjoy!
Hearty, healthy and just what you need on a cold winter's day. The recipe is vegan but you may want to add some sour cream, grated cheese too. Fresh cilantro and a squeeze of lime perfect this protein packed, superfood-rich dish.
Hi there from snowy CT! We have about three feet of snow on the ground and it is still snowing…dreaming of summer days around here. Last weekend we headed up to NH to ski at Gunstock Mountain Resort which has the most lovely views of Lake Winnipisaukee. Yours truly was taken out a by a teen skiing out of control. Fortunately just a few bumps and bruises…I was worried about my knee but it seems fine a few days later (phew). Sunday, I decided not to ski (but still enjoyed my favorite apres ski recipe for buffalo dip) and instead made this perfect, easy, no-soaking the beans instant pot ham and bean soup. Trust me on this one – it comes out perfectly every time and not having to soak the beans saves time and allows this soup to be a last minute dish. So here is to snowy days and hot soup.
Tips to making no soak instant pot white bean and ham soup
I recommend Northern white beans for this recipe. You can use Cannellini or other white beans too but Northern beans really hold up well to pressure cooking. Also, this soup is very versatile. With my French husband, I tend to use a generous tablespoon of herbs de Provence. If you prefer though you could Italian seasoning or any mix of herbs that you like. I also recommend chopping the onion, celery and carrot roughly (mirepoix) for some texture against the creaminess of the beans. Lastly, if you want a vegetarian option, skip the ham, add more salt to taste and use vegetable broth instead of water. Serve the soup with some crusty bread and a salad and your winter day will be that much warmer!
Super easy and relatively fast recipe as there is no need to soak the beans. Tender white beans in a rich stock and plenty of vegetables and salty bits of ham make a delicious and economical soup. Freezes well and heats up too for lunch or supper now or when you need it.
Course Main Course, Soup
Cuisine American, French
Keyword Beans, Instant Pot, No soak beans, Soup
Prep Time 35 minutesminutes
Cook Time 35 minutesminutes
Servings 8
Cost 5
Equipment
Instant Pot
Ingredients
1pounddried Great Northern White Beanspicked over and rinsed. Cannellini beans would work here too but reduce the cooking time by five minutes.
1tablespooncooking oilolive or I like avocado oil
1white or yellow oniondiced
3stalks of celeryroughly chopped
3medium carrotspeeled and chopped
3clovesgarlicfinely chopped
1heaping tablespoon of herbs de Provenceor another seasoning mix you like such as Italian seasoning
1bay leaf
¼poundof hamor a ham hock bone (with some meat on it). If going for the vegetarian option then leave out the ham.
4cupsof chicken stockor vegetable and 4 cups of water (if using a very meaty ham bone you may want 2 cups of stock and 6 cups of water as the ham will be salty).
Instructions
Turn Instant Pot on sauté setting and heat olive oil in the insert.
Add onion, celery and carrots and sauté until starting to soften, a few minutes (keep an eye on it as they can burn if you are not careful…stir occasionally).
Add garlic, stir a few seconds until you can smell the garlic.
Then add herbs and bay leaf, stir and turn off the sauté function.
Add the dried beans to the pot along with the ham shanks.
Pour in the stock and water and combine gently.
Close lid and seal pressure cooker.
Cook on high pressure and set timer for 35 minutes. It will take about 25 minutes to reach pressure and then the timer will start. When finished cooking, let pressure naturally release for 20 minutes.
Manually release any remaining pressure, carefully open pot (only after all pressure is released).
If using a ham bone or shank, then remove ham shanks to cutting board and shred/cut meat into bite-sized pieces. Add back to soup and season with kosher salt and black pepper to taste.
Serve with a salad and some crusty bread for a delicious lunch or supper.
Happy Monday! Did you enjoy the big game? I fell asleep after eating waaaay too many chips and queso as well as stuffing myself with my delicious (if I do say so) buffalo dip. I am not much of a football fan but I am 100% about the snacks! We have had so much snow in the past week in CT. I had all kinds of plans and frankly tossed them all, cozied up by the fire and read a book (After the War). As it was a lazy kind of weekend, I also had the good sense to make my perfect slow cooker pot roast which takes all of ten minutes to prep and then cooks all day making the house smell delightful and come dinner time – you have a delicious meal all cooked.
History of pot roast at the SB house
Apparently pot roast has been a staple in our family for decades. My grandmother made it every Sunday evening. My mom did too more often than not. I tried using the family recipe but if I am being honest, I must have done something wrong as it came out terrible (Mr. SB told me that, “he had limits”…when I served it to him). So after fiddling around with my slow cooker, I created this easy recipe which I have been making for at least ten years. It literally comes out perfect every time. It hardly qualifies as a recipe (as it is so simple to make) but you would not know it by the results. I think the secret is a bit of red wine and some rosemary both of which add so much flavor.
Steps to making perfect slow cooker pot roast
The first step is a good quality piece of beef. If you have been reading my blog for some time, you know I am a fan of Walden Local for grass fed beef from local New England farms. Pot roast at the supermarket is often called pot roast. Other cuts of meat that work are bottom round, round roast – really any of the less expensive, thick cuts of beef.
Root vegetables work so well with this too. I love turnips, potatoes and carrots. You will want to slice them all about the same thickness for the best results. Turnips and whole carrots are usually thin enough that I slice them in half lengthwise and then cut them again so I have four pieces from the original vegetable.
A few notes on the ingredients
The recipe calls for cream of mushroom soup too. I use the Pacific brand or Trader Joe’s as both brands are simply cream, mushrooms and salt. I recommend reading labels carefully if you go the standard supermarket route as some brands contain a great deal of preservatives. Perfect slow cooker pot roast also calls for a packet of onion soup. I like Simply Organics for a good brand (again without dozens of ingredients I can not pronounce!).
Lastly, a small tip is to lightly grease the slow cooker for easy clean up. I like to use Choice Foods spray avocado oil.
Grab a loaf of fresh bread and an easy salad and dinner is done!
No-fuss recipe for an unbelievably tender pot roast with a savory, flavorful gravy and perfectly cooked vegetables. Serve it with some crusty bread and a green salad for a delicious meal.
13 to 4 pound Beef roast (chuck roast, pot roast, bottom round or other large, lean cut of beef)
1ContainerCream of mushroom soup (see notes above on brands)
1PacketDried onion mix (I like Simply Organics brand)
4CarrotsCut in half vertically and then again in half
4 ParsnipsPrepare as you do with the carrots above
1/4CupDry red wine
1TbspDried rosemary leaves, crushed
Instructions
Combine cream of mushroom soup, soup mix, dried rosemary, red wine and stir. Place mixture in the slow cooker (you may want to coat the slow cooker with a thin spray of oil for easy clean up).
Place roast on top of mixture and turn to coat so that all sides are lightly covered.
Place sliced vegetables around roast (I like to coat those too in the soup mixture).
Cook for 8 to 9 hours. Enjoy with a green salad and a fresh loaf of bread if you like.
Hi there! Phew, we had quite a snowstorm in CT yesterday with at least two feet of snow from what I can tell. How did you fare? With all of the time indoors, I have continued the decluttering and organizing and have more places to share with you along with a few tips and ideas. This is the second part of a two part series about top spaces to organize in your home. If you missed the first post, you can find it here.
Digital decluttering: email and files
Your digital space can be easily over run (I am looking at you 3,000+ emails in my unread inbox!). I find that being able to read the email without opening it is my downfall. So, I can see the “Thanks” reply so I don’t bother to open it. As I become busy, the emails just pile up.
I have taken a “look at it once” approach. When reviewing emails, right away I determine if I need to either delete it or put it in a folder. I like to organize folders by year or client/person. For example, I usually can remember an email by who sent it to me and the general time frame so this strategy works well for me. I recommend organizing by however you think. An easy way to deal with Gmail organizing when you want to delete emails is to do a search and then it allows you to delete anything in that search.
For files on your desktop, I like to do the same. I usually set up a year folder and then subfolders within such as:
Girls Activities
Clients (and then subfolders with each client’s name)
Financial (and then subfolders such as tax preparation)
You get the picture. This way, my desktop is clean and orderly which is a mood boost when I am getting started in the morning. Here is a screenshot.
Organized inbox by calendar year
We also organize pictures the same way – by year and then month. This has worked so well as I can recall generally when a vacation or event happened so when I want to create a photo book or look back on a memory I know exactly where to look.
Also, do not forget to create back ups of any digital files. I like Microsoft One Drive for a cloud version. There are also free versions of Dropbox and other cloud storage that work well too. Nothing worse than having your computer malfunction and losing all of your work and other files!
Organizing your car
The car can be a magnet for clutter. If you have young children it may accumulate toys, empty wrappers from snacks and sippy cups. Older kids tend to leave sports equipment, books, water bottles and wrappers too. I seem to have an issue with reusable shopping bags multiplying!
The first step is to remove everything from the car. Give it a good vacuum and wipe down and then put back in what is really needed.
Papers. Insurance cards, registration and if you belong to a Triple A, make a copy of that card and put in the glove box of every car so it is easily handy.
Emergency water/snacks. I always keep water bottles in the car. I am not a fan of plastic bottles but this is the one place that I do keep bottles handy. Occasionally my girls will forget a water bottle for sports practice or as they head to school so keeping a stash is key.
Shovel and ice scraper. If you live in a climate where there is snow and ice this is a must.
Blanket. I always keep a blanket. This has been handy for kids becoming cold or even our pets.
Trash bags. A store of trash bags makes it easy to keep the wrappers and other unwanted items at bay. When I get gas, I use the time to empty the trash if needed.
Money. Have you ever found yourself wishing you had a spare $20 for ice cream or a cool drink? Or maybe the sports team is collecting money for the coach’s gift? I find a spare $20 in the glove box has been so handy.
Children’s art
Children’s Art. As I mentioned, I did look into Artkive. I realized I can do the same with my own iPhone for much less money. To keep it manageable, I am taking a few pictures a day. I will allow myself to keep one small folder of originals. So far, it has been so much fun to review the girls’ art. With one recently off to college, it is bittersweet and seems like yesterday that she was at her little table painting with her glitter paints and making all kinds of projects! Eventually I will take the photos and make a collage on Shutterfly with the favorites. At any rate, I will have all of them stored digitally which is so nice!
So, I will leave you with one last thought. Organizing is like an exercise program. You do not just do it once and that is it. We move through various stages of life and that movement requires us to re-examine our possessions.
Start a new job working from home? Well the old job’s clothes may not be right anymore and it may be time to donate many of those formal clothes. You child is now in kindergarten? Toys that were once useful may not be in this new phase. You get the picture. Similar to an exercise program, it is wise to start out slowly. Tackle one area at a time. You have the year to do it.
Hi there. I have been completely pre-occupied these last couple of weeks for two main reasons. First, I have a client in the political space (non-partisan, non-profit). With the events of January 6th plus inauguration, it has been non-stop. I am so happy that the inauguration was held without event. I particularly loved the poet laureate, Amanda Gorman. I will be re-reading her poem for days to come.
Second…drumroll…college girl left for actual (versus online in the dining room) college. So today’s post is about my child leaving for college. I promise to be back soon with organizing and food (so much to blog about!).
Getting ready for college (me not her!)
Folks, first, I want to say that the pandemic has made this experience so different than the typical send off. Through the years, I have read Facebook posts of friends who were distraught about their child leaving for college. They counted the days. They wept. I get it. My little pumpkin with braids in her hair who was just tackling her ABCs at the kitchen table is now off to college? What? Time plays tricks on us as those moments seemed like yesterday. So, yes, I had some sadness (and wait towards the end of this post for the full details). However, honestly after watching her not have a full life all fall term due to the pandemic, well I was happy that she could finally experience college life – in all of its good and not so good, but learning moments.
Getting her room ready
I was so excited to have her pick out a color palette for her dorm room (yes as a blogger it should not be a surprise that color palettes can be part of the dorm room!). We had fun, donning our double masks and equipping ourselves with plenty of hand sanitizer, as we hit Target, Ikea and Homegoods for just the perfect mix of throws, pillows, sheet sets and accessories. I also went into full mom mode, packing a first aid kit and “dorm doctor” set of medicines just in case. We picked out the essentials – electric tea kettle, Brita filter and of course some nice clothes too. I am not sure how we fit all of it into the car, but somehow we managed (with a Thule on top of course).
A walk down memory lane
At the same time, I was full into organizing her art going back to toddlerhood (yes, I did not throw all of it out…I had an art portfolio for my favorites). Mr. SB and I had a good chuckle at some of the cards with funny sayings, misspellings and portraits of us all drawn by our little artist. A favorite was one of the Disney princesses after seeing Disney on ice. Funny how those memories come rushing back to you. So come the day to drive there, I felt like I had fully gone through a walk in time but was generally happy to see her off on her great adventure.
Get ready for water works
Then came my youngest daughter’s video, which compiled special moments from all of our home videos. As high-school girls said to her sister, “I made it for you last spring but since you did not leave, I am giving it to you now.” She put together the sweetest mix of scenes of she and college girl when they were tikes. Yup, there they were dancing together on a vacation to Mexico. Hugging each other as little girls. All dressed up for Easter, Christmas and Halloween. Oh sure, I was ready to send pumpkin off…really, I am truly happy. I promise. Just fine.
Ladies (and gentleman if I have any male readers:) I bawled my eyes out…I had to head to bed early “to read a book” so I could cry by myself. I played that darn video at least ten times until I am pretty sure I had no tears left.
A few observations about my child leaving for college
When I finally pulled myself together I realized that you know what? It was a gift. Am I still happy that my gal is all grown up and in a wonderful university where I know she will thrive? Of course. Am I so happy that she can have a full college experience. Yes! But trying to pretend that time has not passed, that my own life will not be changing dramatically (even with just one out of the nest) or that life is frankly short, is not a good way to live. Appreciating all that she has become, all of those moments that make a wonderful life and make being a mom so gratifying, is not something to sweep under the rug so to speak. No matter how painful it can be! So maybe I did not do a month’s worth of Facebook posts, or document the drop off with dozens of photos, but I had my own way of thinking about it.
At that last moment where she had to leave, I gave her a big hug. I shed a few tears which I did wipe away quickly and drove off. My little girl flapped her wings and flew pandemic restrictions and all. Mom could not be prouder.
Hi there! A new year is prime time to talk decluttering and organization. Like many of you, I like to start the new year with a clean and organized home and will be writing more about that and how to help you in coming posts. Before I get into tactics though, I want to start with some retrospection. Your past matters when organizing. Why? Because just like in relationships, marriage, parenting and finances and more, much of your behavior may be rooted in the past. In fact, psychology plays a large role in why decluttering can be so hard. So let’s take a moment to think this one angle through.
What was your home like growing up?
Did you grow up in a spotless, perfectly organized home? Every item had a “home” put in its designated place at all times? Or was it the opposite? Maybe it was tough to find the kitchen table because of all of the papers piled on top? Or the dining room was not a dining room but a storage unit? Did your parents save everything or throw it all out?
How the Depression and the War influenced family organization
In my case, my dad grew up in the Great Depression. My mom was also born at the tail-end of the Depression and was growing up during World War II. People had far less stuff, whatever was purchased was bought very carefully and nothing was discarded without thought. Characteristic of that era, my parents tended to save items and were reluctant to throw them away. It turns out my French husband had the same dynamic. His parents grew up shortly after WWII when there were real shortages of necessities in France.
Growing up
How did this impact our homes? Both of our families had lovely homes for which we are grateful. My mom kept a spotless, beautiful home, and the clutter was mostly confined to the hidden areas. That said, over the years, these items tended to accumulate so I became used to seeing a space (especially a closet or “junk drawer”) full of items. In other words, no one wanted to throw anything out! Sure we would get new decor (but the old decor was stored for someday). I am not criticizing my family for these ways – it went along with the times. Also, even when I was a kid, we did not have the explosion of cheap items created abroad. We tended to buy more carefully and keep what we bought.
How does that impact my organization journey?
Fast forward to now
If you have been following my blog, you know I started an organization journey (Project O) a few years ago. I had some of the typical obstacles that kept me from throwing anything out:
“I might need it someday”
“My children (or sub in nieces/nephews/their children may need it someday.”
Sentimental
It was a gift
“It cost a lot/or it is worth a lot.”
I promise to write more on these challenges. That said, the biggest obstacle for me has been overcoming the past and what has been engrained as “normal.”
What is “normal” varies for each person
Your past matters when organizing because it sets up your “normal.” Here are a few habits/behaviors that may be setting you up for failure as you try to declutter and organize.
Your family saved everything for someday. You may need that rope (yes, I come from a family of avid sailors…we had plenty of ropes around the house/garage!), tennis racket, window treatment, fill-in-the-blank. This is a big one. In my house, we often had lovely new curtains or a rug…but the old ones were not discarded but stored. I can not remember when an item that had been replaced was used again…
Your family and friends shopped a great deal. Shopping was big in the eighties and nineties. Many of us grew up going to the mall just for fun. Shopping was entertainment and bargain hunting was a practical sport in my family. Frankly I still enjoy a trip to my favorite boutique or discounter. That said, shopping and especially impulse buys can really add to your stuff and make your home unmanageable. Retailers are masters at luring you in with sales and then making it very hard not to buy. Social media and the Internet, with hyper targeting, has made it even more likely you will buy on impulse. Buyer beware.
Your house was a mess/super organized/cluttered. I have a friend who grew up in a very cluttered home. Her mom never saw a garage sale she did not love and came home with dozens of “finds.” My friend today has the opposite approach. Her husband calls her the “terminator” as she throws everything out. It can work both ways. She could have also become immune to clutter and that would become her normal for now. Neither is inherently bad but if clutter is something you want to avoid then be aware of how your home growing up may impact what you are comfortable with now.
Where am I today (and how do I deal with it?)
So dealing with my past has helped me really understand the obstacles that face me when decluttering and organizing. Here are few:
As I noted, my mom kept a very clean and lovely home. I actually am also very particular about cleanliness which I no doubt inherited. Enjoy cleaning…but decluttering is another story.
I have tendencies to keep items too long (I am looking at you Restoration Hardware window treatments…) with the idea I may need them someday, they were costly, it was a gift etc.. Questions I ask:
Am I keeping this because of my past? What part of my past? Frugal, depression era parents (usually a good thing especially when it comes to finances but not so much when decluttering).
Do I feel guilty because perhaps my modern day values do not align with the values of my family growing up (but are OK today as we are not in a depression, items are readily available etc.)
Is a closet that is stuffed to the gills a result of too much stuff or the fact that I am used to seeing closets looking that way? While Pinterest and Instagram may present unreasonable or unrealistic organization, both platforms woke me up to what is possible. As I have decluttered and organized I have discovered how calm and freeing it can be to have fewer items.
Have you examined your past and how it may impact your decluttering and organizing journey?
Hello 2021. Am I glad to see you! I am up early today as 2020 New Year’s celebrations went the same as the rest of 2020. Small, low-key and at home. We ordered sushi takeout and Mr. SB made some steamed clams. I think I was in bed by 10!
The upside is I am up bright and early this morning and thinking through my hopes and plans for 2021. I thought I would share instead of keeping them in my head.
Organization and Home Plans for 2021
I will start with the house. If you have been following my blog you know I started Project O (O is for organization) years ago. I learned a great deal and will be sharing more this January on how you can declutter and organize. I am in a good spot but have the following to tackle in 2021.
Archiving all kids artwork. Yes, I have teens. Yes, I still have artwork that I want to preserve. I am going to use a free app from Artkive and put all of the actual art into a book. If you would like Artkive to do the task you can. For me, by the time I organized the art (it is one large folder) I may as well do it myself.
Tackling sentimental clutter. I found an excellent podcast over break, called the Sustainable Minimalists She recommends making appointments with your sentimental clutter and going through it in 15 minute increments. I love this idea. My goal is to take two packing boxes and consolidate into a scrapbook or one memory box.
Creating photo books. I usually create a photo book and calendar every year. This year was no different. I created a calendar of our time at the shore in CT. However I never created a book for our three week trip to Bretagne and Normandy France or our tour of the Pacific Northwest. On my list for this winter!
Refreshing our kitchen. Our kitchen screams late nineties. Everything works and I am grateful for all of the yummy meals we make there. However having spent so much time in it this past year, I really want to paint the cabinets white, install new countertops and refresh certain appliances.
Deck redo. Our deck has been an afterthought until this year. In 2020 our girls loved laying out in the sun and we started entertaining on the deck. The table, which is 19 years old, has seen better days. I would like to paint it a Nantucket grey and buy some comfortable deck furniture. Aiming for this spring.
Well am sure there will be more plans to come but these are some of the more pressing ones that I hope to tackle. How about you? Do you have certain projects and goals for 2021?
Hi all. I could not wait to share this special recipe with you. Chocolate. Toasted hazelnuts. Nutella. Need I say more? Yes, today I am sharing the most spectacular chocolate hazelnut cake with Nutella frosting. I was looking for a decadent cake for our Christmas Eve celebration. This recipe fit the bill perfectly. Both girls sighed after the first bite and then mumbled through mouthfuls…”really, really yummy mom.” Coming from two teens that is about as good as it gets! Trust me this recipe will be on rotation for all of your special events.
Tips for making chocolate hazelnut cake with Nutella frosting
This cake is not hard to make but it does have a few steps.
I bought roasted, unsalted hazelnuts at Trader Joes (you can buy these anywhere of course). I took a cup and about an 1/8 of a cup and spread them out on a cookie sheet with a non-stick pad. Roast the nuts at 350 degrees for about 10 minutes. Watch the nuts carefully as they cook fast and can burn. I also turn them over by shaking the cookie sheet gently about halfway through.
Do not add hot chocolate to your cake batter or it will melt the butter and not come out properly. I let the chocolate cool (I used my microwave to melt the chocolate) and then added the Nutella (I took a little sample to make sure it was the right temperature:).
If you would like even cake layers you can slice off the top with a serrated knife. For this version I made the cake in tiny pans but I have made it as both a bundt cake and a layer cake. The layer recipe is below.
Recipe for chocolate hazelnut cake with Nutella frosting
6ouncesabout half a bag of semisweet chips or semisweet chocolate, chopped
3/4cupNutella
1cupunsalted butterroom temperature
3cupsconfectioner’s sugarsifted
1pinchsalt
3Tbspheavy creamthe cream should not be cold
For decorating:
Confectioner’s sugar for dusting
White chocolateoptional for decorating
1/4cupground toasted hazelnuts
Instructions
For the hazelnut cake
Preheat oven to 350F. Butter two 8-inch cake pans and line the bottom of the pans with a circle of parchment paper. Note: make sure your cake pans have full 2 inch sides to accomodate this cake batter. You can also use a springform pan or even make cupcakes. Make sure you thoroughly grease pans. Non stick pans also work well.
In the bowl of a stand mixer or with electric beaters, cream the butter and sugar together until very light and fluffy (4-5 minutes).
Add the eggs and vanilla extract, and beat for another minute, scraping down the sides of the bowl to get everything incorporated.
Add the baking soda, baking powder, and salt, and mix briefly to combine.
Next, add the flour in a few stages, alternating with the milk, mixing until all of the ingredients are combined. Then mix in the ground hazelnuts. I like to finish mixing by hand with a silicone spatula to make sure everything on the bottom and the sides of the bowl is well mixed.
Divide the batter evenly between the two prepared cake pans and bake for about 35-40 minutes, until risen, golden on top, and the cake springs back when pressed lightly.
Allow the cakes to cool for 10 minutes or so in the pan, then remove the layers and place on a baking rack to cool completely before frosting. (Cake layers can also be made a day ahead, and wrapped and kept in the fridge until ready to frost.)
For the frosting
Melt the chocolate in a double boiler or in the microwave using short bursts. Stir until smooth and allow to cool to room temperature before adding to the frosting. Note: this is important because you don’t want warm chocolate to melt the butter. Once warm. Add in the Nutella and mix.
Cream the butter and confectioner’s sugar in the bowl of a stand mixer with the paddle attachment or mix with an electric mixer.
Add the salt, the cooled melted chocolate mixed with the Nutella, and beat together until the mixture is smooth and uniform. Add the cream and mix until smooth. Make sure the cream is room temperature.
Frost between the cake layers, and then frost the sides and top of the cake. Decorate with curls of white chocolate, a dusting of confectionary sugar and the hazelnut crumbs.
Hi there. It is countdown to Christmas around here, and I can’t wait to share with you a few creative ways for wrapping holiday gifts. Wrapping gifts is one of my favorite things to do. Growing up my mom used to have me wrap all of the presents. I gladly took on the task! Every step is fun from picking out the look + color scheme, wrapping paper, ribbon, trimmings – not to mention watching my family and friends open the gifts. I hope you enjoy these ideas, and that they spark some creativity while you wrap your own gifts.
Please note, this post contains affiliate links (but I only recommend what I love and would use!).
The steps to creative ways of wrapping holiday gifts
Creative holiday gift wrapping steps:
Establish the look and feel. Rustic? Cozy? Formal? Vintage? Farmhouse? Just as you would pick a look for decorating your home, the same can be done for wrapping gifts.
Choose the container. I often re-use boxes year to year (eco friendly). I keep a selection of different sizes. Further, the assortment of box sizes also adds some visual interest when you group the packages together.
Select wrapping paper. Wrapping paper really sets the tone with the color palette, texture, pattern. I also prefer to buy some wrapping paper that is not only for Christmas. The colors can evoke holidays without an obvious holiday theme. Bonus: You can use that paper year round.
Choose ribbon or trim. Trim also can add that special detail and again give a look and feel. Of course, velvet has a very different feeling than straw raffia. Both can be lovely if paired with the right paper and embellishments.
Embellishments. This is where I have some fun. I love using ornaments, natural items like pine cones or fun details such as greenery. Additionally, ornaments are also a second gift. I include gift tags here too. I use everything from cut out holiday card images to photos for my gift tags.
How I wrapped my gifts this year
This year I had several themes:
La Belle France: I used a deep red cranberry and cream toile wrapping paper with coordinated velvet and gold ribbon. If you have read my blog, you know I am a Francophile. So it is no surprise that French toile would be one of my favorite ways to wrap gifts. The touch of gold adds some sparkle too. It says holiday without being obvious.
Shimmery gold and white: For this theme, I selected cream and gold wrapping paper patterned with holiday messaging. I tied the packages with heavy, dark green velvet ribbon or gold satin. I embellished one gift with a beaded, gold star ornament for some additional holiday cheer.
A sparkly star adds a nice touch
Candy cane land: With a few younger children to wrap for, I opted for a cheery bright red wrapping paper embellished with candy cane inspired trimmings of red ribbon, white string and ornaments or bells.
Brown paper packages tied up with string (could not resist the Sound of Music tie in!): Here I chose rustic patterned craft paper trimmed with holiday ribbon and pinecones from the yard.
Nautical “Take me to the sea” (or seafood as the case may be): I used plain craft paper with a natural straw, raffia ribbon embellished with sea ornaments and real sea shells.
Details on wrapping ideas
La Belle France
Deep cranberry red and cream toile wrapping paper is the base. This toile is not necessarily a Christmas print but the deep cranberry paired with the cream works so well for holiday wrapping. I picked up the ribbon at Costco ages ago but this here.
Cranberry toile evokes the holidays without an obvious theme
The small tree you see has fairy lights on it with miniature vintage inspired cranberry heart ornaments. I put the tree in our formal living room (our real, fresh tree is in our more casual family room).
Fell in love with the vintage heart ornamentsCranberry and cream toile wrapping paper with gold and velvet ribbon wraps presents under a fresh evergreen tree
Shimmery Gold and White
Cream and gold paper with holiday script makes a great canvas. The “Merry Christmas” pattern came from Home Goods. Home Goods has a lovely assortment of papers and the quality is excellent. If you can find what you are looking for, I would think you will be happy with the weight and handling of this paper.
That said, I also picked up the other pattern at Walmart for 97 cents a roll! Once you decide on your look and feel you can often find papers even the drugstore. This one was a perfect example. Since I had chosen the gold and cream color palette as an overall theme, it was easy to find gift wrap at Walmart that fit the bill. I also found another pattern at Caspari which has gorgeous papers. This dark green velvet ribbon drapes beautifully and was easy to tie.
Gold and white wrapping paper is tied with green velvet and gold satin ribbon
Candy Cane Land
Candy cane inspired. The cheerful bright red paper was actually from my local drugstore and was reversible with a peppermint stripe.
Red and white gift wrap decorated with ribbon and bells
I added ribbon and embellishments of a candy cane ornament, some bells from Michaels and a glittery red ribbon I had on hand. If you use double sided tape to secure the ribbon to the back of the package it is seamless. I can’t wait to drop these specially wrapped gifts with the little girls who will be receiving them!
Candy cane inspired presents for little girls
Brown paper packages tied up with string
I had the patterned craft paper on hand but added the cute truck/Christmas tree ribbon and tied some pine cones (from the yard) on top with raffia string. I love the rustic feel. Additionally, candy canes (and other candy) are also an easy and inexpensive way to decorate a gift.
Craft paper with natural embellishments make perfect wrapped holiday gifts
Take me to the sea
Last summer we spent so much time sailing, kayaking and enjoying the beach on northern Long Island Sound, I was excited to purchase nautical gifts and wrap them up accordingly. My husband is a huge seafood fan so I could not resist the lobster and crab ornaments. These ornaments are from Christmas Tree Shops but you can find a similar lobster here – I also used real seashells that I had on hand for additional embellishments.
Craft paper gift wrap decorated with sea ornaments and real seashellsA lobster holiday ornament makes a great gift embellishmentA blue crab adorns this gift
Next step I put wrapped gifts around the house and in the places where the gift wrap really accents the surroundings.
How about you? Do you like to wrap gifts? Any special creative ways for wrapping holiday gifts that you would recommend?
Hi there! Today I am sharing my favorite gingerbread cookie recipe. The cookies have the perfect mix of warming spices and are soft in the center, but crispy on the outside. We love to use our favorite cookie cutters and then decorate with sprinkles or icing or possibly some raisins or currants. You can make the dough ahead of time and refrigerate for up to a couple of days or even freeze for later use. This year I made them twice. Once for our Christmas Tree Cutting Tailgate Menu and another batch for gift giving and eating at home!
Making gingerbread cookies is a holiday tradition
I have been making this recipe ever since I was in elementary school! I would make them for eating of course but also for decorating our Christmas tree or putting into pretty containers for a holiday gift. My mother loved these cookies and I used to make her a plate just for her! She liked them with tea and called them “spice” cookies and always said the cookies were not overly sweet and perfect with a cup of tea.
Tips for making my favorite gingerbread cookie recipe
A few tips for making what will become your favorite gingerbread cookies:
Be sure to use plenty of flour on your cutting board or counter where you roll out the dough. The flour melts into the cookie during baking so you do not have to worry about it detracting from the look of the cookie.
I recommend a non-stick rolling pin. I have had this Kitchen Aid version for years, and it rolls the dough out evenly and without letting it stick.
When you cut out the dough, place your cookie cutter at the edge as far as it will go. This will allow you to maximize the number of cookies you can cut out at once so the process will be more efficient.
Like all cookies, you need to watch the baking time carefully. The tops of the cookies should not be too shiny. I usually bake one batch and then try a cookie to determine the best time to bake.
If you like a soft cookie, make the dough thicker. If you prefer something crispy, roll it out more thinly and cook slightly longer. When I am using dough to decorate I tend to make the cookies crisper so they easily hold their shape. For eating, I prefer a chewy cookie so I adjust the thickness and baking time accordingly.
Favorite Gingerbread Cookies
These gingerbread cookies have the perfect mix of warming spices and are soft in the center, but crispy on the outside. Use your favorite cookie cutters and decorate with sprinkles or icing. Perfect holiday treats that are as delicious to eat as they are to look at!
Sprinkles and raisins or currants if you like for decorating
Instructions
Mix flour, ginger, cinnamon, baking soda, nutmeg and salt in large bowl. Put to the side.
Beat butter and brown sugar in large bowl with electric mixer on medium speed until light and fluffy. Add molasses, egg and vanilla and mix well. Gradually beat in flour mixture on low speed until well mixed. Press dough into two thick flat disks. Wrap in plastic wrap. Refrigerate 4 hours or overnight or up to a couple of days. You can also freeze dough and then thaw it out when you are ready to use it.
Preheat oven to 350°F. Roll out dough to 1/4-inch thickness on lightly floured work surface. Cut into gingerbread men and women or desired shapes with a cookie cutter. Place 1 inch apart on ungreased baking sheets. If you are using sprinkles or raisins/currants then decorate before baking (raisins and currants won’t stick to baked cookies).
Bake 8 to 10 minutes or until edges of cookies are set and just begin to brown (See tips on how to avoid overcooking). Cool on baking sheets 1 to 2 minutes. Remove to wire racks and cool completely. Decorate cooled cookies as desired. Store cookies in airtight container up to 5 days.
We love to decorate cookies for Christmas, Valentines and pretty much any holiday or celebration. Sugar cookies are a natural go-to recipe but through the years I have found most recipes result in crispy or even hard cookies. This recipe tweaks the standard sugar cookie recipe with the addition of cream cheese. The other secret is using cake flour instead of regular flour. The result? Pillowy soft sugar cookies that melt in your mouth! With snow coming later today I am planning on making a second batch!
Tips for Making Pillowy Soft Sugar Cookies
The first tip, which actually applies to all cookies, is to soften both the cream cheese and butter. I usually leave it out on the counter or use the soften function in my microwave. Softening allows the cream cheese and butter to mix in with your dry ingredients and gives an even texture to the cookie.
Second, as I noted above, cake flour is super fine flour. You can find this in the baking aisle at your local supermarket. I find King Arthur makes excellent flours for baking, and they have a cake flour version. My local supermarket also carries Swan’s Down and Soft As Silk. Either brand would work well too.
Lastly, you need to watch the baking time carefully. In order to get that soft, pillowy texture you will not want to over cook. I usually bake two trays at once and then switch the cookies from top to bottom racks midway through baking. You will need to work with your oven. The second the edges become the slightest brown, take the cookies out to cool.
Decorating soft sugar cookies
These cookies are perfect for dipping into sprinkles or some powdered sugar. As Christmas is next week I used a mix of red, green and multi colored sprinkles for an assortment. I have also used red and pink at Valentines day. My girls love to decorate cookies too so we have also frosted these cookies. Would love to hear if you have tried the recipe and how it came out. Please comment below!
Pillowy Soft Sugar Cookies
Pillowy soft sugar cookies melt in your mouth. Decorate with powdered sugar or sprinkles and you have the perfect sweet treat for holiday or anytime baking.
Line baking sheet with parchment paper or a silicon mat (I like Silpat)
Combine flour with baking powder in a bowl.
Cream together butter and cream in a separate bowl with electric or stand mixer.
Add sugar to butter/cream mixture and beat for 1 minute. Add egg and beat to combine. Add extracts and beat until combined. Add in baking powder and cake flour (in three sections), mixing to combine.
Once incorporated, refrigerate dough for at least an hour.
Preheat oven to 375 degrees F.
Dough will be sticky so use flour on your hands or wear gloves to roll out 1-2 inch balls.
If using sprinkles, dip into sprinkle mixture gently.
If you would like a dome shape, you can use the bottom of a cup to gently flatten the top of the balls but don’t flatten too much or the cookies won’t puff up or be pillowy soft.
Bake for 9-11 minutes. Remove cookies when you see the underside edges turning golden. You will have to watch carefully after about 8 minutes as it happens quickly. The time may also might vary for your oven and altitude.
Let cool on a baking rack. If frosting, let cool completely.
It is really starting to look like Christmas in Connecticut. That means it is time for my favorite holiday tradition, a Christmas tree hunting adventure! For years the Sunday’s Bread family has been donning warm winter clothes and sturdy boots to take a hayride into the fields of the Connecticut countryside to cut down a fresh tree.
On our first trip to the farm we noticed families from around CT and NY enjoying delicious tailgate spreads. Given that we are all-in foodies around here we just had to do the same. Read on for our favorite Christmas Tree Cutting tailgate menu, some tips and more about this wonderful tradition. As you can see, GG, was all-in with her favorite tartan scarf.
GG sporting a tartan scarf before the Christmas tree cutting
Christmas tree cutting tips
We started cutting down a fresh tree twelve years ago. The girls were so young. While now the hayride is optional back then we had to take it as they could not walk that far. So first tip – check the weather and it is likely you will need to wear warm clothes and boots. If the day is going to be cold, you may even want some hand and toe warmers.
The atmosphere is very festive. Where we go they even have oxen (see picture). They also have a cute Christmas market where you can buy ornaments, wreaths and of course trees. We prefer the adventure of walking through the fields to find one. Your own cut tree is as fresh as you can get so they last easily through the holidays. I guess you can tell that I am a fresh tree gal. There has never been a question of fresh versus artificial at the SB house. I love the smell of fresh pine, and the way the white lights glow against the needles.
Each of the oxen weighs 600 pounds!
As much as I love a fresh tree, there are a few items you may want to bring with you (even if you buy one from the market or local home store). While our tree farm does provide some cord to tie the tree to the roof, we always install our ski rack and bring our own set of cords for tying it securely. As I love the Christmas market and often buy a wreath or other items, I usually bring a plastic bag for the trunk so that the needles do not get everywhere.
Once you find your tree, perhaps the most important tip is to stay next to it. Our girls usually disagree about which tree is coming home with us so that means one of us has to stay with the trees under consideration. Mr SB then uses one of the farm’s saws (they give you those), and we all help securely get it down. At our farm, you are given a tag and part of the tag stays with the tree. You move the tree to the side and then they will pick it up and put it on their wagon to bring it to the parking area.
A note on Christmas tree decorating
Growing up in Rhode Island, we always had a beautiful tree. As I adore Christmas and all of the preparations I often decorated it. I was the most enthusiastic one especially after my sisters had left for college. You could say I am bit of an expert at this point. Now, I love taking out the antique ornaments. Some ornaments are from my grandparents – at least 100 years old at this point. We have also collected ornaments from around the world. We have brought back ornaments from our tours of the National Parks, Mexico, France, South America and pretty much everywhere we have traveled.
What do I do with the girls’ home made ornaments?
As for the home made ornaments from Sunday School or school – well, it all goes on the tree. I love the memories. I know in the blogging world, the trend is a super coordinated, perfect tree – that is just not me. It does not bring me joy. So, up goes the cardboard cutout with a little photo of my college girl when she was five. I add some beautiful gold ribbon as a garland along with candy canes and gingerbread cookies. At least in our eyes the tree is very beautiful and full of Christmas spirit, memories and meaning.
Christmas tree cutting tailgate tips
Back to the tree cutting, we usually go with other families. As the farms can be crowded, we caravan so we can park next to each other. We all bring our favorite menu items. So here is the menu – it may be a bit eclectic but delicious all of the same and travels easily. Oh, and Mr. SB loves to bring his portable grill.
I am including his recipe too. The caper mayonnaise is to die for, and that leftover Thanksgiving turkey is delectable when dipped in it (shh don’t tell). I also love the mayo slathered on some sourdough bread piled high with turkey for the best sandwich ever. It would even make a delicious dip for crudite or some plain ol potato chips.
Christmas tree cutting tailgate menu
OK our tailgate philosophy is pretty simple. Delicious, easy food that can be consumed ideally with your fingers (finger food:). I love to make it cute with a tartan tablecloth, festive ice bucket decorated with candy canes (a galvanized steel bucket that I picked up at Michaels a few years ago) and matching tartan plates/cups. All easy and no fuss.
An easy Christmas tree cutting tailgate…plenty of yummy food and drink!
We brought the buffalo dip in an insulated cooler and then reheated it on the grill. Mr. SB prepared the meat at home so it was ready to go on site. We used a folding table versus our tailgate as it was just easier to lay out the spread.
Mr. SB grilling the best-ever sliders on his portable grill
After a hearty tailgate we ventured out into the farm. We found our tree and even decorated it that evening (GG was tired!). We had some leftover turkey from Thanksgiving so I made my Turkey Tetrazzini and we chilled out while watching the Christmas Chronicles. Is there a better day than that? Would love to hear your Christmas and holiday traditions. Check back as I will be sharing how to decorate your mantle with natural greens and more!
GG sleeping after a long day of tree hunting…our tree decorated
Well the weeks fly by and it is almost May. We had an early spring in CT with the trees blooming at least two weeks early. I am not complaining as I love the fresh, bright green of early spring. After having such a great week in Italy, I needed to catch up with my work and also had a trip to LA for work as well. As some good stuff happened in April, I am sharing an April wrap up.
What I have been reading
With a few plane trips in March and April, I was able to read the following:
Lucy Foly’s The Paris Apartment had me guessing to the end. I also re-discovered audio books and the Libby app which is a free app that you connect your library card. You can use it for audio books and ereader (I have a Kindle). This audiobook was brilliant with each character being played by a different actor. After I finished, I quickly consumed Foly’s The Guest List and The Hunting Party. They were all excellent, suspenseful reads (or listens as was my case). In a way they remind me of Agatha Christie – interesting characters, seemingly throw-away details and just when I think I have figured it out…well I have not! I can’t wait for her next book!
I also tackled The Seven Husbands of Evelyn Hugo. I enjoyed this book even though I found the plot line frustrating – using marriage to deal with various challenges. I won’t say more than that but that was a negative for me.
I am a fan of author, Emily Giffin, but Meant to Be was not a favorite even though it was entertaining enough.
Lastly, I read Want by Lynn Steger Strong on the plane home from Italy. Frankly, I really disliked this book and its characters. It could be relabeled, Millenial Fantasy Meets Reality (and that is all I will say in case you want to read it!). I thought the writing was off too. Probably not a book I would have finished had I not been traveling and this was all I had with me.
New Favorite Blogs
I started this blog because I really enjoy reading what real women have to say! Great to see what Martha Stewart is doing but let’s face it, I don’t have a staff of hundreds. So here are a few favorite along with the links:
Summer Wind. I happened upon this blog as I was looking up reviews on Goyard bags. I found her blog and basically read it for two hours straight. I like that she shares about herself (new trend in blogs is that they tend to get right to recipe or outfit etc.). I also love her style. Classic, but stylish leveraging trends but not a slave to them. She is young but I find that I really enjoy her recommendations even though we are at different life stages (kindred style spirits perhaps!).
Before heading to Italy I realized I really needed an update in European style. As a Francophile I have always paid attention to French girl/woman style so I decided to focus my searches on that and found Leonce Chenal and am I glad I did! I really love this blog and find her spot on when it comes to making recommendations on everything from the best French pharmacy skincare to top footwear brands. She is authentic! Second choice is The French. This is similar to Leonce but the woman is an American living in Paris. Check out both of them if you want a dose of French style!
Around the Kitchen + Garden
So with spring having sprung I turned my attention to growing some annuals inside. I have never done this before but found it frustrating that my zinnias last year did not bloom until July. So, I purchased this grow light and a pack of seeds and guess what they have sprouted! Of course CG2 said that it looks like I am growing Cannabis – apparently these are the same grow lights? I would not know (needless to say!).
Back from Italy I became obsessed with Italian cuisine and had to make home made foccaccia. I used a blend of recipes from Lydia Bastianich and Alison Roman (Alison has a same day recipe). Came out delicious but I would probably cook it a tad less as it was on the hard side the next day.
I’ve also been obsessing a bit over Trader Joe’s hacks. Have you listend to their podcast? It is actually quite fun and they offer a few. This week’s hack is coconut shrimp with their pineapple salsa served in soft tacos…I’ll let you know how it goes.