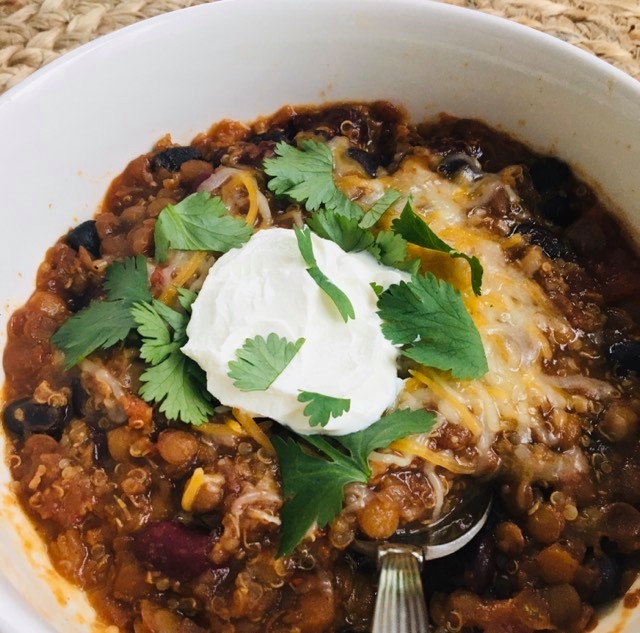
Lentil and Quinoa Chili in the Slow Cooker
Hi friends. Well with about three feet of snow on the ground (it snowed yet again yesterday) I have been looking for comfort food. To date, I have not been as healthy as I should be with snacks… This time, chili fits the bill so well with its satisfying heartiness and a touch of heat. The bonus with this recipe for Lentil and Quinoa Chili in the Slow Cooker is that it is healthy (and practically effortless) too! The recipe is actually vegan, although I like to add some grated cheese and sour cream so in that case it would be vegetarian. You could skip those toppings of course if you are following a vegan diet.
My vegetarian diet
I was a vegetarian for two years when I lived in California (definitely influenced by the Southern California get healthy vibe) before getting married. As Mr. SB is an avowed omnivore I have transitioned our household to more of a meatless Monday or even Tuesday, Wednesday type of diet.
Why? Plant based diets are so good for you even if you may need to plan a bit to ensure you are receiving all of the nutrients you need. Vegetarian recipes are also flat out cheap (meat is always the most expensive part of the grocery bill here) and so much better for the environment. I heard on a podcast recently that skipping meat for just one day of the week actually equals saving the carbon emissions for one cross country trip (coast to coast). Wow! Imagine if the entire country committed to at least a meatless Monday?
Benefits of lentils and quinoa
Often I find that some vegetarian recipes lack texture and sometimes I am still hungry – not this recipe for lentil and quinoa chili. It is full of texture and flavor. The combination of the nutty lentils and the quinoa which naturally thickens the sauce makes it super satisfying.
The recipe is full of health benefits too as both lentils and quinoa are considered superfoods. Lentils have been associated with improved digestive health, sustainable weight loss and healthy blood sugar levels. One cup of lentils has about 18 grams of protein and almost a full day’s worth of folate. A serving of lentils is also high in manganese and potassium. Quinoa is another superfood and is actually not a grain but is a seed. It is also a complete protein possessing all 20 amino acids which is key if you are following a vegetarian diet. One cup cooked quinoa also offers tons of health benefits.
How do you make lentil and quinoa chili in the slow cooker?
This recipe is one of what I call, “On my last nerve” recipes. I keep the ingredients on hand in the pantry. I use both black and red kidney beans for some variation. Cans of beans are fine but if you have pre-cooked beans that would work too. I like the Costco quinoa which is already pre-rinsed to save a step. Trader Joe’s chili lime spice is a wonderful addition if you have a TJs on hand. If not, regular chili powder works just fine and then feel free to squeeze some lime on top at the end. Basically you stir everything together and let it slow cook for eight hours or four on high. Add your favorite toppings. Mine include cilantro, lime, avocado and a small dollop of sour cream. So without further ado, here is the recipe. Enjoy!

Lentil and Quinoa Chili in the Slow Cooker
Equipment
- Slow cooker
Ingredients
- 1 yellow onion
- 2 cloves garlic
- 1 15 oz can petite diced tomatoes with liquid
- 1 6 oz can tomato paste or I like the tubes of past and I use two tablespoons
- 1 15 oz can black beans drained
- 1 15 oz can red kidney beans drained
- 1 cup brown lentils uncooked
- ⅔ cup of quinoa
- 1 Tbsp chili powder or if you can find it 1 and ½ Tbsp of Trader Joes Chili Lime powder
- 1 tsp smoked paprika
- 1 tsp ground cumin
- 1/2 tsp onion powder
- 1/4 tsp garlic powder
- 1/4 tsp cayenne pepper
- 1/2 tsp salt
- A pinch freshly cracked black pepper
- 4 cups vegetable broth
- 1 cup of water
- Fresh chopped cilantro
- Sour cream guacamole, avocados, lime juice or other toppings you desire
Instructions
- Dice the onion and mince the garlic.
- Add the onion and garlic and all ingredients to the slow cooker. Stir to combine.
- Place a lid on the slow cooker and cook on high for four hours (or low for 8 hours).
- After cooking, the lentils should be tender. Taste the chili and add salt to taste.
- Serve hot with your favorite toppings.