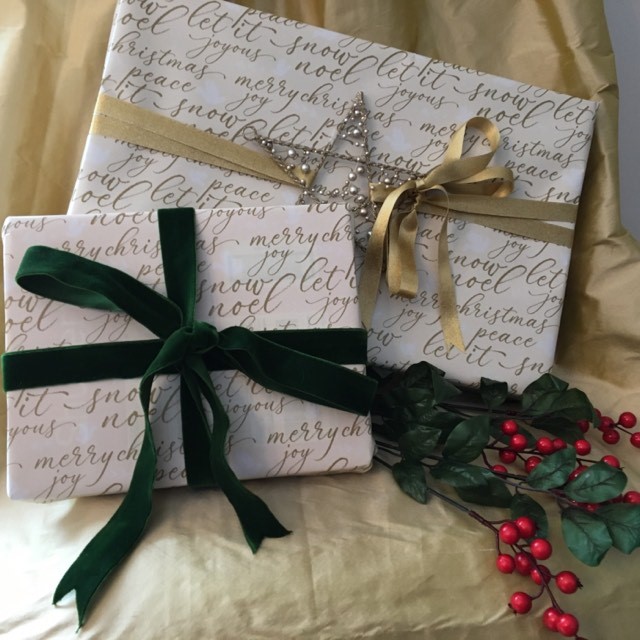
Christmas Tree Reveal (and a catch up!)

Hi there!

Well, the weeks fly by, and it is hard to believe it almost mid-December. Today, it is a holiday catch up (and catch up in general). Let’s talk Christmas trees, holiday decorating and food!

Christmas Tree Tailgate

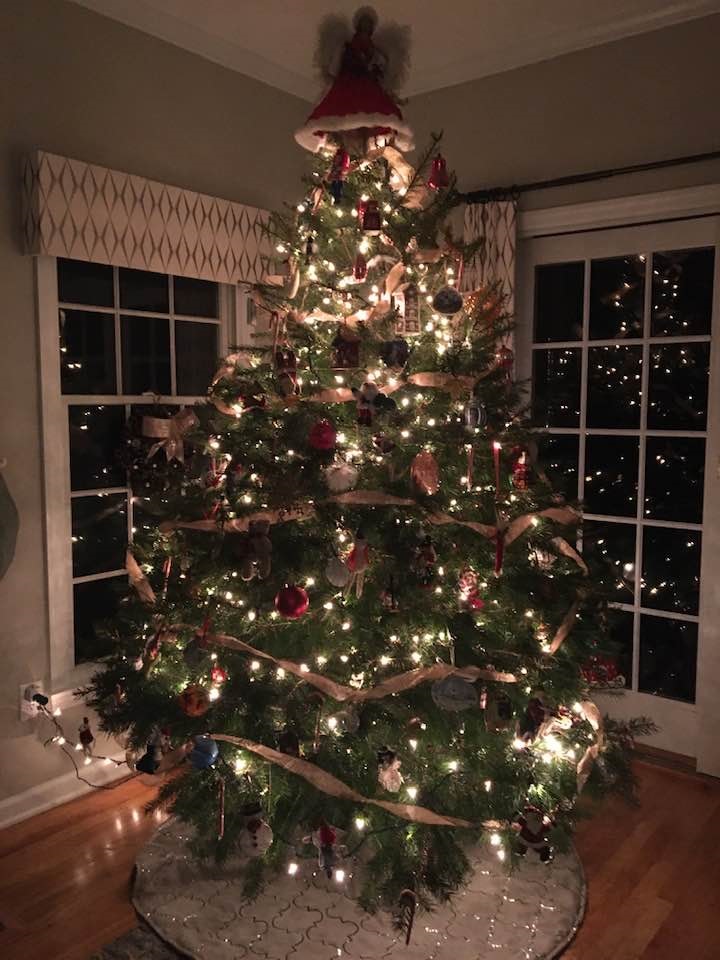
Are you a faux tree devotee or an all-natural tree lover? Not surprisingly we are all in on the natural tree that we actually cut down at a tree farm. We love the atmosphere of tailgating families, hayrides and an adorable holiday village and stores (all at Maple Row Tree Farm in Easton, CT). We like to support thelocal farm (they replant the trees of course).

We also love to tailgate with friends. Every year we always include some favorite menu items – Mr. SB’s sliders with caper mayo and my ever famous buffalo dip. Mimosas are usually the drink of choice. It may just be my favorite day of the year. It is one of the happiest places I have ever experienced!

I adore the smell of fresh pine and the traditional look of it all. However, when I lived in California, I remember thinking a natural tree would not really be my desired look – the warm weather threw me off. However, in a colonial town in CT, it is perfect.

Years ago, my girls decided they wanted colored lights which I happily obliged. But a few years ago, we all agreed that we wanted an all-white light tree. I love how it coordinates with our family room and it fits the many ornaments we have so much better than multicolored. I usually start with the lights and then wrap gold ribbon around the tree for a garland. Our angel goes on top and then the girls and I decorate with the rest of the ornaments – some are over one hundred years old and passed down from my grandparents! I love to collect ornaments from places we have been.

Wrapped presents for under the Christmas tree

I love to wrap presents (see an entire post about it here). A great tip gathered from my favorite mom blogs is to buy some coordinating wrapping paper. I tend to do gold and white with a few accents of dark green. Too much red does not work in my color scheme. Homegoods has beautiful, thick wrapping paper. It is such high-quality that I usually even reuse it the next year for the larger gifts!

I also collect ribbons and ornaments to decorate the packages. Costco, Christmas Tree Shops and TJ Maxx/Homegoods all have beautiful, wired ribbon.

This year’s house decor will follow previous years for the most part. I did buy a new front door mat – has more of a winter theme then holiday so I think we can leave it out until Spring. I used magnolias on my mantle and layered on some decorative elements just like last year.

I purchased this funny sign and plan to put it on the bar for Christmas day when we host 16 for dinner and cocktails beforehand. I have a Santa too that will go right next to it:)

This year’s Christmas dinner menu

This past weekend we hosted friends for dinner. First, we hiked nearby to work up a good appetite. Then back to our house for appetizers and drinks and then dinner. Mr SB made short ribs braised in red wine I made twice baked potatoes (but left out the bacon in the Pioneer Woman recipe and used light sour cream and less butter), smokey sweet carrots (hope to post that recipe soon) and steamed green beans. Delicious, winter meal! My friend brought a delicious apple crisp. It was a perfect night to enjoy the fire and chat afterwards.

We usually host Christmas dinner, so we have a list of favorites that we usually make. This year is no different – here is what I am planning (as of now) –

Glazed ham

Brisket (smoked on Mr. SB’s big green egg)

Seared mushrooms in sherry cream sauce with dill

Mashed potatoes (thanks to Costco just heat, serve and put in a pretty bowl)

Green beans

Tian with zucchini, tomatoes, onions and goat cheese

Smokey sweet carrots (recipe to come!)

Dessert – still thinking about it. Likely assorted holiday cookies and possibly a chocolate cake.

Well that about sums up what has been going on at the SB house. Hoping your holiday season is going well! What are you planning to make the season festive?

Picking the perfect white paint color for kitchen cabinets

Hi there! I am very excited to blog today about picking the perfect white paint color for kitchen cabinets. If you have been reading the blog recently you know that we are updating our nineties kitchen (on a budget!). The first step has been painting the orange-toned, cherry cabinets white. We decided to make this the first step as our hunch was that may be enough to seriously lighten and brighten as well as update the kitchen (versus a complete redo). In our case, we cook a lot (this blog was started to share recipes…) and the layout is perfect. The looks not so much – classic nineties kitchen with the orange tones and sage green counters. We had a feeling that a fresh, white coat of paint may do just the trick.

I have been eager to share this with you (spoiler alert I love the new white cabinets) but have been swamped at work and as I mentioned in my last post, you have to empty your cabinets (or you should), and even when you empty the cabinets dust still seems to get everywhere! Not for the faint of heart my friends…and especially not for a busy working mom with little time on her hands as it is! But, with that behind me, I can say it has all been worth it. So without further ado, today’s post is how to pick the perfect white paint color for your kitchen cabinets – I am sharing my favorite resources as well as the steps I took.

Steps to pick the perfect paint color

Ok, so like any other home improvement project mine always start with reading my favorite blogs, magazines and checking out Instagram and Pinterest. This is easy but I will say beware when it comes to paint colors. Just because a color (and especially white) looks good in a blogger’s home does NOT mean it will work in yours. So doing some browsing is great as a start but the devil is in the details. Do not just take what they have used and go buy the paint and put it on your walls!

After getting an idea of what family of color I want to focus in on, I head to the paint store. We are fans of Benjamin Moore so I usually stick with their palettes although I have found some great colors in Behr and the other brands. Pick out as many chips as you like at this point. The chips will help you narrow down your choices. Again, if I can leave you with two caveats. The above warning about blogger/decorator recommendations, and a second – do NOT pick your paint and actually paint your walls based on a tiny paint chip. Years ago I had chosen what I thought was a blue grey, and it ended up being light teal on the walls (fortunately I like teal!).

Which resources offer great advice on picking the perfect paint color for kitchen cabinets?

After several mishaps of trying to paint a room using a tiny paint chip as a way to visualize, I realized I needed to take one crucial step – painting the wall at least partly or by using a fantastic peel and stick paint sample in a large size to see what the color actually looks like on OUR wall (not some blogger or decorator’s home).

So at this point, I usually narrow down my paint chips to two or three and then I either go buy a sample of paint, or I order the color from Samplize which I absolutely adore. Samplize paints two coats of the color on a large, peel and stick wallpaper square. You can move the sample around to see it in different lights and locations. Folks this was a game changer! It is really worth the cost (around $6), and actually less expensive than buying a paint sample (not to mention messy and time consuming to paint it on your walls and have to look at an eye sore for days until you actually paint #beentheredonethat).

In addition to ordering colors I think would work in our home, I also have two blogs that I highly recommend you check out for their advice on picking a paint color. The first is my absolute favorite with paint expert, Kylie offering a great advice with a good dose of humor (dang that gal loves her wine:). You can really get technical here and learn about the LRV of a paint color (light reflecting value) and where to find it for each color. She also has so many before and afters, and what I love is that she works with people on a budget. I do not personally find it all that helpful to read about people with million dollar design budgets redoing their homes (hello…wouldn’t we all have a perfect home with that budget? And, what fun is that!?). Kylie also offers really great review of all colors and especially whites. White Dove? She has you covered? Simply White? That one too. She is a fantastic, free resource that helped me so much. Folks, you need to learn the difference between your cool whites and your warm whites if you are going to pick the perfect white paint color for your kitchen cabinets.

The second blog that I recommend is Maria Killam. She also has some excellent advice about paint colors in general as well as many photos that can help inform your decision. She explains how to understand a color’s undertones (goodness when did this all get so complicated?). Between Kylie and Maria, there is a ton of great advice and frankly I would have picked the wrong white paint color for kitchen cabinets without their wisdom. Thank you ladies if you ever read this!

How did I ultimately pick the perfect white paint color for our kitchen cabinets

So after setting up Pinterest boards, searching #whitekitchen on Instagram, reading blogs and finding the wonderful advice from Kylie and Maria, I took those paint samples from Samplize and pasted them on the wall. I looked at those dang samples in the morning, at night and at all hours of the day. I moved them around, held them up to my backsplash and asked everyone’s opinion (well maybe not everyone but my one daughter who is very into design).

We looked at White Dove (too yellow), Simply White (also yellow), Decorator’s White (icky sterile, hospital white in our lighting) and dozens more. Finally we decided on Benjamin Moore’s Swiss Coffee. It has no yellow undertones (again in our light) but was so much softer than the other whites under consideration. It also seemed to pair beautifully with another Moore color, Sail Cloth, which we decided to use for the walls. This entire process took about three weeks. If you don’t have that much time, you could possibly compress it…but I say, don’t rush it. Painting your kitchen cabinets is a big change so you want to get it right!

Next post – I will reveal the “after” photos. I am waiting for a new hood and we need to repair one part of the backsplash before I can share the photos with you. Until then, do your research before trying to pick the right white for your kitchen cabinets! Mimi

Updating our nineties kitchen on a budget

Hi all. It has been awhile but goodness we have had a lot going on…not the least of it an upgrade to our nineties kitchen. That’s right. The nineties called and they want their kitchen back! Oh and what a throwback it was. Orange stained cabinets with sage green counters. So, how do we update it on a budget? Well today’s post is short but I promise much more as I really wished someone had clued me into what goes into painting kitchen cabinets as a start! But what would a home decorating post be without a “before” picture? See below my friends.

The nineties kitchen – orange stained cherry cabinets and sage green counter tops….how do we update on a budget?

So first, this kitchen has delivered so many delicious meals and I realize just how fortunate I am to have it! Please do not think I am not grateful…but that said…well, it is time to enter 2021. We can still honor our possessions by giving them a facelift right?

So that is what we did. The details will be in posts to come (promise…I am still not 100% there as this involved emptying all of those cabinets, rewashing EVERYTHING as dust was EVERWHERE…). So, let’s call this a sneak peek and a post so y’all know I am still around:) Until then… Happy St. Patricks Day (I am part Irish so I love a good St. Patricks Day!). Mimi

How to decorate with digital art ( from Etsy)

Hi all. Today I am excited to share how to decorate with digital art from Etsy. It is inexpensive, creative and with the array of offerings on Etsy, the possibilities are limitless.

Like many of you, the months of hibernating at home has me evaluating every room with a critical eye. Recently I moved a large piece of art out of the foyer and into our dining room, and I love the new placement. However, as I searched around for a replacement for the front hall, to my dismay, I learned that without spending hundreds of dollars I could not find anything. Then I discovered some great matching brushed gold frames at TJ Maxx ($15 for 3 on clearance!). I bought six, and as it turned out, the frames were just the right size for some beautiful vintage and art prints that I downloaded and printed from our color printer. While it was a stroke of luck to find these frames, I have seen similar ones at Michaels and big box stores.

How to decorate with digital art from Etsy – first steps

So the first step is to assess your space. Is it casual? Formal? What is the color scheme? How big is it? For this particular project, the area is an alcove as you enter our main front entrance. Below the wall is a console table with some decorative objects. The feel of the area is slightly formal (but not stuffy) as the rooms that branch off of the foyer is the formal dining and living rooms. The walls area pale ivory with a hint of yellow (Benjamin Moore Niveous) and the floors are natural, hard wood. With that in mind, I started the fun part – searching for art.

Originally I was not looking specifically for digital art but I realized as I entered search terms that this option was available. Some of the art types and terms I considered included:

Asian art

Botanical prints (there are dozens of digital options here)

Abstract art

Mid century modern

Most of the Etsy shops also allow you to sort by color, size and type of art so other categories may appear as you get started. Beware, a few hours can go by as you surf around in Etsy (enjoyable hours I may add).

As I was looking for a slightly vintage, formal feel with those specs in mind I finally settled on Wonder and Chaos a delightful shop full of interesting and sometimes whimsical prints at very reasonable prices. Their vintage theatrical prints really caught my eye (see photo). I then found other prints that fit the feel and color scheme of the area.

What size to download?

A great benefit of digital art is that once you download the art you usually have access to multiple sizes. In my case I was searching for roughly 8 by 11 which would be easy to print at home and would fit into my beautiful, bargain frames. I noticed though that you can download a larger size and go to a photo processing site such as Shutterfly to print if you want one of those larger pieces.

Printing and other tips

The first time I printed out one of the prints I used plain white printer paper. This was not a bad idea to get a sense of layout. However, that quality paper is NOT going to give you the best print as I soon found out. I happened to have some very fine Cranes resume paper (remember when people actually used paper for resumes?). It was such a huge improvement to print on very high quality paper. While a box of high quality paper may be pricy compared to regular print paper, it is well worth it. Also, many of the Etsy shops offer printing tips which I highly recommend you read.

After printing out each print (I had chosen six), I grouped them together in different layouts. My bargain frames also had a great bonus of a paper template so I could tape up the gallery before putting in any nails. If you buy frames without that sort of template I would recommend tracing the frames onto craft paper and then cutting them out. A level is also key to ensuring that you hang the templates straight. Lastly, I used double sided tape to lay out the frames to give an idea of how I was going to display the art.

How to decorate with digital art from Etsy
My paper templates to help me layout the gallery wall

I decided to slightly stagger my middle grouping for some interest. Then I hung the pictures (once again using a level). Here is the finished wall.

How to decorate with digital art from Etsy
The finished gallery wall…all for a total of $60!

Above you can see the finished wall (and yes my photo is a bit cut off…still learning on the photography front!). The entire wall cost $60 which is a fraction of what I would have paid with paper prints and trying to frame them custom. I also have access to the larger sizes or can print multiple copies. All in all I have been so pleased with this find!

I hope you enjoyed this post on how to decorate with digital art from Etsy. Please share with your friends and come back often!

It’s A Wrap: 5 Creative Ways for Wrapping Holiday Gifts

Hi there.  It is countdown to Christmas around here, and I can’t wait to share with you a few creative ways for  wrapping holiday gifts.  Wrapping gifts is one of my favorite things to do.  Growing up my mom used to have me wrap all of the presents. I gladly took on the task!  Every step is fun from picking out the look + color scheme, wrapping paper, ribbon, trimmings – not to mention watching my family and friends open the gifts.  I hope you enjoy these ideas, and that they spark some creativity while you wrap your own gifts.

Please note, this post contains affiliate links (but I only recommend what I love and would use!).

The steps to creative ways of wrapping holiday gifts

Creative holiday gift wrapping steps:

  1. Establish the look and feel.  Rustic?  Cozy?  Formal?  Vintage?  Farmhouse?  Just as you would pick a look for decorating your home, the same can be done for wrapping gifts. 
  2. Choose the container.  I often re-use boxes year to year (eco friendly).  I keep a selection of different sizes.  Further, the assortment of box sizes also adds some visual interest when you group the packages together.
  3. Select wrapping paper.  Wrapping paper really sets the tone with the color palette, texture, pattern.  I also prefer to buy some wrapping paper that is not only for Christmas.  The colors can evoke holidays without an obvious holiday theme.  Bonus:  You can use that paper year round. 
  4. Choose ribbon or trim.  Trim also can add that special detail and again give a look and feel.  Of course, velvet has a very different feeling than straw raffia.  Both can be lovely if paired with the right paper and embellishments.
  5. Embellishments.  This is where I have some fun.  I love using ornaments, natural items like pine cones or fun details such as greenery.  Additionally, ornaments are also a second gift.  I include gift tags here too.  I use everything from cut out holiday card images to photos for my gift tags.

How I wrapped my gifts this year

This year I had several themes:

  • La Belle France:   I used a deep red cranberry and cream toile wrapping paper with coordinated velvet and gold ribbon.  If you have read my blog, you know I am a Francophile.   So it is no surprise that French toile would be one of my favorite ways to wrap gifts.  The touch of gold adds some sparkle too. It says holiday without being obvious.
  • Shimmery gold and white:  For this theme, I selected cream and gold wrapping paper patterned with holiday messaging.  I tied the packages with heavy, dark green velvet ribbon or gold satin.  I embellished one gift with a beaded, gold star ornament for some additional holiday cheer.
Cream and gold gift wrap decorated with a holiday star ornament
A sparkly star adds a nice touch
  • Candy cane land:  With a few younger children to wrap for, I opted for a cheery bright red wrapping paper embellished with candy cane inspired trimmings of red ribbon, white string and ornaments or bells.
  • Brown paper packages tied up with string (could not resist the Sound of Music tie in!):  Here I chose rustic patterned craft paper trimmed with holiday ribbon and pinecones from the yard.
  • Nautical “Take me to the sea” (or seafood as the case may be): I used plain craft paper with a natural straw, raffia ribbon embellished with sea ornaments and real sea shells.

Details on wrapping ideas

La Belle France

Deep cranberry red and cream toile wrapping paper is the base.  This toile is not necessarily a Christmas print but the deep cranberry paired with the cream works so well for holiday wrapping.  I picked up the ribbon at Costco ages ago but this here.

Cranberry red and white toile gift wrap for holiday gift wrapping
Cranberry toile evokes the holidays without an obvious theme

The small tree you see has fairy lights on it with miniature vintage inspired cranberry heart ornaments.  I put the tree in our formal living room (our real, fresh tree is in our more casual family room).

Tiny Christmas tree with white lights and toile wrapped gifts
Fell in love with the vintage heart ornaments
Toile Gift Wrapped Holiday Packages
Cranberry and cream toile wrapping paper with gold and velvet ribbon wraps presents under a fresh evergreen tree

Shimmery Gold and White

Cream and gold paper with holiday script makes a great canvas.  The “Merry Christmas” pattern came from Home Goods.  Home Goods has a lovely assortment of papers and the quality is excellent.  If you can find what you are looking for, I would think you will be happy with the weight and handling of this paper. 

That said, I also picked up the other pattern at Walmart for 97 cents a roll!  Once you decide on your look and feel you can often find papers even the drugstore.  This one was a perfect example.  Since I had chosen the gold and cream color palette as an overall theme, it was easy to find gift wrap at Walmart that fit the bill.  I also found another pattern at Caspari which has gorgeous papers. This dark green velvet ribbon drapes beautifully and was easy to tie.

Gold and white wrapping paper is tied with green velvet and gold satin ribbon

Candy Cane Land

Candy cane inspired.  The cheerful bright red paper was actually from my local drugstore and was reversible with a peppermint stripe. 

Red and white gift wrap decorated with ribbon and bells

I added ribbon and embellishments of a candy cane ornament, some bells from Michaels and a glittery red ribbon I had on hand.  If you use double sided tape to secure the ribbon to the back of the package it is seamless. I can’t wait to drop these specially wrapped gifts with the little girls who will be receiving them!

Red and white striped wrapping paper tied with red ribbon and decorated with ornaments
Candy cane inspired presents for little girls

Brown paper packages tied up with string  

I had the patterned craft paper on hand but added the cute truck/Christmas tree ribbon and tied some pine cones (from the yard) on top with raffia string.  I love the rustic feel. Additionally, candy canes (and other candy) are also an easy and inexpensive way to decorate a gift.

Craft paper with natural embellishments make perfect wrapped holiday gifts

Take me to the sea  

Last summer we spent so much time sailing, kayaking and enjoying the beach on northern Long Island Sound, I was excited to purchase nautical gifts and wrap them up accordingly.  My husband is a huge seafood fan so I could not resist the lobster and crab ornaments. These ornaments are from Christmas Tree Shops but you can find a similar lobster here – I also used real seashells that I had on hand for additional embellishments. 

Nautical gift wrap ideas
Craft paper gift wrap decorated with sea ornaments and real seashells
Nautical gift wrap ideas
A lobster holiday ornament makes a great gift embellishment
Nautical gift wrap ideas
A blue crab adorns this gift

Next step I put wrapped gifts around the house and in the places where the gift wrap really accents the surroundings.

How about you? Do you like to wrap gifts? Any special creative ways for wrapping holiday gifts that you would recommend?

Weekend Wrap Up: Holiday Decorating and Buffalo Check Style Finds

Happy Monday all, and welcome to the holiday weekend wrap up.  It was a busy one!  This weekend I finished decorating, baked my favorite gingerbread as well as soft sugar cookies (that taste as good as they look) and wrapped gifts.  I am focusing today’s post on holiday decorating and Buffalo check style finds but promise to share my recipes and gift wrap ideas in the coming days.

It’s a Buffalo Check Christmas

Buffalo check wired ribbon
Buffalo check wired ribbon trims my pine garland on the deck

As I shared before in my wreath tutorial (making your supermarket wreath look good:) I love this year’s trend of buffalo check.  I am craving a homey, warm Christmas atmosphere inside and out.  The cheerful red combined with the black check fits the bill.  Never one to be reticent I will admit right now that I may have gone overboard.  Is it bad to buy a matching buffalo check scarf for your dog?  GG and I had some fun (and there were plenty of treats for her patience!).  I found both the dress and scarf at Old Navy which is always a good source of affordable fashion and usually right on trend.  I bought a sweater too.

Buffalo Check Ribbon

I love using ribbon to decorate, and I used the buffalo check ribbon to trim my garland on the deck and found an adorable basket with…you guessed it buffalo check.  I picked up some bright red pillows too.  This little scene is what I see from our kitchen sink so I try to always have something cute to look at for every season.  As I mentioned in my how to make your supermarket wreath beautiful – I also used the buffalo check ribbon and trimmed the wreath with berries and pine cones.

Me and GG sporting our buffalo check style

Deep Red Berries in a White Pitcher

It is the small things in life right?  And, sometimes the best decorating is simple and inexpensive.  I found these artificial stems at Michaels and put them in this white pitcher. The pitcher was a wedding gift and from the Museum of Modern Art in New York (I like this one from Target too)  I love the deep red of the berries next to the white pitcher. I keep moving it around the house as it adds such a nice pop of color.  I could see these berries in vintage jars as well.

Faux red berries for holiday decorating
Faux red berries in a white pitcher add a nice touch for holiday decorating

Holiday Tablescape

We had a nice family dinner Saturday night.  I adore the white village theme that Pottery Barn showcased this year.  I found these mini ornaments with a similar look at Christmas Tree Shop (see below).  Paired with a pine cone, some red candles and with my jacquard Santa and his sleigh Williams Sonoma tablecloth, it made such a cozy and festive table. 

Ornaments are a fun way to add some festive touches to your holiday table and are often inexpensive and easier to store than an entire village.

Pottery Barn Christmas village theme
Christmas village theme tablescape

Holiday Mantle Decorating Tutorial

Lastly, I love using natural products to decorate.  First, I like to support our local farms and nurseries.  Second, I do not have to store anything – I just add to our compost when the holiday is over.  If you are in the Fairfield County area, Town and Country nursery has a lovely Christmas shop.  I purchased fresh magnolia and boxwood bunches.  I prefer these greens as they do not leak sap!  One year it took me forever to remove the sap from the mantle after using pine branches.  Here is how I decorated our mantle (see below for pictures):

  1. Lay down the magnolia branches.  Step back to see what it looks like and adjust the leaves accordingly.  Also, trim any errant stems.
  2. Layer on the boxwood using the same technique of stepping back.
  3. I love candles and use our existing candles to flank either end.  chasing some faux lighted candles.
  4. Add touches.  You can be creative here.  I used some vintage looking ornaments from Magnolia home mixed in with some pinecones and silver ornaments sprinkled throughout.
  5. You could add some lights too with a strand of white battery operated lights.
Decorating your mantle with fresh greens for the holidays

Well I hope you enjoyed this post on holiday decorating and Buffalo check style finds. Please check back in for some recipes and more and I would love to hear about your holiday decorating and planning.

Holiday Wreath Tutorial

Hi all! So the holiday decorating bug has hit me. With the pandemic, this year is likely to be a smaller gathering. Normally we host Christmas dinner for twenty! It may just be us or if the weather continues to be warm, a few friends on our deck – nonetheless I want to make it special. With all of this time at home it seems ever more important to make our surroundings as warm and beautiful as possible. Normally I can find a lovely wreath at Costco. This year I am not shopping as much so found myself with fewer options at the supermarket. The pre-made bow that was rather sad looking and crumpled left me realizing that I needed to do some work to make the wreath worthy of our front door. So today, I am happy to share my holiday wreath tutorial.

What do you need for this holiday wreath tutorial?

To make your supermarket wreath beautiful you need the following items that are available at your local Michaels or Hobby Lobby or even dollar store.

  1. Wired ribbon in a pattern of your choice. This year buffalo check has been drawing me in – maybe it is the cozy feel it evokes. I want warm, cozy and luckily I found a spool at TJ Maxx. I also found it on Amazon. I used a 10 yard spool with ribbon left over.
  2. A basic supermarket wreath. If you can find one without the bow then that is better as you won’t need it – you will save money too. They charge quite a bit for those premade ones!
  3. Pinecones and other decorative items. I had some wired cranberry stems from previous holidays. Feel free to be creative. Michaels has a large selection of wired floral that would work well. Pine cones found in nature are lovely too. You will need wire and wire cutters if you go that route. Oh, and all of the ribbon and trimmings can be used again and again. Store them in a dry place and you can use for future wreaths.

Steps to make a beautiful holiday wreath

  1. I took my wreath outside as the needles tend to get everywhere… I laid it down flat to see if any of the greens were sticking out too far (these supermarket wreaths take a beating during transit!). Then I trimmed any errant stems.
  2. I took the spool of ribbon and wrapped it around the wreath. You will want some at the end to tie. Tie the ends in a loose knot. You may want to adjust it so do not tie it too tight in case you need to untie it.
  3. Then you will prepare your bow. Take a separate bit of ribbon and loop the ribbon and place it against the tied off ribbon. Eye ball it to see if you think the bow looks full enough. Once it is to your liking tie it.
Holiday wreath tutorial
Hold your ribbon until tied and guestimate to see that it is the right length

4. Then “fluff” the bows. You will want nice rounded bows and with wired ribbon you can shape the ribbon into the desired look. This usually takes some fussing to get the look I want. I also always trim the ends into a nice double “V” shape.

5. Add your embellishments. If you have wired floral items, it is easy to tuck them in between the rounds of ribbon. If you are using pinecones from nature, you will need to cut some wire and then add your pinecones.

Enjoy your gorgeous supermarket wreath (at a fraction of the price to pay to have it decorated for you!).

BEST FALL 2020 COOKING, RECIPES AND DECORATING

Hi there from me and G, my darling dog and best work-at-home buddy!  The temperatures dropped in the New York area, and it is feeling like autumn!  I love fall but have to say, I do not want summer to go especially with the pandemic likely forcing us all inside.  On the bright side, I absolutely love this time year for decorating, cooking and entertaining.   So today I am starting a series of posts on Best Fall 2020 Cooking, Recipes and Decorating.

Apple Crisp Bars with Salted Caramel Drizzle

This weekend was perfect for apple picking, and we picked a bunch.  I decided to adapt my blueberry crumble bar recipe to make a divine apple crisp bar.  I could not stop there though, so I also made some homemade salted caramel to drizzle on top (and of course had to have some French vanilla ice cream on the side).  These apple crisp bars are divine – with their sweet, salty, caramely drizzle, soft apple filling and decadent shortbread crust and topping – as you may have guessed, they did not last one day.  Recipe to come!  

Apple crisp bars with salted caramel drizzle

The easiest Crockpot Butternut Squash Soup

It was not all sweet stuff though.  College girl told me that she loves butternut squash (who knew?), and that she wanted butternut squash soup.  So I made the easiest butternut squash soup ever in the crockpot.  Shh…it also has carrots, onion and other healthy ingredients (she normally hates carrots…picky toddlers can grow up to be picky teens!)

We headed to the shore Sunday and came back on the late side so to have that soup ready was fantastic.  I served the soup along with a green salad and Mr. SB’s famous roast chicken.  His roast chicken always comes out perfectly.  There is something about being French that gives you natural talent for creating a perfect roast chicken…must be genetic!   I also served my roast fingerling potatoes coated with Penzey’s Northwood’s spice which is a favorite.  Will post these recipes soon (except the roast chicken…he won’t disclose his secrets).

More cooking and recipes!

In the blog world, apparently you need to be thinking ahead so I also cooked a test batch of turkey soup with wild rice – also delicious and super cheap to make if you have leftovers (can easily sub chicken for the turkey).   But I will save sharing the recipe until after Thanksgiving when you will be pulling your hair out trying to figure out what to do with all that leftover turkey!

About a year ago, I started this blog and guess what?  My first post was the best-ever pumpkin bread!  Life got in the way (#2020) so I had to put my blog dreams on hold until recently, but am happy to share that recipe.  It is delicious and healthier than the usual you find out on Pinterest.  

Fall online shopping

Lastly, I had to do some fall shopping online (well maybe not “had to”).  As the budget minded girl I am I headed to Target.com and found this awesome long sweater.  It is so cozy.  I decided to buy it in another color too.  I love the yellow, teal and aqua and will pair that one with black and grey. At 5 foot 4, I am an extra small. It does run long but I love the fit (see above pic).

Fall decorating

I finally cleared the deck of dead plants (keeping it real here!) and bought some mums for that space and the front step.  I also dug out my fall wreath.  I found this one that would work well on Amazon but I am re-using one from a season past.  More to come on the decorations.  I just ordered these darling pumpkins from Target.  At $5 each they are a steal, and I love the neutral colors and texture which will work well with my other fall entertaining. Well I promise recipes will be up soon! Check back for more best fall 2020 cooking, recipes and decorating.

How are you preparing for fall 2020?  Any good recipes or tips to share?

Thanks for stopping by!